Automate Your Snow Removal with Linear Actuators
Winter brings the ongoing challenge of snow management, and whether you're operating a commercial snow plow or managing snow removal on your property with a tractor-mounted snow blower, efficiency and safety are paramount. One of the most frustrating aspects of operating snow removal equipment is the constant need to manually adjust chute direction or blade angle—tasks that require stopping the machine, removing your hands from the controls, and physically repositioning components in freezing conditions.
🎥 Video — Snow Plow Linear Actuators for a Snow Blower Chute
Electric linear actuators offer a transformative solution to this problem. By integrating actuators into your snow blower chute or plow blade system, you can adjust the direction and angle of your equipment with the simple push of a button, without stopping your work or exposing yourself to the elements. This guide covers everything you need to know about selecting, installing, and operating linear actuators for snow removal applications, from residential snow blower chutes to commercial plow blade systems.
At FIRGELLI Automations, we've worked with countless customers who have successfully automated their snow removal equipment using our actuators. The installations we'll describe work on John Deere tractors, Cub Cadet snow blowers, and virtually any snow removal equipment where you need remote-controlled adjustment of components.
Why Automate Your Snow Chute or Plow Blade Control
Manual adjustment of snow chutes and plow blades isn't just inconvenient—it's a genuine safety and efficiency concern. When operating a snow blower, both hands should remain on the controls to maintain safe operation and prevent the machine from getting away from you on slippery surfaces. Stopping to manually redirect the chute means:
- Interrupting your workflow and significantly increasing the time required to clear an area
- Allowing snow to accumulate where you've already cleared while you make adjustments
- Repeatedly exposing yourself to cold temperatures and removing protective gloves
- Creating potential safety hazards by taking your attention away from the machine's operation
- Causing physical strain from repetitive manual adjustments in awkward positions
With an actuator-controlled system, you maintain full control of your equipment while making adjustments on the fly. This means continuous operation, better snow placement, and dramatically reduced physical strain during what is already demanding work.
Environmental Protection Requirements for Outdoor Actuators
Snow removal applications represent one of the most demanding environments for electric actuators. The combination of moisture from snow and ice, freezing temperatures, road salt exposure, and continuous outdoor operation requires careful attention to environmental protection ratings.
IP Rating Fundamentals
The IP (Ingress Protection) rating system defines how well an electrical enclosure protects internal components from solid particles and liquids. For snow removal applications, you need to pay particular attention to these ratings. An IP rating consists of two digits: the first indicates protection against solid objects, and the second indicates protection against liquids.

For snow chute and plow applications, we recommend actuators with a minimum IP rating of IP65, which provides protection against dust ingress and water jets from any direction. However, IP66 or IP67 ratings offer even better protection for continuous outdoor exposure. Our Classic Rod Linear Actuator with the protective rubber boot installed achieves IP66 rating, making it ideal for snow removal applications.
Additional Protection Measures
Beyond selecting an actuator with an appropriate IP rating, consider these additional protective measures:
- Rubber boots: Installing protective rubber boots over the actuator rod provides an extra barrier against moisture, ice, and debris entering the actuator body
- Mounting orientation: Position actuators so that water naturally drains away from electrical connections and mounting points
- Cable protection: Use weather-resistant cable glands and ensure all wiring connections are sealed and protected from the elements
- Regular maintenance: Clean actuators after use to remove salt and debris, and apply appropriate lubricants to exposed metal components
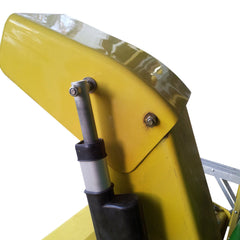
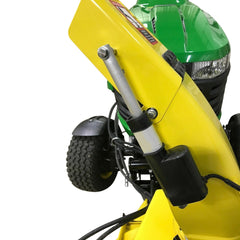
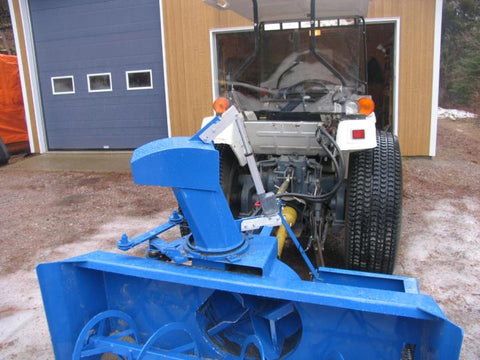
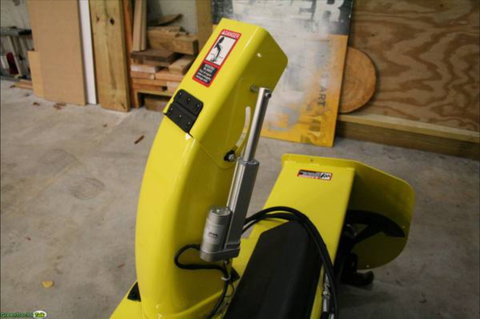
Automating Snow Blower Chute Direction Control
Snow blower chute automation is one of the most popular applications for compact linear actuators. The installation is straightforward, and the improvement in operational efficiency is immediately noticeable. Most snow blowers use a simple lever or crank mechanism to rotate the chute left and right—this existing mechanical system provides the perfect foundation for actuator integration.
Selecting the Right Actuator for Chute Control
For snow blower chute applications, we typically recommend the Classic Linear Actuator in a 4-inch or 6-inch stroke length with 150 lbs of force. This specification provides sufficient power to rotate even heavy-duty chutes while maintaining compact dimensions that fit neatly into existing equipment spaces.
The stroke length you need depends on the geometry of your particular chute mechanism. Measure the distance the existing manual control lever travels through its full range of motion—this will guide your stroke length selection. In most cases, a 4-inch stroke provides adequate rotation for standard snow blower chutes, while larger commercial units may benefit from a 6-inch stroke.
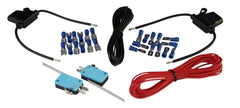
Complete Parts List for Chute Control
A complete snow blower chute automation system requires these components:

- Classic Linear Actuator: 150 lbs force rating, 4" or 6" stroke with protective rubber boot
- Control system: Either a waterproof rocker switch for simple on-off control, or a wireless remote control for added convenience
- Electrical Wiring Kit (EL-Kit): Includes all necessary wiring, connectors, and critically important inline fuse for over-current protection
- Premium mounting brackets (MB1-P): Provide secure attachment points for the actuator
- Optional MB6 Swivel Body Bracket: Allows the actuator body to rotate, which can be beneficial in applications where the mounting angle changes significantly through the range of motion


Installation Process for Snow Chute Control
The installation process involves these key steps:
Power Supply Integration: Most installations use the existing 12-volt battery system on the tractor or snow blower. The inline fuse included in the EL-Kit must be installed in the positive wire between the battery and actuator—this protects both the actuator and your equipment's electrical system from potential over-current situations.
Switch Mounting: Select a convenient location on your equipment's control panel or handlebar for the rocker switch. The switch dimensions are provided with the product specifications, allowing you to cut a precise mounting hole. For handlebar mounting on walk-behind snow blowers, consider using a weatherproof project box to house the switch and protect connections.
Actuator Mounting: The MB1-P premium mounting brackets attach to the actuator ends and provide secure mounting points. In most installations, one bracket mounts to a fixed point on the snow blower frame, while the other connects to the chute rotation mechanism where the manual control previously attached. Use the existing mounting holes where possible, or drill new holes using appropriately sized bolts for your specific equipment.
Mechanical Connection: The actuator connects to the chute mechanism using clevis pins and cotter pins (included with the actuator). The clevis design allows for the angular changes that occur as the chute rotates. Ensure the actuator can move through its full stroke without binding or reaching the end of travel in the mechanism—you want the chute to reach its full rotation range before the actuator reaches its mechanical limits.
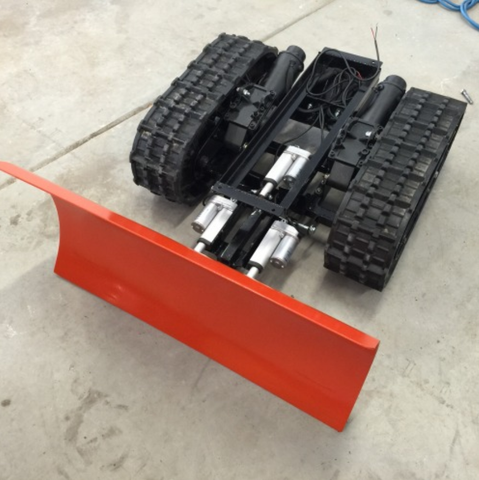
Snow Plow Blade Control Systems
Snow plow blades require more complex control than simple chute rotation because they typically need adjustment in two axes: horizontal angle (yaw) for directing snow left or right, and vertical tilt for controlling how the blade contacts the ground surface. Professional plow systems automate both of these movements for maximum efficiency.
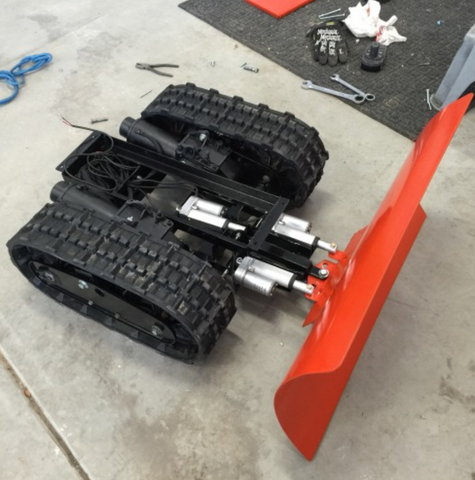
Understanding Dual-Axis Blade Control
Horizontal Angle Control (Yaw): This adjustment allows you to angle the blade left or right to direct snow to either side of the plow path. A single actuator mounted horizontally can control this motion, replacing the manual lever or hydraulic cylinder typically used. For this application, a 150 lbs force actuator is usually sufficient, though larger commercial blades may require more force.
Vertical Tilt Control: This adjustment raises or lowers the blade's cutting edge, allowing you to control how aggressively the blade scrapes the surface. This is particularly important when transitioning between different surface types or adjusting for varying snow depths. Vertical tilt requires more force because the actuator is working against the weight of the blade. We recommend a minimum of 200 lbs force for this application, with 300+ lbs for larger or heavier blades.
Parts List for Complete Plow Blade Automation
Automating both blade movements requires:
- Horizontal Control Actuator: Premium Linear Actuator, 150-200 lbs force, 6-8" stroke (depending on blade size)
- Vertical Control Actuator: Premium Linear Actuator, 200-300+ lbs force, 4-6" stroke
- Dual control system: Two separate waterproof rocker switches or a dual-channel remote control system
- Heavy-duty mounting brackets: Designed for higher force actuators and heavy equipment applications
- Electrical Wiring Kits: One for each actuator, including fuses and connectors
Force Calculation Considerations
Determining the correct force rating for plow blade applications requires understanding the mechanical advantage of your mounting configuration. The force required depends on:
- The weight of the plow blade itself
- The distance from the pivot point to where the actuator attaches
- The angle at which the actuator pushes or pulls relative to the blade
- Additional resistance from snow loading on the blade during operation
As a general guideline, mounting the actuator closer to the pivot point requires more force but less stroke, while mounting farther from the pivot reduces force requirements but increases stroke needed. Most plow blade installations benefit from 200-300 lbs force actuators for vertical control and 150-200 lbs for horizontal control.
Electrical System Integration and Safety
Proper electrical integration is critical for reliable operation and protecting both your actuators and equipment. Most snow removal equipment operates on 12V DC power systems, which matches perfectly with FIRGELLI actuators' 12V DC specifications.
Power Source Connection
Connect the actuator system directly to your equipment's battery using appropriately sized wire (typically 16-18 AWG for actuators under 200 lbs force). The connection should be made as close to the battery as practical to minimize voltage drop, which becomes more significant in cold weather as battery performance decreases.
Critical: Always install the inline fuse provided in the EL-Kit on the positive wire between the battery and actuator. This fuse is specifically sized to protect the actuator from over-current conditions that could result from mechanical binding, electrical shorts, or other fault conditions. Position the fuse holder in an accessible location so it can be replaced if needed.
Switch Wiring Configurations
For simple on-off control using rocker switches, the wiring is straightforward. The switch interrupts one leg of the power supply, reversing polarity depending on which direction you press. The momentary switch design means the actuator only moves while you're actively pressing the switch, giving you precise control over positioning.
For systems with multiple actuators (such as dual-axis plow blade control), you have two options: install separate switches for each actuator, or use a multi-channel control box that can manage both actuators from a single interface. The separate switch approach is more affordable and straightforward, while a unified control system provides a cleaner installation and more intuitive operation.
Cold Weather Electrical Considerations
Cold temperatures affect electrical systems in several ways that are important for reliable actuator operation:
- Battery capacity: Lead-acid batteries lose significant capacity in freezing temperatures. Ensure your battery is properly maintained and fully charged before winter operation
- Wire flexibility: Some wire insulation becomes stiff in extreme cold. Use wire rated for low-temperature flexibility to prevent cracking and connection failures
- Connection integrity: Ensure all electrical connections are clean, tight, and protected from moisture. Corrosion accelerates with road salt exposure
- Actuator speed: Linear actuators may operate slightly slower in extreme cold as lubricants thicken. This is normal and doesn't indicate a problem
Installation Tips and Best Practices
Successful actuator integration goes beyond simply bolting components in place. These practical tips will help ensure reliable, long-term operation:
Mounting Geometry Optimization
The efficiency of your actuator installation depends significantly on mounting geometry. Ideally, the actuator should push or pull in a direction that's perpendicular (90 degrees) to the component you're moving. As the angle deviates from perpendicular, the effective force decreases according to the cosine of the angle.
In practice, mounting angles will change throughout the range of motion—this is normal. However, try to optimize the geometry so the actuator works most efficiently through the middle of its travel range where you'll use it most frequently. The MB6 swivel body bracket can help accommodate significant angle changes by allowing the actuator body to rotate.
Mechanical Limit Protection
Linear actuators have internal limit switches that stop the actuator at the end of its stroke. However, you should design your installation so the mechanical system reaches its limits before the actuator does whenever possible. This prevents the actuator from continuously applying force against a hard stop, which can strain components over time.
For chute rotation, adjust the mechanical stops on the chute mechanism to halt rotation just before the actuator reaches full extension or retraction. This approach also provides a more positive stop feel when operating the system.
Maintenance Access Considerations
Plan your installation to allow reasonable access for periodic maintenance. You should be able to:
- Inspect electrical connections without major disassembly
- Clean snow and debris from around the actuator
- Remove and reinstall the actuator if service becomes necessary
- Access the fuse holder for replacement
Consider creating a simple maintenance checklist that includes cleaning the actuator after heavy use, inspecting connections, and checking for any loose mounting hardware.
Testing Before Snow Season
Install and test your actuator system well before the first snowfall. This allows you to identify and resolve any issues in comfortable working conditions rather than in an emergency situation during a snowstorm. Run the system through its full range of motion multiple times, checking for smooth operation, adequate force, and proper electrical function.
Troubleshooting Common Issues
Understanding how to diagnose and resolve common issues will help keep your system operational when you need it most.
Actuator Not Moving
If the actuator doesn't respond when you activate the switch:
- Check the fuse—a blown fuse is the most common issue and indicates either a short circuit or mechanical binding that caused over-current
- Verify battery voltage—the system requires at least 10.5V to operate properly
- Inspect all electrical connections for corrosion, looseness, or damage
- Test the switch by measuring voltage at the actuator connections when the switch is pressed
Insufficient Force or Slow Movement
If the actuator moves but lacks power or operates slowly:
- Low battery voltage is the most common cause—charge or replace the battery
- Check for mechanical binding in the system the actuator is moving
- Verify that ice hasn't built up around moving components
- In extreme cold (below 0°F), some slowing is normal as lubricants thicken
Erratic or Intermittent Operation
If operation is unreliable:
- Inspect wire connections—vibration can loosen connections over time
- Check for damaged wire insulation that might cause intermittent shorts
- Verify that the switch is functioning properly and not damaged by moisture
- Ensure mounting brackets haven't loosened, which can cause binding
Advanced Control Options
Beyond basic rocker switch control, several advanced options can enhance your snow removal automation system.
Wireless Remote Control
Wireless remote control systems eliminate the need for dashboard-mounted switches and allow operation from outside the vehicle. This can be particularly useful for:
- Walk-behind snow blowers where you want to avoid handlebar-mounted controls
- Commercial operations where multiple people might operate the same equipment
- Applications where you want to adjust the blade angle while observing from the side
Position Feedback Systems
For applications requiring precise positioning, feedback actuators with built-in potentiometers provide position sensing. This allows you to:
- Return the chute or blade to specific positions repeatedly
- Display current position on a gauge or digital readout
- Integrate with more sophisticated control systems
- Implement programmable position presets
Arduino-Based Automation
For DIY enthusiasts comfortable with electronics, Arduino microcontroller integration opens up possibilities for sophisticated automation, such as automatic chute rotation based on equipment heading or programmable blade angle sequences. These systems require more technical knowledge but can provide highly customized control strategies.
Seasonal Maintenance and Winterization
Proper maintenance extends actuator life and ensures reliable operation throughout winter.
Pre-Season Preparation
Before winter begins:
- Clean all components thoroughly, removing any dirt or debris from the previous season
- Inspect electrical connections and clean any corrosion with electrical contact cleaner
- Apply a thin coat of corrosion-preventive spray to electrical connectors
- Cycle the actuator through its full range several times to distribute lubricant
- Check all mounting hardware for tightness
- Verify the protective rubber boot (if installed) is intact and properly seated
During Season Care
Throughout winter operation:
- Clear accumulated snow and ice from around the actuator after each use
- Avoid operating actuators against solid mechanical stops repeatedly
- If ice forms on the actuator, allow it to thaw before operating
- Monitor electrical connections periodically for corrosion from road salt
End of Season Storage
When winter ends:
- Thoroughly clean the entire system, paying special attention to removing any road salt residue
- Apply a light coating of lubricant to exposed metal parts
- If you remove equipment for summer storage, consider extending the actuator to mid-stroke and storing it in a dry location
- Disconnect electrical connections and protect them from moisture during storage
Conclusion
Automating your snow removal equipment with electric linear actuators represents a practical, achievable upgrade that delivers immediate benefits in safety, efficiency, and comfort. Whether you're controlling a residential snow blower chute or automating a commercial plow blade system, the installation process is straightforward with the right components and planning.
The key to success lies in selecting actuators with appropriate force ratings and environmental protection for the demanding outdoor conditions, implementing proper electrical integration with necessary over-current protection, and following best practices for mounting geometry and mechanical design. With proper installation and basic maintenance, these systems provide years of reliable service.
At FIRGELLI Automations, we've been supporting snow removal automation projects since 2002, and we continue to see innovative applications from customers who recognize the value of electric actuation in harsh winter conditions. If you're planning an installation and need guidance on component selection or have technical questions about integration, our team is available to provide application-specific recommendations based on your particular equipment and requirements.
Frequently Asked Questions
What force rating do I need for my snow blower chute?
For most residential and light commercial snow blower chutes, a 150 lbs force actuator is sufficient. The chute rotation mechanism typically requires minimal force since it's a rotary motion with relatively little resistance. We recommend the Classic Linear Actuator with a 4-inch or 6-inch stroke depending on your chute's rotation range. If you have an unusually large or heavy commercial chute, consider stepping up to a 200 lbs actuator. The determining factor isn't usually the weight of the chute itself, but rather the mechanical advantage of where the actuator mounts relative to the chute's pivot point.
Will the actuator work in extreme cold temperatures?
Yes, FIRGELLI actuators are designed to operate in temperatures down to -20°F (-29°C). However, you should expect slightly slower operation in extreme cold as the internal lubricants thicken. This is normal and doesn't indicate a problem. To ensure reliable cold weather operation, select an actuator with an appropriate IP rating (IP66 or higher recommended) and consider using the protective rubber boot for additional environmental protection. The Classic Linear Actuator with boot installed is particularly well-suited for cold weather applications. Also ensure your equipment's battery is properly maintained and fully charged, as cold temperatures significantly reduce battery capacity.
Can I control multiple actuators with one system?
Yes, you can control multiple actuators, but each actuator requires its own control circuit. For dual-axis plow blade control (both horizontal angle and vertical tilt), you'll need two separate actuators. You have two options for control: install separate rocker switches for each actuator, giving you independent control of each movement, or use a multi-channel control system or remote that can manage both actuators from a unified interface. The separate switch approach is more economical and simpler to install, while a unified control system provides cleaner integration and more intuitive operation. Each actuator must have its own fused power connection to protect it independently.
How do I protect the electrical wiring from the elements?
Protecting electrical connections is critical for reliable winter operation. Use the following approaches: First, all wire splices and connections should be made using waterproof crimp connectors or heat-shrink terminals with adhesive lining. Second, apply dielectric grease to connector pins before mating to displace moisture and prevent corrosion. Third, route wiring away from areas where snow and road salt accumulate, and secure it properly to prevent chafing from vibration. Fourth, use weatherproof cable glands where wires enter junction boxes or control panels. Finally, the inline fuse holder should be mounted in a location that's protected from direct moisture exposure but still accessible for service. For permanent outdoor installations, consider using marine-grade wire which has tinned copper conductors that resist corrosion better than standard automotive wire.
What stroke length do I need?
Stroke length depends on the geometry of your specific application and how far the component needs to move. For snow blower chutes, measure the arc distance the existing manual control lever travels from full left to full right—this gives you a starting point. Most installations work well with 4-inch stroke actuators, while larger commercial units may benefit from 6-inch strokes. For plow blade horizontal control, 6-8 inch strokes are typical depending on blade width and mounting location. For vertical tilt control, 4-6 inch strokes usually provide adequate range. An important consideration: don't


