Upgrading Your Snow Blower with Electric Chute Control
Manual snow blower chute adjustment is one of those tasks that seems minor until you're battling a blizzard at 6 AM, stopping every few minutes to manually reposition a frozen chute mechanism. Factory-installed electric chute controls—particularly OEM systems from manufacturers like John Deere—can add hundreds or even thousands of dollars to the cost of a snow blower. For many homeowners and commercial operators, that premium simply isn't justified for what amounts to a relatively straightforward motorized mechanism.
The solution is a DIY electric chute actuator retrofit using linear actuators. This upgrade transforms your manual snow blower into a modern, operator-friendly machine with remote chute control—without the OEM price tag. Whether you're looking to add convenience to an existing machine or restore electric functionality to a unit with a failed factory system, a properly selected and installed linear actuator provides reliable performance in harsh winter conditions.
This guide covers everything you need to know: component selection, force requirements for cold-weather operation, proper mounting techniques, electrical wiring configurations, and weatherproofing strategies specific to snow removal equipment. By the end, you'll understand exactly how to implement a professional-grade electric chute control system on virtually any snow blower platform.

How Linear Actuators Control Snow Blower Chutes
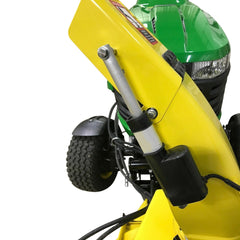
A linear actuator converts electrical energy into precise linear motion, making it ideal for controlling the rotational position of a snow blower chute. The actuator mounts between a fixed point on the blower housing and a pivot point on the chute assembly. As the actuator extends or retracts, it pushes or pulls the chute through an arc, allowing the operator to direct snow discharge left, right, or straight ahead—all from the operator's position.
The fundamental advantage over manual systems is operational efficiency. Instead of shutting down, walking around the machine, and physically rotating a frozen chute mechanism, the operator maintains continuous forward progress while adjusting discharge direction as needed. This becomes especially valuable when clearing large areas or dealing with changing wind conditions that require frequent chute repositioning.
Most snow blower chutes rotate through approximately 180 to 200 degrees of travel. A 4-inch stroke actuator provides sufficient linear travel to cover this rotational range when properly positioned. The geometry is straightforward: the actuator acts as one leg of a triangle, with the chute pivot point as the apex. As the actuator length changes, the angle of the chute relative to the machine changes proportionally.

Selecting the Right Actuator for Snow Blower Applications
Force Requirements: Why 150 Pounds Matters
Snow blower chute control requires a minimum force rating of 150 pounds (approximately 667 Newtons). This specification isn't arbitrary—it's driven by the operating environment. The internal lubricant used in actuator drive screws performs well at room temperature but thickens considerably in sub-freezing conditions. At temperatures below 0°F (-18°C), standard grease viscosity can increase by an order of magnitude, requiring significantly more motor torque to achieve the same linear motion.
Additionally, snow and ice buildup around the chute pivot mechanism creates additional resistance. A chute that moves freely in October may require substantial force to budge in January after repeated freeze-thaw cycles have introduced ice into the pivot assembly. The 150-pound specification provides adequate margin to overcome both internal viscosity increases and external mechanical resistance without overloading the actuator motor.
Using an actuator with insufficient force capacity will result in stalling, intermittent operation, or premature motor failure when the unit reaches its thermal overload threshold repeatedly. The small cost difference between a 50-pound unit and a 150-pound unit is negligible compared to the frustration of an unreliable system.
Recommended Actuator Models
Three actuator families have proven reliable in snow blower applications over more than a decade of field use:
- Classic Rod Actuators: The most popular choice for snow blower retrofits. These units feature a robust design with a threaded rod drive system, providing excellent force capacity and reliability. The 4-inch stroke, 150-pound model represents the optimal balance of travel distance and force for most residential and light commercial snow blowers.
- Premium Line Actuators: These units offer enhanced environmental sealing and improved corrosion resistance compared to Classic models. The investment is worthwhile for commercial operations or regions with particularly harsh winter conditions. Premium actuators also include hall-effect position feedback, though this feature isn't typically utilized in basic snow blower installations.
- Utility Actuators: A budget-friendly option that still meets the 150-pound force requirement. Utility models sacrifice some refinement in finish and component selection but provide reliable core functionality at a lower price point. These work well for DIY installations where cost is a primary concern.
All three families support 12V DC operation, which is standard for snow blower electrical systems. Avoid actuators designed for 24V or AC voltage systems, as these will require additional power supply conversions.
Stroke Length Considerations
A 4-inch stroke provides the standard range of motion for snow blower chute control. This length accommodates the typical geometry of residential and commercial snow blowers when the actuator is mounted in the recommended position.
Longer stroke actuators (6-inch or 8-inch) can be used but require different mounting locations to prevent the actuator from reaching mechanical interference points. The additional stroke length doesn't necessarily provide more chute rotation—it simply means the actuator must be mounted further from the chute pivot point. This can complicate installation without providing functional benefits.
Shorter stroke actuators (2-inch or 3-inch) may not provide sufficient travel to achieve full chute rotation, limiting your ability to discharge snow to the sides. These are only appropriate for specialized applications where reduced chute travel is acceptable.
Weatherproofing and Environmental Protection
Protective Rubber Boots
The RB2 two-part rubber boot is essential for Classic Rod Actuators used in snow blower applications. This accordion-style protective cover seals the gap between the actuator body and the extending rod, preventing water, slush, and ice from entering the actuator housing. The two-piece design allows the boot to compress and extend with the actuator stroke without binding or restricting motion.

At approximately $9, the rubber boot represents one of the most cost-effective reliability improvements you can make. Without this protection, water can migrate along the actuator rod during thaw cycles, enter the housing, and freeze inside the mechanism. This introduces mechanical resistance and can damage internal components if ice formation is severe enough.
Premium Line Actuators include enhanced environmental sealing as part of their base design, though adding a rubber boot still provides an additional layer of protection. For Utility Actuators, a rubber boot is strongly recommended to compensate for their more basic sealing.
Installation Orientation
Always install the actuator with the extending rod facing downward whenever possible. This orientation uses gravity to your advantage: any water that does penetrate past the rod seal will tend to drain out of the actuator rather than migrating toward internal electrical components.
In a snow blower installation, this typically means mounting the actuator body to the upper portion of the chute and the rod end to the blower housing. While not always achievable due to space constraints or mounting point locations, downward rod orientation should be the default approach unless physical limitations dictate otherwise.
Complete Parts List and Components
A functional snow blower chute control system requires several coordinated components beyond just the actuator. Here's a comprehensive breakdown:
Primary Components
- Linear Actuator: 4-inch stroke, 150-pound capacity. Choose from Classic, Premium, or Utility series based on budget and desired features.
- Rubber Boot (RB2): Required for Classic Actuators, recommended for Utility Actuators, optional but beneficial for Premium Actuators. Provides environmental protection for the extending rod.
- 3-Position DPDT Toggle or Rocker Switch: Controls actuator direction (extend/off/retract). Available in momentary or sustained (latching) versions. Momentary switches automatically return to center when released, stopping actuator motion immediately. Sustained switches remain in the selected position until manually moved, allowing hands-free operation.
- EL-KIT External Limit Switch Kit: Includes two limit switches, pre-terminated wiring, connectors, and fuse blocks. These limit switches provide electrical cutoff at the end of actuator travel, preventing the motor from stalling against mechanical stops.

Optional Mounting Hardware
Many snow blowers have existing mounting points that align with the standard clevis holes on linear actuators. If your machine lacks suitable mounting locations, mounting brackets provide adjustable attachment points. The MB1 series brackets work well for this application, with standard versions for Classic/Utility Actuators and MB1-P versions for Premium Actuators.
When using brackets, remember that the actuator must pivot at both mounting points as it extends and retracts. Only secure the fully-enclosed mounting hole on the bracket base. Use washers to create a small gap that allows several degrees of rotation during operation. Restricting this movement will bind the actuator and may damage mounting points.

Installation Procedures and Mounting Techniques
Locating Mounting Points
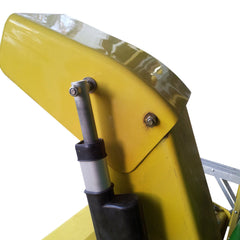
The actuator forms one side of a triangle with the chute pivot as the apex and the mounting points as the other two vertices. Optimal geometry places the actuator roughly parallel to the chute rotation axis when the chute is in the center position. This arrangement provides consistent mechanical advantage throughout the range of motion.
Most snow blowers have suitable mounting locations near the chute base and on the main housing. Look for existing holes or structural reinforcements that can support mounting hardware. The actuator mounting points must allow free rotation—do not over-tighten bolts, as this will restrict pivoting motion and may crack plastic components or deform thin metal housings.
If drilling new mounting holes is necessary, use the actuator's retracted and extended lengths to verify that the installation geometry won't create binding at the travel extremes. With the actuator fully retracted, the chute should be at one rotational extreme. With the actuator fully extended, the chute should reach the opposite extreme without the actuator hitting mechanical interference points.
Mounting Hardware Selection
Use stainless steel or zinc-plated hardware to resist corrosion. Grade 5 or higher bolts provide adequate strength without being brittle in cold temperatures. Nylon-insert lock nuts prevent loosening from vibration during operation.
The clevis holes on standard actuators accommodate 1/4-inch bolts. Use washers on both sides of the mounting point to distribute load and protect surfaces. Do not overtighten—the actuator should pivot freely with minimal resistance.

Switch Installation
The control switch mounts within easy reach of the operator's position, typically on the handlebar or dashboard area. The recommended toggle switches have an 11.5mm diameter mounting neck, requiring a 12mm hole for installation. Mount the switch from underneath, with the threaded nut securing it from the top side. The included washer and face plate provide a finished appearance and protect the mounting surface.
Position the switch where it can be operated without releasing the handlebar grips. Many operators prefer mounting on the right side, assuming right-hand operation, though left-side mounting works equally well. Ensure the switch is oriented so that the logic is intuitive—typically, pushing the switch right rotates the chute right, and pushing left rotates the chute left.
Electrical Wiring and Control Systems
Basic Wiring Configuration
The electrical system connects the snow blower's 12V electrical system to the actuator through the control switch and limit switches. The EL-KIT simplifies this process by providing pre-terminated wiring and connectors designed specifically for actuator control.

The DPDT (Double-Pole, Double-Throw) switch reverses polarity to the actuator motor, changing rotation direction and thus extending or retracting the rod. In the center position, no power flows to the actuator. The limit switches interrupt power when the actuator reaches the end of travel in either direction, preventing the motor from stalling.
Momentary vs. Sustained Switch Operation
Momentary switches require constant operator input—when released, they return to the center position and stop actuator motion. This provides precise control, allowing the operator to position the chute at any point along its travel arc. This operates similarly to automotive window switches.
Sustained (latching) switches remain in the selected position until manually moved. Activate the switch to extend or retract, and the actuator will continue moving until it reaches the limit switch at that end of travel or until you manually center the switch. This allows hands-free operation but provides less precise intermediate positioning.
Both approaches work well—the choice depends on personal preference. Many operators prefer momentary switches for the additional control they provide.
Power Source and Electrical Integration
Most snow blowers with electric start have a 12V electrical system powered by the starter battery. Tap into this system for actuator power. The actuator current draw is modest—typically 3-5 amps under normal operation—which is well within the capacity of standard snow blower electrical systems.
Include an inline fuse (provided in the EL-KIT) to protect against short circuits. Connect to switched power rather than constant battery power to prevent parasitic drain when the machine is not in use.

System Operation and Adjustment
Once installed, the electric chute control system operates intuitively. Activate the switch in the desired direction, and the chute rotates accordingly. With a momentary switch, release to stop at any position. With a sustained switch, the chute continues rotating until it reaches the end of travel or you center the switch manually.
During initial operation, verify that the limit switches engage properly at both ends of travel. You should hear the actuator motor stop when reaching either extreme. If the motor continues running after reaching mechanical stops, the limit switches may need adjustment or the wiring may need verification.
The system requires minimal maintenance beyond what you already perform on your snow blower. At the start of each season, verify that the actuator moves freely through its full range of motion. Apply a small amount of silicone spray lubricant to exposed metal surfaces to prevent corrosion. Check electrical connections for signs of corrosion and clean or replace as needed.
Troubleshooting and Maintenance
Common Issues and Solutions
If the actuator fails to move, first verify that power is reaching the unit. Use a multimeter to check for 12V at the actuator connectors when the switch is activated. No voltage indicates a problem with the switch, limit switches, fuse, or wiring connections. Voltage present but no movement suggests an actuator issue—this is rare with properly selected 150-pound units but can occur if the unit has been damaged or if internal ice formation has occurred.
Slow or jerky motion typically indicates insufficient force capacity (wrong actuator selected) or internal contamination. Verify that you're using a 150-pound minimum unit. If correctly specified, the actuator may need internal cleaning or replacement of the drive nut if contamination has occurred.
If the actuator runs continuously without stopping, the limit switches may have failed or become misaligned. Check their mounting and verify they're being activated by the actuator rod travel. The EL-KIT includes external limit switches that should be positioned to engage just before the actuator reaches its internal mechanical stops.
Seasonal Preparation
Before storing your snow blower for the off-season, retract the actuator to its mid-point position. This equalizes stress on internal components during storage. Spray exposed metal surfaces with corrosion inhibitor. If your snow blower will be stored in a damp environment, consider removing the actuator and storing it indoors.
At the beginning of snow season, cycle the actuator through several complete extend/retract cycles before using the machine. This redistributes internal lubricant and verifies that no corrosion has restricted motion during storage.
Cost Comparison and Value Proposition
Factory-installed electric chute controls from major manufacturers typically add $300-$800 to the cost of a snow blower. OEM replacement parts for failed factory systems often cost $400-$600 for just the actuator assembly, not including labor for installation.
A complete DIY installation using FIRGELLI components costs approximately $150-$250 depending on which actuator series you select and whether you need mounting brackets. The functional performance matches or exceeds OEM systems—you're using the same fundamental technology, just sourced as individual components rather than as a proprietary assembly.
For commercial operators running multiple snow blowers, the cost savings compound. Standardizing on a proven aftermarket solution also simplifies maintenance and spare parts inventory compared to managing proprietary systems from multiple manufacturers.
Advanced Options and Customizations
While the basic toggle switch system serves most users well, several enhancements are possible for those seeking additional functionality:
A remote control system can replace the hardwired toggle switch, allowing chute control via a wireless remote. This is particularly useful for commercial operators or those who want to adjust the chute without taking hands off the steering controls.
Position feedback actuators provide real-time information about chute angle. While not necessary for basic operation, this enables digital displays showing exact chute position or integration with more sophisticated control systems.
Dual actuator systems can control both chute rotation and deflector angle simultaneously. This requires additional wiring and switches but provides complete hands-free control of snow discharge direction and trajectory.
Conclusion
Converting a manual snow blower chute to electric control is one of the most practical upgrades you can perform. The improvement in operational efficiency—especially during extended snow removal sessions—justifies the modest investment in components. Modern linear actuators provide reliable performance in harsh winter conditions when properly selected and installed.
The key factors for success are using adequate force capacity (minimum 150 pounds), proper environmental protection (rubber boots and downward rod orientation), and correct mounting geometry that allows free pivoting at both attachment points. Follow these principles, and you'll have a system that performs reliably season after season.
Whether you're upgrading an older machine, replacing a failed OEM system, or simply adding convenience to a manually-controlled blower, the approach outlined here has been proven in thousands of installations across North America over more than a decade.
Frequently Asked Questions
Why do I need 150 pounds of push/pull force for snow blower chute control?
The 150-pound force requirement is driven by cold-weather operating conditions. The internal lubricant on the actuator's drive screw thickens substantially at low temperatures, increasing the resistance to motion. At temperatures below 0°F, grease viscosity can increase by 10x or more compared to room temperature. Additionally, snow and ice buildup around the chute pivot mechanism creates external resistance. A 150-pound actuator has sufficient power margin to overcome both internal viscosity increases and external mechanical resistance without overloading the motor. Lower force actuators will stall or fail prematurely in cold conditions.
Can I use a different stroke length actuator?
Yes, but you'll need to adjust mounting locations to accommodate the different travel distance. A longer stroke (6-inch or 8-inch) requires mounting points further from the chute pivot axis, which may complicate installation without providing additional functional benefit. The standard 4-inch stroke provides full chute rotation for most snow blowers when mounted in typical positions. Shorter strokes (2-inch or 3-inch) may not provide sufficient range of motion to achieve full chute rotation. Unless you have specific geometric constraints, the 4-inch stroke represents the optimal choice.
Should I choose a momentary or sustained (latching) toggle switch?
Both switch types work well—the choice depends on your operating preference. Momentary switches require you to hold the switch while the actuator moves and automatically stop when released, similar to automotive window controls. This provides precise positioning control, allowing you to stop the chute at any point in its travel arc. Sustained (latching) switches remain in the selected position until manually moved, allowing hands-free operation, but the chute will continue rotating until it hits the limit switch unless you manually return the switch to center. Most operators prefer momentary switches for the additional control they provide.
Is the rubber boot really necessary, or is it just an optional accessory?
For Classic Rod Actuators used in snow blower applications, the rubber boot is essential, not optional. The boot seals the gap between the actuator body and extending rod, preventing water, slush, and ice from entering the actuator housing. Without this protection, water can migrate along the rod during thaw cycles and freeze inside the mechanism, introducing resistance and potentially damaging internal components. At approximately $9, it's one of the most cost-effective reliability improvements you can make. Premium Line Actuators have enhanced sealing built in but still benefit from a rubber boot as an additional layer of protection.
Will the actuator fit my snow blower without drilling new holes?
Many snow blowers have existing mounting points that align with standard actuator clevis holes. The best approach is to examine your specific machine before ordering components. Look for structural reinforcements or existing holes near the chute base and on the main housing. If suitable mounting points exist, you can bolt the actuator directly through its clevis holes using the proper diameter bolts and washers. If your machine lacks appropriate mounting locations, adding mounting brackets provides adjustable attachment points. Alternatively, you can drill new mounting holes using the photographs in this guide as reference for optimal positioning.
Can I power the actuator from my snow blower's existing electrical system?
Yes, most snow blowers with electric start have a 12V electrical system powered by the starter battery. The actuator current draw is typically 3-5 amps under normal operation, which is well within the capacity of standard snow blower electrical systems. Connect to switched power rather than constant battery power to prevent parasitic drain when the machine is not in use. Always include the inline fuse provided in the EL-KIT to protect against short circuits. If your snow blower uses a pull-start system without a battery, you'll need to add a small 12V battery to power the actuator system.
What maintenance does the actuator system require?
The system requires minimal maintenance beyond normal snow blower care. At the beginning of each season, cycle the actuator through several complete extend/retract cycles to redistribute internal lubricant and verify smooth operation. Apply silicone spray to exposed metal surfaces to prevent corrosion. Check electrical connections for signs of corrosion and clean with contact cleaner if needed. Before off-season storage, position the actuator at mid-stroke to equalize internal stress, and spray exposed surfaces with corrosion inhibitor. If stored in a damp environment, consider removing the actuator and storing it indoors. These simple steps will ensure many years of reliable operation.


