What's Covered in the Guide
- Upgrading Your Snow Blower with Electric Chute Control
- How Linear Actuators Control Snow Blower Chutes
- Selecting the Right Actuator
- Weatherproofing and Environmental Protection
- Parts List and Components
- Installation and Mounting
- Electrical Wiring and Controls
- Operation and Adjustment
- Troubleshooting and Maintenance
- Cost and Value
- Advanced Options
- Frequently Asked Questions
Upgrading Your Snow Blower with Electric Chute Control
Manual snow blower chute adjustment is a small job until the weather is bad enough that you need the machine most. In wet snow, drifting snow, or a freeze-thaw cycle, a chute that turned easily in the garage can become stiff, icy, and awkward to move with gloves on. Every stop to reach for a crank or handle also interrupts clearing speed and increases the chance of blowing snow back over a path you already cleaned.
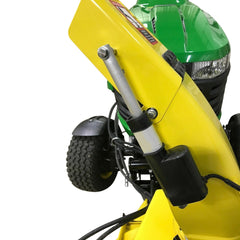
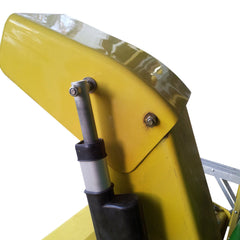
A practical retrofit is to use a 12V DC linear actuator to rotate the discharge chute from the operator position. The concept is simple: mount the actuator between the fixed snow blower frame and a moving point on the chute. Reversing polarity extends or retracts the actuator, which pushes or pulls the chute through its arc. With the right force rating, weather protection, and mounting geometry, the result is a dependable electric chute control system without relying on a proprietary replacement assembly.
This guide focuses on residential and light commercial two-stage snow blowers, including tractor-mounted and walk-behind machines that already have a chute pivot and a 12V battery or charging system. The same principles also apply when adding powered control to a chute deflector, although the stroke and bracket geometry may differ. If you are new to actuator selection, the Linear Actuator Force and Stroke Guide is a useful companion because it explains how force, speed, and travel length trade off in real installations.
The important assumption in this article is that the chute pivot is mechanically sound before the actuator is added. A linear actuator should not be used to force a bent, rusted, or seized chute into motion. Before buying parts, disconnect or loosen the manual chute control and rotate the chute by hand. It should move through its full range with firm but smooth resistance. If it grinds, jams, or lifts off the pivot, repair that mechanical issue first.

How Linear Actuators Control Snow Blower Chutes
A linear actuator converts rotary motor motion into straight-line push and pull force. On a snow blower chute, that straight-line motion becomes rotation because the actuator is connected away from the chute centerline. Think of the chute as a lever rotating around its vertical pivot. The actuator attaches to that lever at one point and to the stationary blower housing at another point. As the actuator changes length, the triangle formed by those three points changes shape, and the chute angle changes with it.
Most chute rotation mechanisms need less travel than many people expect. A 4-inch stroke actuator is often enough for a large portion of the left-to-right chute range when the moving attachment point is placed a few inches from the chute pivot. The exact range depends on the distance from the chute center, the offset of the fixed bracket, and how much rotation your machine allows before the chute hits its stops. A cardboard template or temporary clamp-on bracket is the safest way to test this before drilling permanent holes.
One useful installation method is to set the chute in the straight-ahead position and set the actuator near the middle of its stroke. Hold the actuator in the proposed location and swing the chute left and right by hand. The actuator should not go over-center, collide with the chute ring, strike the engine housing, or force the clevis joints to twist sideways. The best geometry allows both actuator ends to pivot freely while keeping the actuator body clear of thrown snow and moving belts.

Selecting the Right Actuator for Snow Blower Applications
Force Requirements: Why 150 Pounds Matters
For chute rotation, FIRGELLI commonly recommends a minimum actuator force rating of 150 lb for cold-weather reliability. That does not mean a clean chute requires 150 lb to turn on a warm shop floor. The margin is there because winter machines operate in conditions that increase resistance: grease thickens, snow packs around pivots, ice bridges form across moving joints, and the chute may be loaded by wind pressure or partially frozen slush.
Using too little force usually shows up as an intermittent problem. The actuator may work in the garage, then stall on the first subzero morning. It may move the chute to one side but not back again after the pivot is loaded with snow. Repeated stalls are hard on motors, switches, wiring, and batteries. A higher-force actuator is generally slower than a lower-force one, but chute positioning does not need high speed. Reliability in the cold is the priority.
If you want to compare units in engineering terms, convert force units consistently and leave margin for temperature. The Force Converter is helpful when drawings, component labels, or calculations use newtons, pounds-force, or kilogram-force.
Actuator Selection Table
| Design choice | Typical recommendation | Why it matters | Checks before ordering |
|---|---|---|---|
| Voltage | 12V DC | Matches most electric-start snow blower batteries and small machine electrical systems. | Confirm your machine has a healthy 12V source. Pull-start machines may need a separate battery. |
| Force rating | 150 lb minimum for chute rotation | Provides cold-weather margin for thick lubricant, ice buildup, and pivot friction. | Do not size from warm-shop hand force alone. Test after cleaning and lubricating the chute pivot. |
| Stroke length | 4-inch stroke for many chute rotation retrofits | Often gives useful left-right travel without making the actuator difficult to package. | Mock up retracted, mid-stroke, and extended positions before drilling. |
| Protection | Rubber boot and downward rod orientation where possible | Reduces water, slush, and salt exposure at the rod seal. | Make sure the boot does not bind or rub through at full travel. |
| Switch type | Momentary DPDT for most operators | Lets the chute stop as soon as the operator releases the switch. | Choose a switch rated for DC motor current and mount it within gloved reach. |
| Limit control | Use internal or external limit protection depending on actuator and wiring design | Prevents the motor from driving against hard mechanical stops. | Verify the actuator stops electrically before brackets or chute parts bind. |
Recommended Actuator Families
Three actuator families are commonly considered for this type of retrofit. A Classic rod-style actuator is a straightforward choice where cost, force, and mounting simplicity matter most. A Premium-style actuator may be chosen when the application needs stronger environmental sealing or feedback options for a more advanced control system. A Utility actuator can be appropriate for a budget build if it still meets the required voltage, force, stroke, and sealing needs.
Do not choose an actuator solely because it fits physically. Verify the voltage, stroke, force, duty cycle expectations, mounting ends, and environmental exposure. A snow blower chute normally moves for only a few seconds at a time, so the duty cycle is light, but the moisture and temperature conditions are severe. If the actuator will also control a deflector that is constantly blasted by snow discharge, give weather protection even more attention.
Stroke Length Considerations
A longer stroke is not automatically better. A 6-inch or 8-inch actuator may seem attractive because it offers more travel, but the mounting points must be moved to use that travel without over-rotating the chute. If the actuator reaches the end of its stroke after the chute hits its mechanical stop, the motor will stall unless limit protection cuts power first. If the chute reaches full range before the actuator reaches full range, the extra stroke adds complexity without benefit.
Shorter strokes can work in tight spaces, especially for small deflectors, but they reduce angular travel unless the moving attachment point is placed very close to the pivot. That increases the force required because the lever arm is shorter. When in doubt, draw the geometry at full retract, half stroke, and full extend. The Actuator Mounting Angle Calculator is useful when you need to estimate how mounting angle affects force transfer.
Weatherproofing and Environmental Protection
Protective Rubber Boots
Snow blower actuators live in a difficult environment: water, salt, road grit, vibration, and repeated freezing. A rubber boot over the extending rod is one of the simplest ways to improve reliability. The boot helps shield the rod and seal area from slush so contamination is less likely to be carried back into the actuator body during retraction.

Fit the boot after confirming the actuator stroke and bracket clearance. Cycle the actuator through its full travel while watching the boot. It should compress evenly, extend without stretching tight, and stay away from sharp sheet metal. If a zip tie or clamp is used, trim the tail flush so it cannot catch snow or wiring.
Installation Orientation
When packaging allows, mount the actuator so the rod points downward or at least does not direct water toward the motor end. Gravity cannot replace proper sealing, but it helps. Avoid placing the actuator where the rod is constantly sprayed by the discharge stream or where snow accumulates against the seal and freezes solid overnight.
Also consider service access. A bracket hidden under a chute ring may look tidy but can be frustrating when a mid-season adjustment is needed. Leave room to remove a clevis pin, inspect wiring, and wipe away ice. Good installation is not just about the first fit; it is about being able to maintain the system in February with cold hands.
Complete Parts List and Components
A complete electric chute system needs more than an actuator. The exact parts depend on the machine, but a typical build includes the following:
- Linear actuator: 12V DC, commonly 4-inch stroke and at least 150 lb force for chute rotation.
- Protective boot: Recommended for exposed rod-style actuators in snow, slush, and salt spray.
- DPDT reversing switch: A three-position center-off switch reverses polarity so the actuator can extend and retract.
- Fuse or breaker: Protects the wiring if a conductor shorts to the frame or a component fails.
- Limit protection: Internal actuator limits or external limit switches prevent driving into hard stops.
- Mounting hardware: Clevis pins or bolts, flat washers, lock nuts, and brackets sized for the actuator ends.
- Weather-resistant wiring materials: Abrasion sleeve, heat-shrink terminals, dielectric grease, and cable ties.

If your snow blower already has suitable structural mounting points, the actuator may bolt directly to them. If not, mounting brackets help create pivoting attachment points. Brackets should be attached to strong metal sections, not thin covers that can flex. On plastic chute components, spread the load with large washers or backing plates to avoid cracking.

Installation Procedures and Mounting Techniques
Locating Mounting Points
Start by marking three chute positions: full left, straight ahead, and full right. Measure the available space around the chute ring and engine housing in all three positions. Set the actuator at mid-stroke, hold it in the proposed location, and check that both ends can pivot. The actuator should push and pull in line with its body; it should not be used as a structural brace resisting side load.
A common mistake is tightening the mounting bolts until the clevis cannot rotate. The actuator ends must pivot as the chute angle changes. Use washers and lock nuts so the hardware stays secure while still allowing free movement. If the actuator binds at either end of travel, adjust the bracket position before applying power.
Before drilling, clamp temporary brackets in place and run a manual motion test. If you cannot move the chute through the planned range by hand with the actuator disconnected or pinned loosely, the powered version will not be reliable. The actuator should be the final control element, not a cure for poor chute mechanics.
Mounting Hardware Selection
Use corrosion-resistant hardware such as stainless or zinc-plated bolts with nylon-insert lock nuts. The exact bolt diameter must match the actuator clevis and bracket hole, with minimal slop but no binding. Use flat washers on both sides of slots or sheet metal. If the blower vibrates heavily, inspect the fasteners after the first hour of use and again after the first storm.

Switch Installation
Mount the control switch where it can be reached while maintaining safe control of the machine. On walk-behind units, that usually means the handlebar or dash area. On tractor-mounted blowers, place the switch near the steering and lift controls. Test the location with winter gloves, not bare hands in the shop.
Switch direction should be intuitive. If moving the switch right makes the chute rotate left, reverse the motor leads or switch wiring so the control matches the operator expectation. Label the switch if multiple operators use the machine.
Electrical Wiring and Control Systems
Basic Wiring Configuration
A DC actuator reverses direction when polarity is reversed. A DPDT center-off switch is the common manual control because it swaps positive and negative to the motor leads. The center position removes power and stops the actuator. Momentary switches return to center when released; latching switches stay where they are until moved back.

Route wiring away from belts, pulleys, hot muffler surfaces, sharp sheet metal, and the rotating chute ring. Leave a drip loop where wires enter a switch box or connector so melting snow does not run directly into the connection. Use a fuse close to the battery or power takeoff point. For estimating electrical load and understanding the relationship between voltage, current, and power, see the Amps, Volts, and Watts Linear Actuator Guide.
Momentary vs. Sustained Switch Operation
For most snow blower chute controls, a momentary switch is the safest and most controllable option. The chute moves only while the operator holds the switch. This makes it easy to make small corrections when clearing around cars, buildings, and sidewalks.
A sustained or latching switch can be convenient if the actuator has reliable limit protection and the operator wants hands-free movement from one end of travel to the other. The tradeoff is that the operator must remember to return the switch to center if stopping at an intermediate angle. If more than one person operates the machine, momentary control is easier to understand.
Power Source and Electrical Integration
Most electric-start snow blowers provide a suitable 12V source, but battery condition matters. A weak battery may start the engine and still sag under additional accessory load in cold weather. Check voltage at the actuator while the switch is pressed, not only at the battery with no load. If the actuator slows dramatically, inspect the battery, ground path, fuse holder, and connector crimps.
If the machine has no battery, you can add a small 12V battery dedicated to the actuator. In that case, include a charging plan and mount the battery where it is protected from vibration and snow impact. Do not rely on undersized wiring; voltage drop becomes more noticeable in cold weather because the motor already works harder.

System Operation and Adjustment
After installation, test the system with the snow blower off and the chute empty. Move the chute in short bursts and listen for changes in motor sound. A smooth installation will sound consistent through most of the stroke. A sudden change in pitch near the end usually means the actuator is loading against a stop, the clevis is binding, or the chute ring is rubbing.
Set the travel so the actuator stops before any bracket, chute stop, or plastic part is forced. If using external limit switches, position them to cut power slightly before the mechanical hard stop. If relying on internal actuator limits, make sure the chute mechanism reaches its intended range without acting as the stop for the actuator. The actuator should not be the part that bends the chute into position.
Operate the chute several times in the cold before the first major storm if possible. This reveals weak connections and stiff pivots while you still have time to adjust them. Apply a light silicone-compatible lubricant to the chute pivot where appropriate, but avoid heavy grease in locations that collect grit and freeze into a paste.
Troubleshooting and Maintenance
Common Issues and Solutions
| Symptom | Likely cause | Practical check | Corrective action |
|---|---|---|---|
| No movement in either direction | No power, blown fuse, bad ground, or failed switch connection | Measure voltage at the actuator leads while pressing the switch. | Repair power feed, ground, fuse holder, or switch wiring. |
| Moves one direction only | DPDT wiring error, one limit switch open, or damaged conductor | Reverse the switch direction and test voltage polarity at the actuator. | Correct wiring and inspect limit switch continuity. |
| Motor runs but chute does not move | Loose clevis pin, stripped bracket, or disconnected linkage | Watch both actuator ends while operating briefly. | Repair bracket and use lock nuts or retaining clips. |
| Slow or jerky motion | Ice, side loading, weak battery, undersized wire, or actuator under-sized | Disconnect one actuator end and move the chute by hand. | Free the chute pivot, improve wiring, or use a properly rated actuator. |
| Blows fuse repeatedly | Short circuit, stalled actuator, or fuse sized incorrectly | Inspect wire insulation near moving and sharp parts. | Repair wiring and verify the actuator is not driving into a hard stop. |
Seasonal Preparation
Before the season, cycle the actuator fully several times, clean the rod, inspect the boot, and confirm the mounting fasteners are tight but still allow pivoting. Check that all cable ties are intact and that wires have not sagged toward belts or pulleys. After the first storm, inspect again because packed snow often reveals rub points that are not obvious in the shop.
For off-season storage, clean salt residue from the actuator and brackets. Store the chute near mid-position if possible so neither end of travel is held under load for months. If the snow blower is stored in a damp shed, disconnect the battery and consider covering exposed connectors. Avoid pressure-washing directly at actuator seals, switches, and electrical connectors.
Cost Comparison and Value Proposition
A DIY actuator retrofit is attractive because it uses standard components that can be inspected, replaced, and adjusted without buying an entire proprietary chute control assembly. Exact cost depends on the actuator family, brackets, switch type, wiring materials, and whether the machine already has a battery.
| Approach | Example cost assumption | Advantages | Tradeoffs |
|---|---|---|---|
| Manual chute control | No added parts cost | Simple and familiar. | Requires stopping or reaching, and can be difficult when frozen. |
| DIY actuator retrofit | Example assumption: actuator, switch, fuse, wiring, boot, and brackets purchased separately | Custom fit, serviceable components, good value for older machines. | Requires measuring, drilling, wiring, and testing. |
| OEM electric chute repair | Example assumption: manufacturer-specific actuator or control module | Direct fit when parts are available. | Can be expensive and less flexible if a proprietary part is discontinued. |
| Full machine upgrade | Example assumption: buying a newer blower with factory electric controls | Integrated system and new machine features. | Highest total cost if the existing blower is otherwise serviceable. |
The best value case is a mechanically sound snow blower that you plan to keep. If the engine, auger, gearbox, and chute are in good condition, adding electric chute control can make the machine easier to use for a modest parts investment. If the chute itself is cracked, bent, or heavily rusted, fix that first so the actuator is not compensating for worn hardware.
Advanced Options and Customizations
Once the basic chute rotation works, some builders add a second actuator for the deflector angle. This lets the operator control both direction and throw distance from the same position. The deflector actuator may need a different stroke than the rotation actuator because it usually moves a small flap through a shorter arc. Use the same mockup process and protect it carefully because the deflector area sees direct snow discharge.
Wireless control is possible, but it should be used thoughtfully on equipment with moving augers and discharge hazards. Hardwired controls are easier to troubleshoot in severe weather and do not depend on transmitter batteries. If you add a remote system, keep a manual override or accessible disconnect so the chute can be moved or serviced safely.
Position feedback actuators can support indicators or automated control, but most snow blower users do not need feedback for basic chute positioning. If you are building a more complex control system, calculate current draw, fuse sizing, and expected energy use before adding multiple actuators. The Actuator Power Consumption Calculator can help estimate power from force and speed assumptions.
Conclusion
Converting a manual snow blower chute to electric actuator control is a practical upgrade when the chute pivot is healthy and the installation is planned carefully. The keys are straightforward: use a 12V actuator with adequate cold-weather force margin, mock up the geometry before drilling, let both actuator ends pivot freely, protect the rod and wiring from slush, and verify limit protection before using the machine in snow.
For many residential and light commercial machines, a 4-inch stroke and at least 150 lb force is a sensible starting point for chute rotation. Treat those values as a proven baseline, not a substitute for measuring your own machine. Snow blower models vary, and the best installations are the ones that respect the actual chute stops, bracket strength, and available electrical power on the equipment in front of you.
Frequently Asked Questions
Why do I need 150 lb of push-pull force for snow blower chute control?
The extra force is mainly cold-weather margin. A chute that moves easily in a warm garage can become stiff when grease thickens, water freezes around the pivot, and snow packs into the chute ring. A 150 lb actuator is less likely to stall in those conditions than a small low-force unit.
Can I use a stroke length other than 4 inches?
Yes, if the mounting geometry supports it. Longer strokes require different bracket locations and may create interference. Shorter strokes may not rotate the chute far enough. Mock up full retract, mid-stroke, and full extend positions before drilling holes.
Should the switch be momentary or latching?
A momentary center-off DPDT switch is usually preferred because the chute stops when the operator releases the switch. A latching switch can work if limit protection is reliable, but it requires more operator attention when stopping at intermediate chute angles.
Is a rubber boot necessary?
For exposed rod actuators in snow, a boot is strongly recommended. It helps keep slush and grit away from the rod and seal area. It is a low-cost part that can prevent many winter reliability problems.
Will the actuator fit without drilling?
Some machines have usable holes or brackets near the chute base, but many require custom mounting. Use existing reinforced points when possible. If drilling is needed, avoid thin covers and use backing washers or plates where the material is weak.
Can I power the actuator from the snow blower battery?
Usually yes, if the machine has a healthy 12V battery and the wiring is fused properly. Connect through an appropriate fuse and route wires safely. Pull-start machines without a battery need a separate 12V power source.
What maintenance does the actuator system need?
At the start of the season, cycle the actuator, inspect the boot, clean the rod, check fasteners, and test voltage under load. During the season, watch for packed snow around brackets and wire rub points. Before storage, clean salt residue and protect exposed connectors.
Linear Actuator Force Calculator — Incline with Friction Linear Actuator Gear Reduction Calculator Linear Actuator Speed vs. Force Tradeoff Calculator Actuator Speed Calculator — Extension Time Actuator Stroke Length Calculator — Hinged Applications


