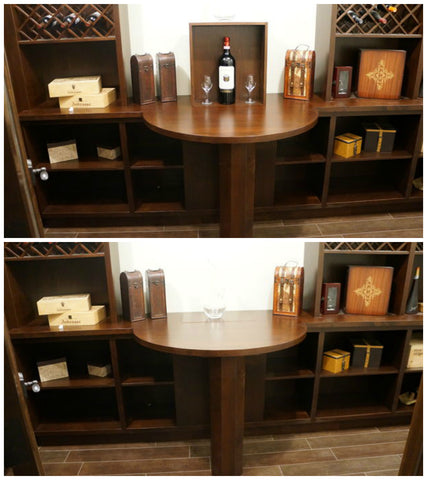
Transform Your Wine Cellar with Motorized Hidden Storage
A well-designed wine cellar is more than just functional storage—it's a showcase of craftsmanship and innovation. One of the most impressive features you can add to any wine cellar, luxury cabinet, or custom furniture piece is a motorized pop-up drawer that emerges at the touch of a button. This hidden storage solution combines engineering precision with practical design, creating a distinctive element that elevates your space from ordinary to extraordinary.
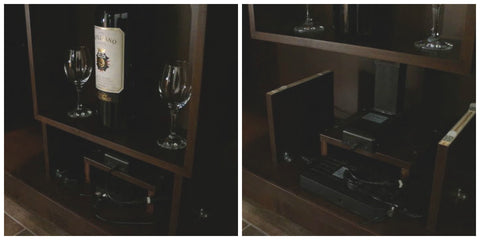
🎥 Video — How to Build a Pop Up Drawer in Your Wine Cellar That Provides Hidden Storage
Whether you're looking to conceal valuable bottles, create secure storage for accessories, or simply add a conversation-starting feature to your home, a motorized pop-up drawer offers versatility that extends far beyond wine cellars. This same concept can be adapted for gun safes, jewelry storage, home offices, or any application where concealed, automated access adds both security and sophistication. Using electric linear actuators, specifically a column lift, this project is more accessible than you might think—requiring only moderate woodworking skills and basic electrical connections.
In this comprehensive guide, we'll walk you through the complete process of designing and building a motorized pop-up drawer system. From selecting the right actuator specifications to cutting precise openings and integrating smooth operation, you'll learn the engineering principles and practical techniques that make this project successful. The result is a seamless integration of motion control technology with custom cabinetry that looks professionally installed because it is built on professional-grade components.
Understanding Column Lift Actuators for Hidden Drawer Applications
The heart of any motorized pop-up drawer system is the actuator that provides the lifting force. Unlike standard linear actuators that extend horizontally, column lifts are specifically engineered for vertical lifting applications where space constraints and load capacity are critical factors.
Why Column Lifts Work Best for Pop-Up Drawers
Column lift actuators feature a compact, telescoping design that retracts into a minimal footprint when lowered—essential for hidden drawer applications where the mechanism must remain concealed. The FIRGELLI Electric Column Lift (FA-SCL-650) used in this project offers several advantages over traditional linear actuator configurations:
- Vertical lift capacity: Designed specifically for lifting against gravity with load ratings up to 180 lbs (approximately 80 kg), providing sufficient force for drawers filled with wine bottles, spirits, or other storage items
- Compact retracted height: When fully retracted, the lift mechanism occupies minimal vertical space, allowing the drawer top to sit flush with the cabinet surface
- Multiple stroke options: Available in 25-inch (635mm), 36-inch (914mm), and 39-inch (991mm) stroke lengths to accommodate different cabinet heights and drawer depths
- Smooth operation: Internal mechanisms ensure consistent speed throughout the stroke length, preventing jerky movement that could disturb bottles or contents
- Integrated limit switches: Built-in end-of-stroke protection prevents over-extension or over-retraction
Selecting the Right Stroke Length
The stroke length determines how high your drawer will rise above the cabinet surface. For most wine cellar applications, you'll want enough height to access the contents comfortably without excessive lift that creates instability. Consider these factors:
- Cabinet depth: Your drawer should lift high enough to clear the cabinet opening plus an additional 2-4 inches for easy access
- Bottle height: Standard wine bottles are approximately 12 inches tall; Champagne bottles are taller at 12.5 inches
- Structural stability: Taller lifts create more leverage and potential wobble—match stroke length to actual needs rather than maximizing height
- Ceiling clearance: Ensure adequate clearance above your cabinet for the fully extended drawer
The programmable memory feature on compatible controllers allows you to set a specific stopping point anywhere within the stroke range, giving you flexibility even if you choose a longer stroke actuator.
Planning Your Build: Materials and Specifications
Successful execution of this project begins with careful planning and selecting appropriate materials. Unlike simple woodworking projects, integrating motion control requires precise measurements and consideration of electrical requirements.
Essential Components and Hardware
For a complete motorized pop-up drawer system, you'll need:
- FIRGELLI Electric Column Lift: Select the appropriate stroke length based on your cabinet dimensions (FA-SCL-650 series recommended for wine cellar applications)
- Wireless remote control: 2-channel RF remote system for up/down operation from a convenient distance
- Power supply: Typically 12V or 24V DC depending on your actuator specifications (verify requirements with your specific model)
- Cabinet-grade plywood: ¾-inch thick material for drawer construction; match species and finish to existing cabinetry
- Hardwood for drawer frame: Oak, maple, or matching wood species for structural components
- Wood glue and fasteners: Cabinet-grade wood glue, pocket hole screws, and finish nails
- Routing template and guide bushings: For creating clean, precise openings in countertop material
- Support risers: Wood blocks or adjustable feet to support drawer in the retracted position
Measuring and Design Considerations
Before making any cuts, create detailed drawings with exact measurements. Key dimensions to determine:
- Opening size: The rectangular hole in your cabinet top should provide 1/16 to 1/8 inch clearance on all sides of your drawer for smooth operation
- Drawer exterior dimensions: Slightly smaller than the opening to allow clearance
- False back depth: Must accommodate the width of the column lift plus clearance for wiring (typically 4-6 inches)
- Cabinet interior height: Measure from the floor of your cabinet to the underside of the top surface to determine available space for the retracted lift
- Weight calculation: Estimate the total weight of your drawer when loaded to ensure it remains well below the 180 lb capacity
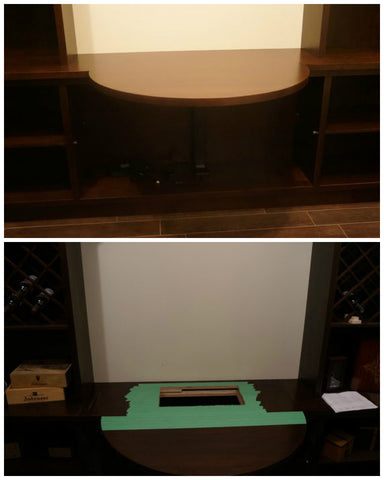
Step-by-Step: Cutting the Cabinet Opening
Creating a clean, precise opening in your cabinet top is critical for professional results. Whether you're working with solid wood, plywood, or composite countertop material, the approach requires careful setup and proper tool selection.
Preparing the Work Surface
Protection and precision are your priorities when cutting into finished cabinetry:
- Apply masking tape: Cover the entire cutting area with blue painter's tape or masking tape to prevent chip-out and protect the finished surface from router base scratches
- Mark your cutting lines: Using a combination square and straightedge, mark the exact dimensions of your opening. Double-check measurements against your drawer dimensions
- Create starting holes: Drill a ½-inch diameter hole at each interior corner, staying just inside your cutting lines. These provide starting points for your router or jigsaw
- Secure the piece: If possible, remove the cabinet top and secure it to sawhorses or a workbench. If working in place, ensure the cabinet is stable and well-supported
Routing for Clean Edges
A plunge router with a straight cutting bit produces the cleanest edges for this application:
- Set up a straightedge guide: Clamp a straightedge parallel to your cutting line, accounting for the distance from your router bit to the edge of the router base
- Make multiple shallow passes: Rather than cutting through in one pass, make several passes at increasing depths. This reduces tear-out and gives you better control
- Support the cutout: As you near completion, have an assistant support the interior piece to prevent it from dropping and tearing wood fibers
- Square the corners: Router bits create rounded corners. Use a sharp chisel to square these if desired, or round the drawer corners to match
After routing, remove masking tape carefully and sand edges smooth with 220-grit sandpaper. Test-fit your drawer mock-up to verify clearances before proceeding to final construction.
Constructing the Drawer with Integrated Actuator Housing
The drawer construction differs from traditional drawer building in one critical aspect: it must incorporate a hidden compartment that houses the column lift mechanism while maintaining the appearance of a normal drawer or cabinet top when retracted.
Building the Drawer Box
Construct your drawer using traditional joinery methods appropriate to your skill level—dovetails, box joints, or pocket hole construction all work well:
- Cut drawer sides and front: These pieces should be the full height of your desired lift distance. For a 25-inch stroke, your drawer sides might be 24 inches tall, allowing the top to sit flush when retracted
- Create the false back: Cut two back pieces—one that forms the actual rear of the drawer cavity, and one that creates the exterior back surface. The space between these pieces houses the column lift
- Assemble the main box: Join the front, sides, and inner back using your chosen joinery method. Ensure the assembly is square and rigid
- Install the drawer bottom: Use ½-inch plywood for the bottom, set into dados or secured with cleats. This provides the platform onto which the column lift will push
- Attach the outer back panel: Position this to create the necessary cavity for the lift mechanism, typically 4-6 inches deep depending on your actuator model
Integrating the Column Lift
The column lift operates as a free-floating unit—it's not permanently attached to the drawer but rather pushes against the drawer bottom:
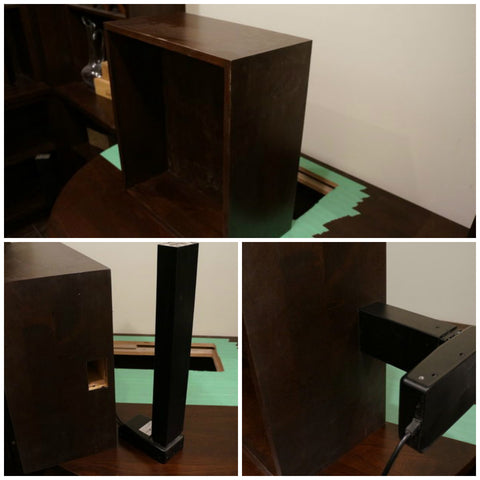
- Position the lift: Place the fully retracted column lift in the false back cavity. The top of the lift should align with the underside of the drawer bottom
- Create a contact plate: Attach a small plywood plate to the drawer bottom directly above where the lift makes contact. This distributes the lifting force and prevents point loading
- Test the extension: Before final installation, power the lift and verify smooth extension without binding. The lift should push the drawer upward evenly
- Add guide features: Consider adding small vertical guides inside the cabinet to prevent lateral movement during operation
Finishing the Drawer Exterior
The drawer top surface must match your cabinet aesthetic seamlessly:
- Veneer or solid top: Apply matching wood species to the top of your drawer box, ensuring grain pattern and color match surrounding surfaces
- Edge treatment: Round over or profile the edges to match adjacent cabinet tops
- Finish application: Apply stain and finish to match existing cabinetry. Multiple thin coats produce better results than thick applications
- Hardware integration: If your design includes a finger pull or handle, recess it so the drawer sits completely flush when retracted
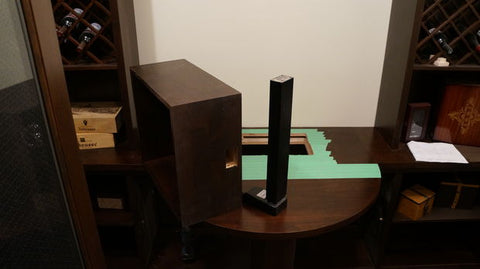
Installing and Adjusting the Complete System
With your drawer built and cabinet opening cut, final installation requires precise positioning to achieve smooth, reliable operation.
Positioning the Column Lift in the Cabinet
The column lift must be positioned so that when fully retracted, the drawer top sits perfectly flush with the cabinet surface:
- Calculate the base height: Measure from your cabinet floor to the underside of the cabinet top. Subtract the retracted height of your column lift and the thickness of your drawer bottom. The difference is the height of platform you need to build
- Construct a stable platform: Build a solid plywood platform or shelf at the calculated height. This must be rigid and level—any deflection will cause binding
- Center the lift: Position the lift platform centrally under the cabinet opening, ensuring the lift will push straight upward without angular loading
- Add support risers: Install two support blocks or risers on either side of the lift. These should contact the drawer bottom when retracted, taking the weight off the lift mechanism when in the down position
Electrical Setup and Wiring
The electrical system for a basic pop-up drawer is straightforward, requiring only low-voltage DC power:
- Mount the control receiver: Position the RF receiver module inside the cabinet where it's protected but accessible. Ensure the antenna wire has adequate length and isn't pinched
- Connect power leads: Wire the power supply to the control receiver according to the manufacturer's wiring diagram, observing correct polarity
- Connect actuator leads: Wire the column lift motor leads to the output terminals on the control receiver
- Test operation: Before installing the drawer, verify that the remote control activates the lift in both directions. The up button should extend the lift, the down button should retract it
- Program limit settings: If your controller includes programmable memory, set the upper limit to stop the drawer at your desired height
For permanent installations, consider routing the power cord through the cabinet back to a concealed outlet. For portable or temporary setups, a standard plug connection works well.
Final Adjustments and Testing
With everything connected, perform these final checks:
- Verify flush retraction: The drawer top should be perfectly level with the cabinet top when fully retracted. Adjust platform height if necessary
- Check for binding: Operate the lift through several complete cycles, listening for unusual noises or resistance
- Test with load: Place representative weight in the drawer and test operation. Add bottles or items gradually up to your expected maximum load
- Adjust support risers: Fine-tune the height and position of support blocks to ensure even weight distribution
- Program memory stops: Set the controller memory to stop extension at your preferred height, preventing over-travel

Advanced Enhancement: Adding Drawer Slides for Superior Operation
The basic design allows the drawer to slide freely within the cabinet opening, relying on close tolerances for alignment. For enhanced smoothness and durability, consider integrating drawer slides into your design.
Benefits of Integrated Slide Systems
Adding heavy-duty drawer slides to a pop-up drawer system provides several operational advantages:
- Reduced friction: Ball-bearing slides dramatically reduce the force required to lift the drawer, allowing the column lift to operate more efficiently
- Lateral stability: Slides prevent side-to-side wobble during extension, crucial for tall lift heights
- Guided motion: The drawer follows a precise vertical path without binding or misalignment
- Extended lifespan: Eliminating wood-on-wood sliding contact reduces wear on both the drawer and cabinet opening
- Weight distribution: Slides distribute the drawer weight across multiple bearing points rather than relying solely on the lift mechanism
Selecting and Installing Vertical Slides
For vertical pop-up applications, you need slides rated for the weight of your loaded drawer and designed to operate in a vertical orientation:
- Choose heavy-duty slides: Select slides rated for at least 150% of your expected drawer weight. Full-extension ball-bearing slides provide the smoothest operation
- Mount to drawer sides: Install the slide members on the interior sides of your drawer, positioned vertically
- Mount to cabinet: Attach the cabinet-side slide members to the interior walls of your cabinet, ensuring perfect vertical alignment
- Verify clearance: The slides add width to your assembly—ensure adequate clearance in your cabinet opening
This enhancement transforms a functional hidden drawer into a precision-engineered system that operates smoothly and reliably for years of daily use.
Beyond Wine Cellars: Alternative Applications for Pop-Up Drawer Systems
While wine cellars provide an elegant showcase for motorized pop-up drawer technology, the same principles and components adapt to numerous other applications throughout residential and commercial spaces.
Security and Concealment Applications
- Home safes and valuables storage: Create hidden compartments in floor-level cabinetry for securing jewelry, documents, or firearms
- Kitchen appliance lifts: Conceal heavy stand mixers or food processors below counter level, raising them only when needed
- Bathroom storage: Build pop-up compartments in vanity cabinets for toiletries or grooming tools
- Office equipment storage: Hide printers, scanners, or charging stations that rise from desk surfaces on demand
Display and Entertainment Applications
- Collectible display cases: Showcase valuable items that rise from furniture tops for viewing then conceal for protection
- Bar and entertainment centers: Create motorized liquor cabinets that emerge from countertops or furniture
- Audio/visual equipment: Similar to TV lifts, smaller components can rise from cabinetry
- Retail displays: Eye-catching product presentations that rise dramatically for customer engagement
Accessibility and Ergonomic Applications
- Adjustable work surfaces: Create height-adjustable stations for users with different physical needs
- Kitchen accessibility: Raise frequently used items to comfortable heights for users with mobility limitations
- Craft and hobby stations: Build pop-up storage for supplies that adjusts to optimal working height
Each application benefits from the same core components—a column lift actuator, control system, and thoughtful integration—adapted to specific dimensional and functional requirements.
Maintenance and Troubleshooting Your Pop-Up Drawer System
Like any mechanical system integrating electrical and moving components, periodic maintenance ensures long-term reliability and smooth operation.
Routine Maintenance Schedule
Perform these simple maintenance tasks to keep your system operating optimally:
- Monthly inspection: Visually inspect the lift mechanism for any signs of binding, unusual wear, or loose components
- Quarterly cleaning: Remove dust and debris from the cabinet interior and lift mechanism using compressed air or a soft brush
- Lubrication: Apply a light machine oil or silicone spray to any sliding surfaces or guide rods every 6 months. Avoid excessive lubrication that attracts dust
- Electrical connections: Annually verify all electrical connections remain secure and show no signs of corrosion
- Load testing: Periodically test with maximum expected load to ensure the lift maintains adequate force
Common Issues and Solutions
Most problems with pop-up drawer systems have straightforward solutions:
Drawer binding or sticking: Check for debris in the opening, verify the drawer hasn't swelled due to humidity, ensure support risers haven't shifted, and confirm the lift remains properly centered.
Slow or weak lifting: Verify power supply voltage matches actuator requirements, check for loose electrical connections, reduce drawer weight if near capacity limits, and inspect for mechanical binding in the lift mechanism.
Remote control not responding: Replace remote batteries, verify receiver has power, check for radio interference from other devices, and ensure the antenna wire isn't damaged or pinched.
Drawer not flush when retracted: Adjust platform or support riser height, verify the lift is fully retracting (check limit settings), and ensure drawer bottom hasn't warped or deflected.
Excessive noise during operation: Lubricate moving components, check for loose fasteners or panels vibrating, verify proper load distribution, and inspect lift mechanism for wear.
Frequently Asked Questions
What is the maximum weight capacity for a pop-up drawer system?
The FIRGELLI Electric Column Lift (FA-SCL-650) used in this design has a maximum lifting capacity of 180 lbs (approximately 80 kg). However, for reliable long-term operation and smooth performance, it's recommended to design your drawer and contents to weigh no more than 120-150 lbs. This provides a safety margin and ensures the actuator doesn't strain under load. If you need to lift heavier loads, consider using dual synchronized lifts or upgrading to industrial actuators with higher force ratings.
How do I determine what stroke length I need?
The stroke length should match the height you want your drawer to rise above the cabinet surface. Measure the vertical distance from the top of your cabinet to the desired drawer height when fully extended. Most wine cellar applications work well with 25-inch (635mm) strokes, providing ample access height. The 36-inch and 39-inch options suit deeper cabinets or applications requiring more dramatic lift heights. Remember that you can program the controller to stop at any point within the stroke range, so choosing a slightly longer stroke gives you flexibility without requiring the drawer to extend fully every time.
What are the electrical requirements for this project?
The column lift system operates on low-voltage DC power, typically 12V or 24V depending on your specific actuator model. Total power consumption during operation is modest—usually under 5 amps. You'll need a standard 120V AC wall outlet to plug in the DC power supply, which then converts to the appropriate DC voltage for the actuator. The RF remote control receiver wires directly to the power supply and actuator—no complex electrical work required. All connections use simple screw terminals or plug connectors, making installation accessible to DIYers comfortable with basic wiring.
How long does it take to build and install a pop-up drawer system?
For someone with moderate woodworking skills and the proper tools, expect the complete project to take 8-12 hours spread across 2-3 days. This includes planning and measuring (1-2 hours), cutting the cabinet opening (1-2 hours), building the drawer assembly (3-4 hours), finishing the drawer surfaces (2-3 hours allowing for drying time), and final installation and adjustment (1-2 hours). Your first pop-up drawer will take longer as you work through the learning curve; subsequent installations go much faster. The electrical connection itself takes only 30 minutes to an hour once the mechanical components are installed.
Can I retrofit this system into an existing cabinet or countertop?
Yes, pop-up drawer systems work excellently as retrofits to existing cabinetry, provided you have adequate interior space. The key requirements are: sufficient vertical clearance inside the cabinet for the retracted lift and drawer (minimum 12 inches for most applications), a cabinet floor strong enough to support the lift platform, and a cabinet top you're willing to cut an opening into. The beauty of the free-floating column lift design is that it requires no permanent modifications to the cabinet structure itself—only the opening in the top surface. This makes the modification relatively reversible if needed. Most wine cellars, kitchen islands, bathroom vanities, and custom furniture pieces have suitable dimensions for retrofit installations.
Are drawer slides necessary, or can I build without them?
The basic design demonstrated in this guide operates without drawer slides, relying on close tolerances between the drawer and cabinet opening to maintain alignment. This approach works well and keeps the project simpler and more affordable. However, adding heavy-duty ball-bearing slides provides significant benefits: smoother operation with less friction, better lateral stability (especially important for taller lifts), reduced wear on wooden surfaces, and more consistent long-term performance. If your budget allows and you're comfortable with the additional installation complexity, slides are a worthwhile upgrade that transforms good operation into exceptional operation. They're particularly valuable for drawers that will be used frequently or carry heavy loads approaching the actuator's capacity.
Can I operate multiple pop-up drawers from one remote control?
Yes, with proper control system design you can operate multiple pop-up drawers. For independent control of each drawer, you'll need multi-channel RF receivers that allow you to address each actuator separately from one remote. Alternatively, if you want multiple drawers to rise and lower simultaneously (like matching drawers on opposite sides of a bar or island), you can wire multiple column lifts to a single receiver channel. This requires matching actuator specifications and ensuring your power supply can handle the combined current draw. A control box with multiple outputs can simplify wiring for multi-actuator installations. Contact FIRGELLI's technical support for specific wiring diagrams when planning multi-drawer systems to ensure proper synchronization and electrical capacity.


