If your eyepiece or camera sensor isn’t matched to your telescope, you’ll either miss your target altogether or end up with extra pixels capturing empty sky. Both are easy to avoid with one calculation. The Telescope Field of View Calculator helps you pin down true FOV, apparent FOV, image scale, and magnification using your actual telescope focal length and eyepiece or sensor details. This is useful whether you’re planning astrophotography, setting up for visual observing, or sorting out survey system design. Formulas, examples, and common technical pitfalls are all detailed below.
What is Telescope Field of View?
The field of view for a telescope is simply how much of the sky you can see at once, expressed as an angle—degrees or arcminutes. A larger FOV means you see a bigger patch of sky, but with less detail. Narrow the FOV and you trade sky coverage for more detail on a smaller area.
Simple Explanation
It’s no different than changing a camera zoom: zoom in and only a small area fills the screen, but it’s clearer; zoom out and you see more, but with less detail. In telescopes, a shorter eyepiece focal length gives more magnification (zoom), so you see less sky, but pick up more detail. This calculator lets you see in advance what your setup will actually show.
📐 Browse all 1000+ Interactive Calculators
Table of Contents
How to Use This Calculator
- Pick the calculation you need from the dropdown—what you want to solve for (True FOV, Apparent FOV, Eyepiece Focal Length, Telescope Focal Length, Magnification, or Image Scale).
- Fill in the input boxes for focal length, eyepiece, field of view, or sensor/pixel details, depending on your mode.
- Double check your numbers actually match your telescope, eyepiece, or sensor.
- Hit Calculate for your answer.
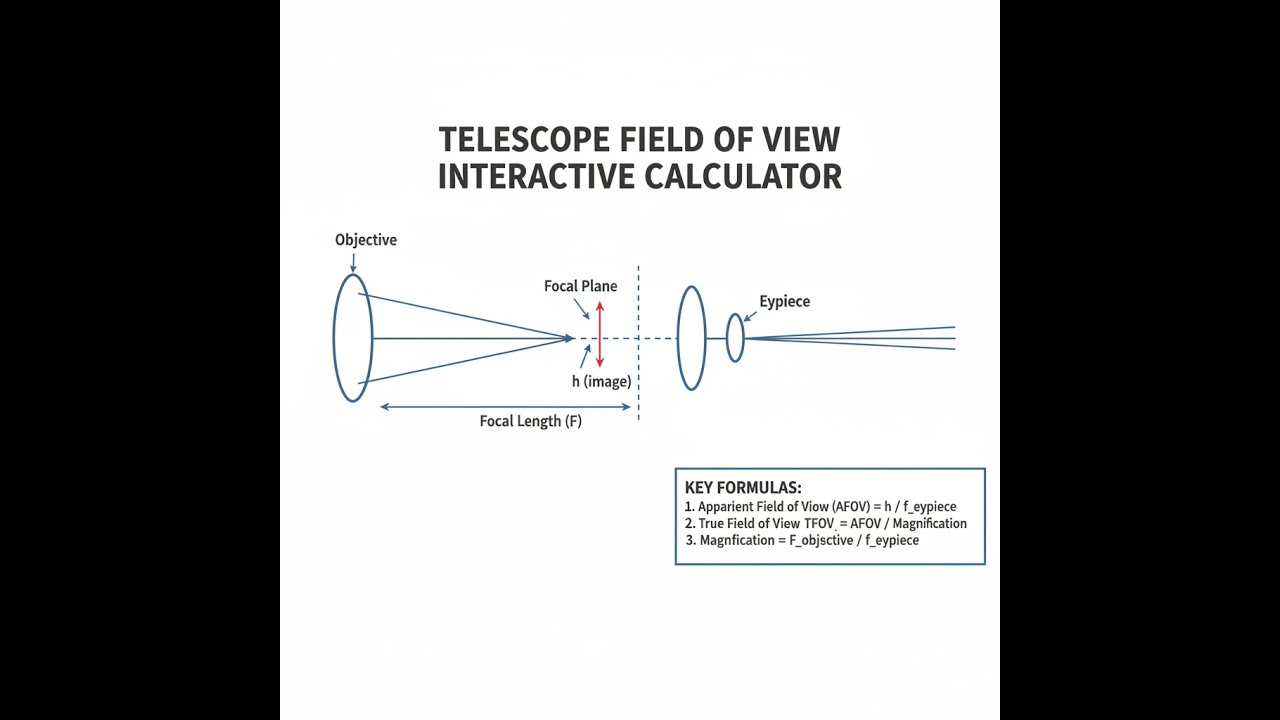
Optical System Diagram

Telescope Field of View Calculator
This calculator is intended for education, concept evaluation, and preliminary design. Results are based on the equations and assumptions described on this page, but cannot account for every real-world load case, tolerance, material property, environmental condition, installation detail, safety factor, code, or regulatory requirement. Verify all inputs, assumptions, units, and results independently before selecting components or using the result in a real application. Safety-critical, structural, medical, lifting, transportation, or regulated applications must be reviewed by a qualified engineer.
Questions about this calculator or found an error? Message our engineering team.
Telescope Field of View Interactive Visualizer
You can get a direct feel for how your choices of telescope, eyepiece, or sensor change the field of view. Watch the frame expand and contract as you tweak magnification, and see which targets will fit on your sky image.
MAGNIFICATION
48×
TRUE FOV
1.08°
ARCMINUTES
65'
FIRGELLI Automations — Interactive Engineering Calculators
Field of View Equations
Here’s the direct formula for true field of view during visual use.
True Field of View (Visual)
θtrue = θapp / M
θtrue = true field of view (degrees)
θapp = apparent field of view of eyepiece (degrees)
M = magnification (dimensionless)
Formula to get magnification:
Magnification
M = Fobj / feye
M = magnification (dimensionless)
Fobj = telescope objective focal length (mm)
feye = eyepiece focal length (mm)
Formula for image scale in astrophotography:
Image Scale (Astrophotography)
S = 206.265 × (p / F)
S = image scale (arcseconds per pixel)
p = pixel size (mm)
F = telescope focal length (mm)
206.265 = conversion constant (arcseconds per radian / 1000)
Formula for sensor field of view:
Sensor Field of View
θsensor = 2 × arctan(d / 2F)
θsensor = field of view along sensor dimension (radians or degrees)
d = sensor dimension (width or height, mm)
F = telescope focal length (mm)
Simple Example
Telescope focal length: 1000 mm. Eyepiece focal length: 25 mm. Eyepiece apparent FOV: 52°.
Magnification = 1000 / 25 = 40×
True FOV = 52° / 40 = 1.3° (78 arcminutes)
Theory & Practical Applications
You’ll need to work out telescope field of view whenever you want to know how much sky you’ll see, especially with different eyepiece or camera choices. The system is afocal when used visually, so the output is collimated and the eyepiece forms the final image. True field of view is the part of the sky you’re actually observing; apparent field is set by the eyepiece. Both relate by the magnification, so deciding your FOV comes down to a balance: more detail, more sky, or more light—rarely all three together.
Visual Observation Systems
For visual observing, magnification is simply telescope focal length divided by eyepiece focal length. Example: a 1200 mm focal length telescope with a 25 mm eyepiece gives 48×. If your eyepiece has a 52° apparent field, the true field is 52° / 48 = 1.083°, about 65 arcminutes—around twice the width of the Moon. That sort of field frames objects like M42 (Orion Nebula) nicely, as M42 itself spans about 65' × 60' at its brightest.
Survey and wide-field research telescopes are designed with lower magnification and wider fields. The Zwicky Transient Facility, for example, trades some corner sharpness and resolution for the ability to cover an enormous patch of sky quickly—their setup uses a 600 mm focal length and a very large detector to scan much of the sky every two nights. They care more about true FOV and solid detection than edge-to-edge pinpoint stars. At around 1 arcsecond per pixel, this is enough for identifying new supernovae or asteroids, but isn’t for fine-structure imaging.
Astrophotography Image Scale
When using a camera, what matters isn’t just the FOV angle, but how many arcseconds each pixel covers. The formula S ≈ 206.265 × (p / F) gives this: 206.265 gets you from mm and radians to arcseconds. If your pixel size is too big for your focal length (“undersampling”), you lose fine detail—the seeing at your location becomes the hard upper limit.
For example, using a Canon EOS 6D (pixel size 6.54 μm = 0.00654 mm) on an 80 mm f/6 refractor (F = 480 mm) results in about 2.81 arcsec/pixel. The sensor size gives a field of view of about 2.72° × 1.82°. This is wide enough for large nebulae, but the sampling is coarse: typical seeing is often 1.5–2.5", so smaller targets get blurred on the sensor even before optical limits are reached. For planetary and small galaxies, you need finer image scale.
You generally want at least two pixels per “blob”—the Nyquist limit. Example: if seeing is around 2", aim for 1"/pixel. Some planetary imagers purposely oversample—smaller pixels, longer focal lengths—to catch very brief moments of sharp atmospheric conditions, often stacking frames and post-processing for the best detail. This is why high-end planetary images sometimes have outrageous oversampling on the order of 0.04"/pixel: it pays off only under excellent seeing and with careful processing.
Focal Reducers and Field Flatteners
Focal reducers increase field of view by shortening system focal length. For instance, a 0.63× reducer on an f/10 SCT takes it from 2000 mm to 1260 mm focal length—so you'll get 1.59× wider field, but also a bigger image scale (less detail per pixel). Useful for getting large objects like the Moon or wide nebulae in the frame, or matching image scale to local seeing more efficiently. Field flatteners don’t change field of view directly, but do help by correcting off-axis sharpness, so you get good stars across the whole frame rather than just the center, especially important for cameras with large sensors.
Worked Example: Deep Sky Imaging Configuration
If you’re aiming to shoot something like the North America Nebula (120' × 100'), equipment matching is straightforward: check if the field of your sensor and scope combination will fully cover the target, and whether your system’s image scale matches your site’s seeing.
Available equipment:
- Telescope: William Optics RedCat 51, F = 250 mm, aperture D = 51 mm
- Camera: ZWO ASI2600MC Pro, sensor 23.5 × 15.7 mm, pixel size 3.76 μm
- Location: Suburban site, Bortle 5, seeing typically 3.2"
Step 1: Calculate image scale
S = 206.265 × (p / F) = 206.265 × (0.00376 mm / 250 mm) = 3.10 arcsec/pixel
Step 2: Evaluate sampling adequacy
For 3.2" seeing, optimal would be about 1.6"/pixel by Nyquist. At 3.10"/pixel, you’re a bit coarse—fine details may get blurred, but for big nebulae, it’s usually acceptable. If you wanted finer sampling, a reducer or a different camera might help, but might not make sense for such a wide target.
Step 3: Calculate field of view dimensions
FOV width = 206.265 × (dwidth / F) / 60 = 206.265 × (23.5 mm / 250 mm) / 60 = 3.23° = 194 arcmin
FOV height = 206.265 × (dheight / F) / 60 = 206.265 × (15.7 mm / 250 mm) / 60 = 2.16° = 129.5 arcmin
Step 4: Target framing assessment
The 194' × 129.5' FOV easily frames the North America Nebula and lets you include adjacent structures like the Pelican Nebula. It’s a solid match for this equipment if you don’t mind losing some fine detail.
Step 5: Exposure planning
Each pixel is 3.10" across, which covers a pretty large sky area. Brighter patches of the nebula will show up quickly. With an f/4.9 scope and 3.76 μm pixels, dark noise becomes a factor around the 2–3 minute mark, depending on sensor cooling and skyglow. Sub-exposures of 2–3 minutes are typical here, and total integration time is more about sky quality than field of view.
Survey Telescope Optimization
Sky survey telescopes are built to maximize (solid angle × mirror area × observing time)—so they can scan more, faster. The Rubin Observatory’s 3.5° field (using a 64 cm detector at a 10.3 m focal length) hits about 0.2"/pixel, sampling their site’s 0.67" average seeing efficiently. This means each 30-second frame covers 9.6 sq. degrees, about forty full moons—good for transient discovery, not for imaging fine planetary detail.
Eyepiece Selection Strategy
When picking eyepieces, you need to match exit pupil to your own eye as well as picking a practical magnification range. Too large an exit pupil (above about 7 mm) wastes aperture, while anything below 0.5 mm gives dim, fuzzy images. On a 200 mm f/5 Newtonian, 5 mm to 35 mm eyepieces will span practical use for most observing. Ultra-wide eyepieces give a more immersive view, helpful for large clusters or nebulae, but the complex optics can reduce planetary contrast—use simpler designs for high power, critical planetary viewing.
Atmospheric and Optical Limitations
All the FOV calculations assume the optics are perfect, but in practical use, limitations show up. Edge of field aberrations—coma, field curvature, and vignetting—often chop off your usable field well before the math says you should run out of it. Fast Newtonians (f/4-f/5) show star distortion off-axis; compound telescopes can show field curvature. Also, as you go lower in the sky, atmospheric dispersion and seeing deteriorate quality further than calcuations predict, sometimes making dispersion correctors or special tweaks necessary for accurate color and sharpness.
Frequently Asked Questions
▼ How does Barlow lens magnification affect field of view?
▼ What field of view do I need for different celestial objects?
▼ Why do astrophotographers prefer specific image scales?
▼ Can I increase field of view without changing eyepieces?
▼ What limits the maximum useful field of view?
▼ How do I convert between degrees, arcminutes, and arcseconds?
Free Engineering Calculators
Explore our complete library of free engineering and physics calculators.
Browse All Calculators →🔗 Explore More Free Engineering Calculators
About the Author
Robbie Dickson — Chief Engineer & Founder, FIRGELLI Automations
Robbie Dickson brings over two decades of engineering expertise to FIRGELLI Automations. With a distinguished career at Rolls-Royce, BMW, and Ford, he has deep expertise in mechanical systems, actuator technology, and precision engineering.
Video Walkthrough - How to Use This Calculator
Need to implement these calculations?
Explore the precision-engineered motion control solutions used by top engineers.


