Installing a motorized flip down TV lift offers an elegant solution for modern homes where space efficiency meets sophisticated design. Whether you're working on a luxury bedroom retreat, a contemporary living room, or a custom home theater, a ceiling-mounted TV system creates a clean, uncluttered aesthetic while maximizing your viewing options. Unlike traditional TV mounts that permanently occupy wall space, a flip down mechanism conceals your television completely when not in use, preserving the architectural integrity of your space.
🎥 Video — HOW TO INSTALL A MOTORIZED FLIP DOWN TV LIFT
The challenge many homeowners and designers face is choosing between a vertical drop down system and a flip down mechanism—and understanding the installation requirements for each. While vertical drop systems require substantial ceiling cavity depth (often 36-40 inches), flip down mechanisms offer a remarkably compact alternative that works in spaces with limited overhead clearance. This guide walks you through the installation process, space requirements, and design considerations for implementing a motorized flip down TV lift in homes both with and without attic access.
Understanding Flip Down vs. Drop Down TV Lifts
When designing a ceiling-mounted TV solution, the first critical decision is understanding the fundamental difference between flip down and vertical drop down systems. This choice significantly impacts your installation requirements, space planning, and overall project feasibility.
Vertical Drop Down Systems
A vertical drop down system lowers your television straight down from the ceiling, maintaining the TV's horizontal orientation throughout the movement. While this creates a dramatic reveal effect, it demands considerable ceiling cavity depth. For a typical 50-inch television measuring approximately 30 inches in height, you'll need the TV's full height plus 5-10 inches for the lift mechanism and mounting hardware—totaling 35-40 inches of clear space above your ceiling. This makes vertical systems practical only in homes with accessible attics or significant ceiling cavities.
Flip Down Rotation Systems
A flip down or rotary system pivots the television from a horizontal (stored) position flush against the ceiling to a vertical (viewing) position. This rotating motion dramatically reduces the required ceiling depth to just 4-5 inches—the thickness of the mechanism plus your TV. This compact profile makes flip down systems viable for homes without attics, condominiums, and retrofit applications where ceiling modification is limited. The FIRGELLI flip down TV lift mechanism exemplifies this space-efficient approach, using precision linear actuators to control the rotation smoothly and quietly.
Space Requirements and Planning
Proper space planning determines whether your flip down TV lift installation will be straightforward or require creative solutions. Understanding your available space helps you choose the right installation method and anticipate any modifications needed.
Measuring Ceiling Cavity Depth
Before purchasing a flip down mechanism, accurately measure your ceiling cavity depth. In standard residential construction, this is typically the space between your finished ceiling drywall and the floor joists above—usually 10-16 inches in homes with attic access. However, you only need 4-5 inches of usable depth for the flip down mechanism itself. The remaining space accommodates wiring, the TV in its stored position, and provides working room during installation.
TV Size and Weight Considerations
Modern flip down TV lifts accommodate displays ranging from 32 to 70 inches, with weight capacities typically between 30 and 100 pounds depending on the mechanism. Verify your TV's weight and VESA mounting pattern before selecting a lift system. The VESA pattern (the mounting hole spacing on the back of your TV) must be compatible with your chosen mechanism. Most flip down systems support VESA patterns from 200x200mm up to 600x400mm, covering the majority of flat-panel televisions.
Ceiling Opening Dimensions
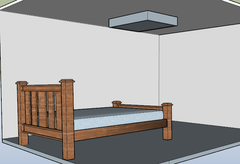
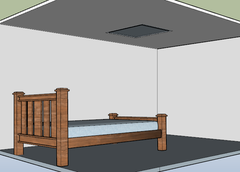
The ceiling opening should match your TV's width and height when the television is in its stored (horizontal) position. For a 55-inch TV measuring approximately 48 inches wide by 28 inches tall, plan for a ceiling cutout of roughly 49 inches by 29 inches, allowing a small clearance gap. This ensures the TV sits flush with the ceiling surface when retracted, creating a seamless appearance.
Installation Methods: With and Without Attic Access
Your installation approach varies significantly depending on whether you have accessible attic space above your ceiling. Both scenarios are achievable, but they require different planning and execution strategies.
Installation With Attic Access
When attic space is available, you can create a truly flush-mounted installation where the TV and mechanism are completely concealed within the ceiling cavity. This method provides the cleanest aesthetic and is the preferred approach for new construction or major renovations.
Step 1: Locate Ceiling Joists - Use a stud finder to locate ceiling joists in your desired installation area. The flip down mechanism must attach to structural framing, not just drywall. Ideally, position your TV so the mounting frame can secure to joists on at least two sides.
Step 2: Frame the Opening - From the attic side, frame a rectangular opening using 2x4 or 2x6 lumber, depending on your joist size. This frame provides solid mounting points and supports the finished ceiling around your cutout. Install blocking between joists to create a complete frame that matches your TV dimensions.
Step 3: Install Mounting Frame - The flip down mechanism includes a mounting frame that attaches to your ceiling framing. Secure this frame with appropriately-sized lag bolts or structural screws—typically 3-inch #10 screws into solid wood. Ensure the frame is level in all directions, as any misalignment will be visible when the TV operates.
Step 4: Rough-in Electrical - Run electrical wiring to the installation location before closing up the ceiling. You'll need 120V power for the control box and low-voltage wiring if you're installing a wall-mounted control panel or remote receiver. Some installations also incorporate HDMI or other AV cables routed through the ceiling.

Installation Without Attic Access
Many homes—particularly condominiums, apartments, or homes with cathedral ceilings—lack attic access. This doesn't eliminate the flip down TV option; it simply requires a surface-mounted approach with decorative concealment.
Surface Mounting Option - The most straightforward approach is mounting the flip down mechanism directly to the ceiling surface. While this creates a visible housing, the compact 4-inch depth of the mechanism means the protrusion is minimal. You can mount the mechanism directly to ceiling joists through the drywall using the same lag bolts or structural screws mentioned above.
Decorative Enclosure - To improve aesthetics, construct a shallow enclosure box from MDF or similar material that houses the mechanism and creates clean lines. This box mounts to the ceiling and provides a finished appearance. Consider these design enhancements:
- Paint the enclosure to match your ceiling color for a seamless look
- Add crown molding around the perimeter to make the box appear as an intentional architectural feature
- Integrate LED strip lighting within the enclosure for ambient lighting effects
- Design the box as a decorative coffered ceiling element that conceals its functional purpose
With creative finishing, a surface-mounted flip down lift becomes an attractive design element rather than a compromise. Many designers create custom millwork that transforms the mechanical housing into a focal point that complements the room's aesthetic.
Step-by-Step Installation Process
Once you've completed the framing and space preparation, installing the actual flip down mechanism follows a systematic process. This procedure applies to the FIRGELLI flip down TV lift system and similar motorized mechanisms.
Mounting the Lift Mechanism
Begin by unpacking all components and verifying you have the mounting frame, lift mechanism, power supply, control box, and all necessary hardware. Position the mounting frame in your prepared opening or on your ceiling surface, ensuring it's centered and level. Mark mounting hole locations, drill pilot holes, and secure the frame with the provided lag bolts or appropriately-sized structural fasteners. The frame must be rock-solid, as it will support the full weight of the TV plus the dynamic loads created during operation.
Attaching the TV to the Mechanism
With the mounting frame secured, attach the TV mounting plate to the back of your television using the VESA mounting holes. Use the correct bolt length for your TV's thickness—bolts that are too long can damage internal components. Once the mounting plate is secure, carefully lift the TV and attach it to the flip down mechanism's pivot arms. Most systems use safety pins or locking bolts to secure the TV in place. Have a helper assist with this step, as positioning a large TV overhead can be awkward and potentially dangerous.
Electrical Connections and Wiring
Connect the power supply to the control box according to the manufacturer's wiring diagram. The flip down mechanism uses electric linear actuators powered through the control box, which manages the synchronized movement and safety features. Wire the remote control receiver if applicable, and ensure all connections are secure and properly insulated. Route all wiring neatly to avoid interference with the mechanism's movement. Test all electrical connections before proceeding.
Testing and Adjustment
Before finalizing the installation, run the mechanism through several complete cycles. The TV should lower smoothly from the stored position, rotate to the viewing angle, and return to the stored position without binding, hesitation, or unusual noise. Most flip down systems include adjustable limit switches that control the stopping points. Adjust these so the TV stops at the optimal viewing angle when extended and sits perfectly flush with the ceiling when retracted. Fine-tune the speed settings if your control box offers this feature—slower operation is generally quieter and appears more refined.
Finishing and Trim Work
The finishing details determine whether your flip down TV lift looks professionally installed or obviously aftermarket. Take time with this phase to achieve a polished result.
Drywall and Ceiling Finish
If you've created a recessed opening, the perimeter must be finished cleanly. Apply corner bead around the opening edges and finish with joint compound, feathering the edges for a seamless transition. Sand smooth and paint to match your existing ceiling. For surface-mounted installations with an enclosure box, finish the box with paint or wallcovering that coordinates with your room design.
Trim and Molding Options
Adding trim around the TV opening elevates the installation from functional to refined. Consider these approaches:
- Minimalist Trim - A simple, flat casing in a complementary finish creates clean lines
- Crown Molding Integration - Extend or add crown molding around the TV opening to make it appear intentional
- Coffered Ceiling Effect - Frame the TV area as a coffered panel with decorative molding for an upscale appearance
- Backlit Panels - Install a backlit acrylic or fabric panel around the opening for a modern, sophisticated look
Control Systems and Automation
Modern flip down TV lifts integrate with various control systems, from simple RF remotes to sophisticated home automation platforms. Understanding your options helps you choose the right control solution for your needs and budget.
Basic Remote Control
Most flip down mechanisms include a handheld RF remote control that operates the lift with up/down buttons. These remotes typically work through walls and furniture, providing convenient operation from anywhere in the room. The control box receives the RF signal and activates the actuators accordingly. This basic system is reliable, affordable, and sufficient for most residential applications.
Wall Switch Integration
For a more permanent control solution, install a wall-mounted switch panel. These typically feature momentary rocker switches for up/down operation and can be positioned near your seating area or at the room entrance. Wall switches provide a clean, architectural control interface that doesn't require keeping track of a remote.
Smart Home Integration
Advanced installations integrate the flip down TV lift with home automation systems. Many control boxes accept trigger inputs that can be activated by automation controllers like Control4, Crestron, or Savant. This enables scenarios like "When I press 'Watch Movie,' lower the TV, dim the lights, and close the shades." Even DIY home automation platforms like Arduino or Raspberry Pi can control flip down lifts through relay modules, offering cost-effective customization.
Design Applications and Use Cases
Flip down TV lifts solve unique design challenges across various residential spaces. Understanding common applications helps you identify opportunities in your projects.
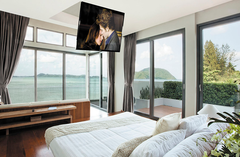
Bedroom Installations
Installing a flip down TV at the foot of a bed creates the ultimate viewing experience. The TV descends at the perfect viewing angle for someone reclining in bed, then retracts completely to maintain the room's peaceful, uncluttered aesthetic. This application is particularly popular in master suites and luxury bedroom designs where space is at a premium and maintaining a serene environment is important.
Living Room Applications
In formal living rooms or spaces with prominent fireplaces, a flip down TV allows you to preserve the room's design integrity. Rather than mounting a large black rectangle above a beautiful fireplace mantel, the TV remains hidden until needed. When guests arrive, your living room showcases your décor and architectural features rather than consumer electronics.
Outdoor and Covered Patio Spaces
Covered patios and outdoor living areas benefit significantly from flip down TV installations. The ceiling-mounted location protects the TV from weather when stored, while the flip-down operation provides viewing when entertaining. Select mechanisms rated for outdoor use or ensure your installation provides adequate weather protection. Pair with weatherproof power supplies and control systems for reliable operation in these environments.
Maintenance and Troubleshooting
Flip down TV lifts require minimal maintenance, but understanding basic upkeep and troubleshooting extends system life and ensures reliable operation.
Routine Maintenance
Every 6-12 months, cycle the mechanism several times and listen for any unusual sounds indicating wear or misalignment. Check that all mounting bolts remain tight, as vibration can gradually loosen fasteners. Keep the mechanism clean by gently removing any dust accumulation—particularly around pivot points and actuator rods. Avoid using harsh chemicals or excessive moisture during cleaning.
Common Issues and Solutions
Mechanism Won't Operate - First, verify power supply connections and check that the control box is receiving power. Test the remote control batteries if applicable. If power is present but the mechanism doesn't respond, check limit switch settings—switches set incorrectly can prevent operation.
Uneven or Jerky Movement - This typically indicates one actuator is working harder than the other, often due to uneven TV weight distribution or binding in the mechanism. Ensure the TV is centered on the mounting plate and all pivot points move freely. Check that the mounting frame remains level and hasn't shifted over time.
Mechanism Stops Mid-Cycle - Most control boxes include overload protection that stops operation if resistance exceeds safe levels. This can occur if something obstructs the TV's path or if the actuators are struggling due to increased friction. Remove any obstructions and verify all moving parts operate smoothly. Persistent issues may indicate actuator wear requiring replacement.
Professional vs. DIY Installation
Deciding whether to hire professionals or tackle installation yourself depends on your skills, available time, and project complexity.
DIY Installation Considerations
A competent DIYer with basic carpentry, electrical, and drywall skills can successfully install a flip down TV lift. You'll need standard tools including a drill, level, stud finder, saw, and possibly drywall finishing tools. The electrical work is straightforward—similar to installing a ceiling fan—but must comply with local electrical codes. The most challenging aspects are creating a clean ceiling opening and ensuring the mounting frame is perfectly level and structurally sound. Budget 1-2 days for a complete installation including finishing work.
When to Hire Professionals
Consider hiring professionals for installations involving:
- Complex ceiling structures or cathedral ceilings requiring custom framing
- Integration with existing home automation systems
- Historical homes where ceiling modifications require special care
- High-value televisions where installation errors could result in costly damage
- Commercial applications requiring code compliance documentation
Professional installers typically charge $800-2,000 for flip down TV lift installation depending on complexity and regional labor rates. This cost covers framing, electrical work, mechanism installation, and finishing.
Video Installation Guide
For a visual walkthrough of the installation process, watch this comprehensive video guide demonstrating flip down TV lift installation from start to finish:
Conclusion
Installing a motorized flip down TV lift transforms how you integrate technology into your living spaces. Whether you're working with abundant attic space or adapting a room without ceiling access, flip down mechanisms offer a practical, space-efficient solution that vertical drop systems simply cannot match. The compact 4-5 inch depth requirement opens possibilities for virtually any residential application, while the clean aesthetic of a ceiling-mounted TV preserves your room's design integrity.
Success with flip down TV lift installation comes down to thorough planning, precise execution during the mounting phase, and attention to finishing details. Take time to accurately measure your space, select the appropriate mechanism for your TV size and weight, and ensure your mounting frame is rock-solid and perfectly level. Whether you choose to tackle the installation yourself or hire professionals, understanding the process helps you achieve optimal results.
The FIRGELLI flip down TV lift mechanism represents years of engineering refinement in motion control systems, bringing the same precision and reliability found in our linear actuators to the residential TV lift market. From initial planning through final operation, a well-executed flip down installation delivers years of reliable, impressive performance that enhances both the functionality and aesthetic of your home.
Frequently Asked Questions
How much ceiling space do I need for a flip down TV lift?
A flip down TV lift requires only 4-5 inches of ceiling cavity depth—significantly less than vertical drop systems that need 35-40 inches. This compact profile includes the mechanism thickness (approximately 4 inches) plus your TV's thickness (typically 1-3 inches). The ceiling opening dimensions should match your TV's width and height to allow the television to sit flush with the ceiling when stored. For homes without attic access, you can surface-mount the mechanism and build a shallow enclosure box, which protrudes only 4-5 inches from the ceiling surface.
What size TV can a flip down mechanism support?
Most residential flip down TV lift mechanisms accommodate televisions ranging from 32 to 70 inches with weight capacities between 30 and 100 pounds. The determining factors are the TV's weight and VESA mounting pattern rather than screen size alone. Before purchasing, verify your TV's specifications against the mechanism's capacity. The VESA pattern (mounting hole spacing) must be compatible—most flip down systems support patterns from 200x200mm up to 600x400mm, covering the majority of modern flat-panel TVs. Always check your specific TV model's weight and VESA specifications before selecting a lift mechanism.
Can I install a flip down TV lift without attic access?
Yes, flip down TV lifts can be installed without attic access using surface-mounting techniques. The most straightforward approach is mounting the mechanism directly to the ceiling, securing it to ceiling joists through the drywall. While this creates a visible housing, the compact 4-inch depth keeps the protrusion minimal. You can enhance aesthetics by building a decorative MDF enclosure around the mechanism and finishing it with paint, crown molding, or other architectural details. Many successful installations in condominiums and homes without attic space use this approach, creating an attractive design feature rather than a compromise.
How do flip down TV lifts integrate with smart home systems?
Flip down TV lifts can integrate with smart home systems at various levels depending on your control box capabilities. Basic systems use RF remote controls that operate independently. Intermediate installations can connect to wall switches for convenient manual control. Advanced integration with systems like Control4, Crestron, or Savant requires a control box that accepts trigger inputs or relay commands. Many flip down mechanisms work with these professional automation systems through simple relay interfaces. DIY enthusiasts can also control flip down lifts using Arduino, Raspberry Pi, or other programmable controllers through relay modules, enabling custom automation scenarios like synchronized operation with lighting, shades, and audio systems.
What maintenance does a flip down TV lift require?
Flip down TV lifts require minimal maintenance for reliable long-term operation. Every 6-12 months, cycle the mechanism several times while listening for unusual sounds that might indicate wear or misalignment. Check that all mounting bolts remain tight, as vibration can gradually loosen fasteners over time. Keep the mechanism clean by gently removing dust accumulation around pivot points and actuator rods using a soft cloth—avoid harsh chemicals or excessive moisture. If you notice uneven movement, verify the TV remains centered on the mounting plate and all pivot points move freely. Most quality flip down mechanisms using electric linear actuators provide years of trouble-free operation with this basic maintenance routine.


