Maximizing Your Outdoor TV Lift Cabinet with Media Device Integration
Modern outdoor entertainment systems demand more than just a weatherproof television. Today's outdoor viewing experience includes streaming devices, gaming consoles, DVRs, Blu-ray players, and cable boxes—all of which need secure mounting within your outdoor TV lift cabinet. The challenge isn't just about finding space; it's about creating a clean, functional installation that maintains equipment accessibility while protecting expensive electronics from the elements.
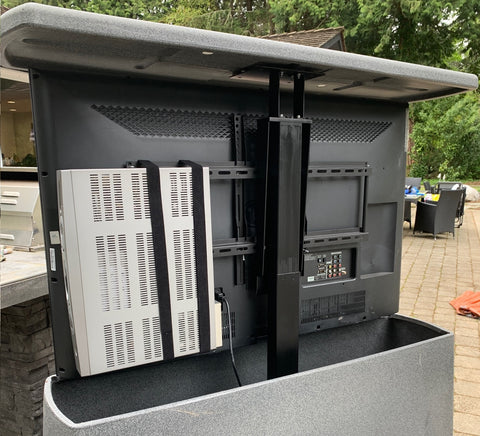
🎥 Video — How to attach a PVR, DVD player, or Xbox etc, to an Aprilia outdoor TV lift cabinet
FIRGELLI Automations' outdoor TV lift cabinets solve this integration challenge through intelligent design and thoughtful engineering. Every cabinet includes industrial-strength mounting solutions that allow you to attach multiple peripherals directly to the lift mechanism itself. This approach keeps all your equipment consolidated, protected, and perfectly synchronized with your television's movement—whether it's rising for a movie night or retracting to weather the elements.
In this comprehensive guide, we'll walk you through the proven methods for mounting PVRs, gaming consoles, streaming devices, and other media equipment to your outdoor TV lift system. You'll learn professional installation techniques that ensure secure mounting, proper cable management, and maintained remote control functionality—all while keeping your setup elegantly concealed.
Understanding Outdoor TV Lift Cabinet Mechanics
Before diving into installation methods, it's important to understand how outdoor TV lifts function. These systems use precision linear actuators to smoothly raise and lower your television from a protected cabinet enclosure. The lift mechanism consists of a rigid frame structure with dual mounting rails that support the TV bracket assembly. This dual-rail design isn't just for stability—it creates valuable real estate for mounting additional equipment.
The lifting mechanism must handle not only the television's weight but also any attached peripherals. Standard outdoor TV lift systems accommodate total loads ranging from 50 to 150 pounds, depending on the model. When planning your media device installation, always verify that your combined equipment weight remains well within the lift's rated capacity to ensure smooth operation and longevity.
The Industrial-Strength Velcro Mounting System
Every FIRGELLI outdoor TV lift cabinet includes professional-grade Velcro mounting strips specifically designed for securing media devices. These aren't consumer-grade adhesive strips—they're industrial hook-and-loop fasteners rated for continuous load-bearing applications. The 1-inch wide strips provide exceptional holding power, with proper installation supporting devices weighing up to 15 pounds per strip.
The Velcro system offers several distinct advantages over traditional mounting brackets or shelves. First, it allows for tool-free installation and repositioning, making it easy to adjust your setup as your equipment changes. Second, the flexible mounting system absorbs vibration during the lift's movement, reducing wear on both the devices and their cable connections. Third, the low-profile design ensures devices remain hidden from the front view while maintaining infrared remote accessibility from the sides.
Velcro Strip Specifications and Placement
The included mounting strips feature an aggressive adhesive backing designed to bond permanently with powder-coated steel surfaces. Each strip consists of both hook and loop sides, allowing you to create custom mounting configurations. For optimal holding strength, clean all mounting surfaces with isopropyl alcohol before applying the adhesive backing, and allow 24 hours for the adhesive to reach full bond strength before loading devices.
Strategic placement is crucial for balanced weight distribution. Position devices as close to the center of the lift mechanism as possible to minimize lateral stress on the actuator system. The dual-rail design allows you to distribute multiple devices across both sides of the frame, creating a balanced load that promotes smooth, quiet operation.
Step-by-Step Installation Guide for Media Devices
Installing your PVR, DVD player, gaming console, or other media equipment requires careful planning and proper technique. Follow this professional installation sequence to ensure secure mounting and reliable long-term performance.
Preparation and Planning
Begin by inventorying all devices you plan to mount and their respective weights. Most cable boxes, DVRs, and streaming devices weigh between 2-8 pounds, while gaming consoles like Xbox or PlayStation units typically range from 6-10 pounds. Document the dimensions of each device, noting particularly the locations of ventilation ports—these must never be obstructed by mounting straps or adjacent surfaces.
Next, determine optimal placement for each device. Devices that require frequent interaction, like Blu-ray players, should mount on the side most accessible to your typical viewing position. Devices that rarely need physical interaction, such as cable boxes or streaming devices, can mount on either side based on cable routing considerations. Always maintain at least 1 inch of clearance around ventilation openings to prevent heat buildup.
Surface Preparation and Velcro Application
Clean both the mounting bracket surface and the device casing with isopropyl alcohol. Allow surfaces to dry completely—any residual moisture or oils will compromise adhesive bond strength. Cut Velcro strips to appropriate lengths, typically 3-6 inches per mounting point. For most devices, four mounting points provide optimal security: two near the front edge and two near the rear.
Apply the hook side of the Velcro to your media device casing, positioning strips to avoid ventilation ports, indicator lights, and button access. Press firmly for 30 seconds to ensure proper adhesion. Apply the corresponding loop side to the TV lift's mounting bracket or side rails, ensuring alignment with the device-mounted strips. Some installers prefer to temporarily position the device first, marking strip locations with a pencil before applying adhesive backing.
Device Mounting and Positioning
After allowing the adhesive to cure for 24 hours, you can mount your devices. Press each device firmly against its corresponding Velcro strips, applying pressure for 15-20 seconds to ensure full engagement. The device should sit flush against the mounting surface with no gaps or tilting. Test the hold by gently pulling on the device—it should resist movement with no slippage or peeling.
Position devices to maintain clearance from the television panel itself. Most installations benefit from mounting devices approximately 1-2 inches behind the rear edge of the TV, ensuring they remain completely hidden from front view while maintaining infrared remote control line-of-sight from the sides. For devices with front-panel displays or indicators you want to monitor, consider mounting them slightly forward or on the outer edge of the bracket assembly.
Cable Management and Connection
Proper cable routing is essential for reliable operation and clean aesthetics. Route HDMI, power, and network cables along the lift mechanism's structural members, securing them with cable ties at 8-12 inch intervals. Avoid tight bends in HDMI cables, which can damage internal conductors—maintain a minimum bend radius of 1 inch. Leave appropriate service loops at connection points to accommodate the lift's full range of motion without creating tension on connectors.
For outdoor installations, all cable entry points into the cabinet must be properly sealed against moisture intrusion. Use waterproof cable glands or silicone sealant at penetration points. Consider using weatherproof connectors or cable boots on exposed connections to prevent corrosion from humidity and temperature cycling.
Advanced Mounting Configurations
Complex entertainment systems often require mounting multiple devices, each with specific requirements and considerations. The dual-rail design of FIRGELLI outdoor TV lift systems accommodates various multi-device configurations while maintaining balanced weight distribution and clean aesthetics.
Multiple Device Installations
When mounting multiple devices, distribute weight evenly between both sides of the lift mechanism. A typical configuration might place a cable box and streaming device on one side, with a gaming console and external storage device on the opposite side. This balanced approach minimizes lateral stress on the actuator system and promotes quieter, smoother operation.
Stack lighter devices vertically when horizontal space is limited, but maintain minimum clearances between units. Most electronics require at least 0.5 inches of separation to prevent heat transfer between devices. Use additional Velcro strips between stacked devices to prevent shifting during lift operation while maintaining these critical clearances.
Gaming Console Mounting Considerations
Gaming consoles present unique mounting challenges due to their size, weight, and ventilation requirements. Modern consoles like Xbox Series X, PlayStation 5, and gaming PCs generate significant heat and require robust ventilation. When mounting these devices, prioritize ventilation clearance over compact installation—overheating will reduce performance and lifespan.
For disc-based consoles, orientation matters. Most disc drives are designed for horizontal operation, and vertical mounting can increase wear on drive mechanisms. Consult manufacturer specifications before mounting any console vertically. Additionally, consider mounting gaming consoles with their indicator lights and disc slots facing outward for easier monitoring and access.
Satellite Receivers and Cable Boxes
Satellite receivers and DVR cable boxes often include internal hard drives that are sensitive to shock and vibration. While the smooth operation of electric linear actuators minimizes vibration, ensure these devices are securely mounted with all four corners supported by Velcro strips. The rigid mounting prevents resonance vibration that could potentially affect hard drive performance or longevity.
Many modern cable boxes feature tuning adapters, CableCARD slots, or external storage connections on their rear panels. Ensure these ports remain accessible by mounting devices with adequate rear clearance or positioning them where the installer can access rear connections without removing the unit from the lift assembly.
Maintaining Remote Control Functionality
One of the key design advantages of side-mounting media devices on TV lift mechanisms is preserved infrared remote control functionality. Most remote controls use infrared line-of-sight communication, requiring clear visibility between the remote and the device's IR receiver. Side-mounting positions devices where IR signals can reach them from typical seating positions without obstruction by the television panel.
For devices with IR receivers on their front panels, ensure these panels face outward from the lift mechanism with no obstructions. Test remote functionality at various angles from your primary seating area before finalizing device placement. In challenging installations where direct line-of-sight is difficult, consider adding IR repeater systems that extend remote control range and eliminate line-of-sight requirements entirely.
IR Repeater Systems
IR repeater systems consist of an IR receiver that mounts in a visible location (typically on the TV frame or cabinet front) and IR emitters that attach directly to each device's IR receiver window. These systems capture IR remote signals and repeat them via wired emitters, allowing perfect hidden mounting of devices without sacrificing remote control capability. Most repeater systems support 4-8 devices and operate from the same power supply as your other equipment.
Weatherproofing and Environmental Protection
Outdoor TV lift cabinets provide primary protection against weather, but proper device mounting enhances that protection. Devices mounted flat against vertical surfaces shed water more effectively than horizontally-oriented installations. Ensure no horizontal surfaces exist where water could pool—even inside a weatherproof cabinet, condensation can occur during temperature swings.
In high-humidity environments, consider adding desiccant packets or small dehumidifier units inside the cabinet to control moisture levels. Electronics are particularly vulnerable to corrosion in coastal environments where salt-laden air accelerates oxidation of connectors and circuit boards. Regular inspection of cable connections and device ventilation ports helps identify early signs of corrosion before they cause failures.
Temperature Management
Enclosed cabinets can trap heat generated by electronic devices, especially during summer months. Ensure your outdoor TV lift cabinet includes adequate ventilation—most quality cabinets feature screened vents positioned to promote convective airflow while excluding insects and debris. Never block these ventilation openings when mounting devices.
In extreme climate installations, consider adding a thermostatically-controlled ventilation fan to actively exhaust heat during operation. Small 12V computer-style fans draw minimal power and can significantly reduce internal cabinet temperatures. Connect these fans to the same power supply system that powers your TV lift and media devices for integrated operation.
Troubleshooting and Maintenance
Properly installed Velcro-mounted devices require minimal maintenance, but periodic inspection ensures continued reliable operation. Every 6-12 months, verify that all Velcro attachments remain secure with no signs of peeling or weakening adhesive bonds. Check cable routing for any signs of wear, particularly at flex points where cables bend during lift operation.
Common Installation Issues and Solutions
If devices become loose or shift during lift operation, the most common cause is insufficient curing time before loading the Velcro strips. Re-secure any loose devices and avoid operating the lift for 24 hours. For heavier devices showing signs of movement, add additional Velcro strips to increase contact area and holding force.
Remote control functionality issues typically stem from obstructed IR receivers or devices mounted with their IR sensors facing inward. Reposition affected devices so their front panels face outward, or implement an IR repeater system to eliminate line-of-sight requirements.
If the TV lift operates roughly or makes unusual noises after adding media devices, verify that total system weight remains within rated capacity and that weight distribution is balanced between both sides of the mechanism. Unbalanced loads create lateral stress on the linear actuators, causing premature wear and reduced performance.
Professional Installation Tips and Best Practices
Drawing on years of experience with TV lift installations, here are professional tips that ensure optimal results:
- Plan cable routes before mounting devices – Route and secure all cables first, then mount devices. This approach prevents the need to remove devices later for cable management.
- Label everything – Use label makers or tags to identify cables, particularly power supplies and HDMI connections. This simple step saves hours during troubleshooting or future modifications.
- Create service loops – Leave 6-12 inches of extra cable length at each connection point. This slack accommodates lift movement and makes device removal much easier for service.
- Test before finalizing – Cycle the lift through its full range of motion several times before permanently securing cables and finalizing device positions. Listen for any unusual sounds and watch for cable binding or tension.
- Document your installation – Take photos of your completed installation from multiple angles. These photos prove invaluable for future troubleshooting or when explaining your setup to service technicians.
- Use surge protection – Install a quality surge protector inside the cabinet to protect all connected devices. Outdoor installations face higher risk of power fluctuations and nearby lightning strikes.
Creating Your Complete Outdoor Entertainment System
Properly mounting media devices to your outdoor TV lift cabinet transforms a simple television installation into a complete, professional-grade entertainment system. The Velcro mounting system included with FIRGELLI outdoor TV lifts provides secure, flexible mounting that accommodates multiple devices while maintaining clean aesthetics and reliable remote control functionality. By following the professional installation techniques outlined in this guide, you'll create a setup that delivers years of reliable outdoor entertainment while protecting your investment in premium electronics.
The key to success lies in careful planning, proper weight distribution, and attention to environmental factors like ventilation and moisture protection. Take time during installation to ensure all devices are securely mounted, cables are properly routed, and remote control functionality is verified from your primary viewing positions. The extra effort invested in a quality installation pays dividends in reliability, convenience, and enjoyment of your outdoor entertainment space.
Frequently Asked Questions
What is the maximum weight I can mount to my outdoor TV lift?
The total weight capacity varies by TV lift model, but most outdoor TV lift systems accommodate combined loads of 50-150 pounds, including both the television and any mounted peripherals. Always verify your specific lift model's rated capacity and ensure your television plus all media devices remains at least 10-15% below the maximum rating. This safety margin ensures smooth operation and extends actuator lifespan. The Velcro strips themselves can support approximately 15 pounds per 1-inch strip when properly installed, but the lift mechanism's overall capacity is the limiting factor.
Can I mount any type of device to the TV lift mechanism?
You can mount most standard consumer electronics including cable boxes, DVRs, satellite receivers, streaming devices, gaming consoles, Blu-ray players, sound bars, and network storage devices. The primary requirements are that devices must have flat mounting surfaces for Velcro attachment, adequate ventilation clearances must be maintainable, and total system weight must remain within the lift's rated capacity. Devices with internal hard drives should be mounted securely with all corners supported to minimize vibration exposure. Avoid mounting devices that generate excessive heat or require frequent physical interaction unless they're positioned for easy access.
How do I ensure proper ventilation for mounted devices?
Maintain at least 1 inch of clearance around all ventilation ports and heat-dissipating surfaces. Position devices so airflow paths remain unobstructed—never mount a device with its ventilation ports facing a solid surface. For multiple stacked devices, leave minimum 0.5-inch spacing between units to prevent heat transfer. In enclosed cabinets, verify that the cabinet itself has adequate ventilation vents positioned for convective airflow. For high-heat devices like gaming consoles or AV receivers, consider adding thermostatically-controlled ventilation fans to actively exhaust heat during operation. Regular inspection of device temperatures helps identify inadequate ventilation before it causes failures.
What if I need to replace or service a mounted device?
The Velcro mounting system allows easy device removal for service or replacement. Simply pull the device away from its mounting surface—the hook-and-loop connection separates cleanly. The Velcro strips remain attached to both the device and mounting surface, allowing you to press the device back into place after service. If you're permanently replacing a device, peel the old Velcro strips from the removed device and apply new strips to the replacement unit, aligning them with the existing strips on the mounting surface. For devices requiring frequent access, consider mounting them on the most accessible side of the lift mechanism or positioning them where they can be reached without removing other equipment.
Why doesn't my remote control work with side-mounted devices?
Most remote control issues with side-mounted devices stem from three causes: IR receivers facing inward toward the lift mechanism rather than outward toward the viewing area, obstructions blocking line-of-sight between the remote and device, or mounting positions outside the remote's effective range. To resolve these issues, first verify that device front panels (where IR receivers are typically located) face outward with clear line-of-sight from your primary seating positions. Test remote functionality from various angles to identify the optimal device orientation. If line-of-sight remains problematic due to cabinet design or viewing angles, install an IR repeater system that eliminates line-of-sight requirements by using wired IR emitters placed directly on each device's IR receiver window.
How long will the Velcro mounting hold? Will it weaken over time?
Industrial-grade hook-and-loop fasteners maintain their holding strength for many years when properly installed and not subjected to excessive loading or environmental extremes. The adhesive backing typically provides the strongest bond after 24-72 hours of curing time and maintains full strength indefinitely when applied to clean, dry surfaces. The hook-and-loop engagement itself can be cycled thousands of times before showing any degradation in holding power. In outdoor TV lift applications where devices remain mounted continuously, you can expect 5-10 years of reliable service before any replacement becomes necessary. Periodic inspection every 6-12 months allows early detection of any weakening adhesive bonds, though this is rare in properly prepared installations. If you need to reposition devices frequently, the Velcro strips can handle dozens of attachment cycles before the hooks begin to show wear.


