Mounting Media Components to Your TV Lift: A Complete Guide
Modern home entertainment systems rarely consist of just a television. Cable boxes, DVRs, streaming devices, gaming consoles, and Blu-ray players are essential components that need to travel with your TV when using a tv lift mechanism. Without proper mounting, these devices become an awkward tangle of cables and equipment that defeats the elegant concealment a TV lift provides.
🎥 Video — How to attach a PVR or DVD player etc to a Firgelli TV Lift Mechanism
The challenge is straightforward: how do you securely attach auxiliary equipment to a motorized lift system that operates vertically, often multiple times per day, without drilling into expensive electronics or creating permanent modifications? The solution is simpler than most installers expect, requiring only industrial-strength velcro straps and a few minutes of installation time. This method works across all FIRGELLI tv lifts, from floor-mounted cabinet systems to ceiling-drop configurations, and can accommodate multiple devices on a single lift mechanism.
In this guide, we'll walk through the complete process of mounting PVRs, DVRs, streaming boxes, and other media components to your TV lift mechanism using a proven velcro mounting system that's been tested across thousands of installations. We'll also address common concerns about weight capacity, remote control functionality, cable management, and device positioning for optimal performance.
Why Velcro Mounting Is the Ideal Solution
When engineering a mounting solution for auxiliary components on a TV lift system, several requirements must be satisfied simultaneously. The mounting method must be strong enough to support the device through hundreds of lift cycles, yet remain non-permanent and adjustable. It needs to accommodate devices of varying sizes and weights while maintaining a clean, professional appearance.
Industrial-grade velcro straps excel in this application for several reasons. First, they provide exceptional holding strength—commercial-grade velcro strips can typically support 10-15 pounds per square inch of contact area, far exceeding the weight of any standard media component. A typical cable box weighs 2-4 pounds, while most DVR units range from 4-8 pounds, well within the capacity of even modest velcro installations.
Unlike permanent mounting solutions such as brackets or screws, velcro allows for complete reversibility. If you upgrade equipment, change TV sizes, or modify your entertainment setup, the velcro can be removed and repositioned without leaving damage. This flexibility is particularly valuable in rental properties or situations where the AV setup may evolve over time.
The soft, cushioned nature of velcro also provides vibration dampening. As the tv lift mechanism operates, the velcro straps absorb minor vibrations that could otherwise be transmitted to the mounted devices. This protection is especially important for equipment with hard drives, such as DVRs, where mechanical shock could potentially cause issues over time.
Materials and Tools Required
The beauty of this installation method lies in its simplicity. You'll need minimal materials and no specialized tools beyond what most households already have available. The primary component is industrial-grade, double-sided velcro strapping, which features hook-style fasteners on one side and loop-style on the other. This configuration allows the strap to grip itself when wrapped around both the lift mechanism and the device.
For optimal results, use velcro straps that are at least 1 inch wide. Wider straps distribute the load more effectively and provide greater holding strength. The total length needed depends on your specific TV lift model and the size of devices you're mounting, but 45-50 inches per strap provides enough length to wrap around the lift arms and most standard media components with room for adjustment.
You'll need a minimum of two straps per device—one positioned near the front of the device and one near the rear—to prevent tilting or rotation during lift operation. For larger or heavier devices, consider using three or four straps for additional security and load distribution.
Beyond the velcro straps, the only other tool required is a good pair of scissors or a utility knife for cutting the straps to the appropriate length. Some installers prefer to have cable ties or velcro cable wraps on hand to manage the power and signal cables that will also need to travel with the mounted devices.
Step-by-Step Installation Process
Measuring and Cutting the Velcro Straps
Begin by measuring the circumference around your TV lift's mounting bars where you plan to position the device. FIRGELLI TV lift mechanisms typically feature horizontal mounting arms that extend from the central lifting column—these arms are ideal attachment points. Add the width and depth of your device to this measurement, then add an additional 8-10 inches for overlap and adjustment flexibility.
Cut at least two straps to this length. For the initial installation, err on the side of cutting the straps slightly longer than you think necessary. You can always trim excess velcro after testing the fit, but straps that are too short will need to be replaced entirely. Having extra length available during the initial fitting process makes positioning and adjustment much easier.
Attaching the First Strap to the Lift Mechanism
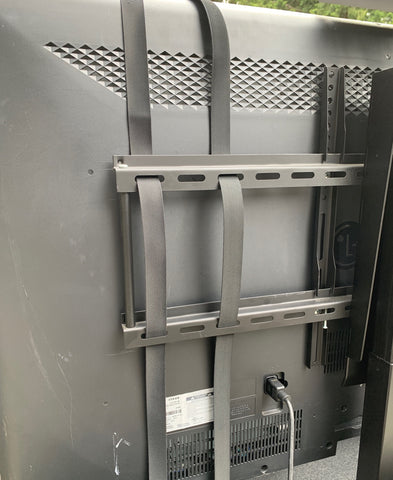
With the TV lift in the raised position, identify the upper and lower horizontal mounting bars that hold your television. These bars are standard on all FIRGELLI TV lift models, including the floor-mounted TVL-180 and the rear-mounted TVL-170 configurations. Position your first velcro strap around the lower mounting bar, approximately one-quarter of the way in from the side where you plan to mount your device.
Wrap the strap completely around the mounting bar once, ensuring the hook side faces outward. This creates a secure anchor point that won't slip during operation. The double-wrap technique, where the strap passes around the bar twice before extending to the device, provides additional security for heavier components but requires longer straps.
Positioning and Securing the Device
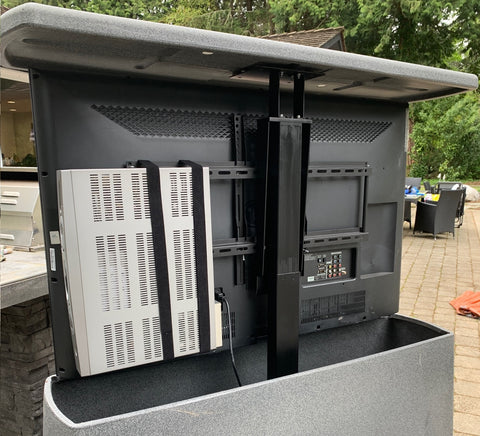
Before permanently securing the device, consider its optimal position relative to the television. Most installers position media components flush with the side edge of the TV, which keeps them concealed from the viewing position while still allowing infrared remote control signals to reach the device through signal bounce and reflection.
Place your device against the mounting bars in the desired position, then bring the free end of the velcro strap around the device. Wrap the strap snugly—it should be tight enough to prevent any movement but not so tight that it compresses or deforms the device housing. Press the velcro firmly together, ensuring maximum contact between the hook and loop surfaces for optimal holding strength.
Repeat this process with the second strap positioned near the opposite end of the device. The two-strap configuration prevents the device from tilting forward or backward during lift operation. For devices longer than 12 inches or heavier than 6 pounds, add a third strap in the center for additional support and stability.
Testing the Installation
Before considering the installation complete, test the entire system through multiple lift cycles. Using your TV lift's remote control, operate the lift through its full range of motion several times, observing the mounted device carefully during both ascent and descent. Listen for any unusual sounds that might indicate the device shifting or the straps slipping.
Check that all velcro connections remain secure and that the device maintains its position relative to the TV throughout the entire travel range. If you notice any movement or instability, lower the lift, tighten the straps, or add additional straps as needed. A properly installed device should remain completely stationary relative to the TV during operation, with no visible shifting or rotation.
Mounting Multiple Devices on One Lift
One significant advantage of TV lift systems is their ability to accommodate multiple auxiliary components simultaneously. The bilateral design of FIRGELLI TV lift mechanisms, with mounting bars extending on both sides of the central lift column, allows devices to be mounted on either or both sides of the television.
When mounting multiple devices, balance is important for smooth operation and long-term reliability. If you're installing two devices of similar weight, position them on opposite sides of the TV to maintain even weight distribution across the lift mechanism. This balanced configuration reduces stress on the linear actuator motor and mounting hardware, contributing to longer system life and quieter operation.
For three or more devices, arrange them to keep the center of gravity as close to the lift column centerline as possible. Most FIRGELLI TV lift systems can accommodate 10-15 pounds of additional equipment beyond the television weight without any performance impact, though it's always advisable to check the specific weight capacity of your particular model.
When positioning multiple devices, consider their ventilation requirements. Electronics generate heat during operation, and proper airflow is essential for reliability and longevity. Leave at least one inch of clearance between devices and between devices and the TV to ensure adequate air circulation. Avoid stacking devices directly on top of each other unless the manufacturer specifically designs them for stacked installation.
Remote Control Functionality and IR Signal Management
A common concern when side-mounting media components is whether remote controls will continue to function properly when the device's infrared receiver isn't facing the viewer. Fortunately, the physics of infrared signal propagation make side-mounting entirely practical in most home theater environments.
Infrared signals used by consumer electronics remote controls are highly reflective and diffuse readily off walls, ceilings, furniture, and even the TV screen itself. When you press a button on your remote, the IR signal radiates outward in a cone pattern, bouncing off multiple surfaces before reaching the target device. This signal bounce means that devices mounted flush with the TV's side edge remain fully functional for remote control operation in typical viewing environments.
For installations where remote control reliability is critical—such as in very large rooms or environments with significant IR interference—consider positioning devices with their front panels angled slightly outward rather than perfectly flush with the TV edge. A five to ten-degree angle provides direct line-of-sight to the IR receiver while maintaining a reasonably concealed appearance.
Alternatively, IR repeater systems can extend remote control functionality to devices in challenging positions. These systems use a small IR receiver positioned in the viewing area connected to IR emitters that attach directly to the mounted devices' IR receivers, ensuring reliable control regardless of device orientation or position.
Cable Management for Mounted Devices
Mounting the physical device is only half the installation challenge—managing the power and signal cables that connect to your media components requires equal attention for a professional result. The cables must have enough length and flexibility to travel with the TV through its full lift range without binding, pulling, or creating strain on the connectors.
Start by measuring the total travel distance of your TV lift system and add at least 12-18 inches of slack to each cable. This extra length accommodates the cable routing path around the lift mechanism and prevents tension during operation. Use high-quality cables rated for repeated flexing—standard consumer cables can develop internal breaks when subjected to the constant bending that occurs during lift operation.
Secure cables to the TV lift structure using velcro cable wraps or cable ties at regular intervals, but avoid over-tightening these fasteners. The cables should be loosely guided along the lift path, not rigidly clamped in place. Create gentle service loops in the cables near both the device and the connection points to absorb any minor cable movement during operation.
For AC power cables, ensure adequate capacity on your power source for all connected devices. Most TV lift installations include a power strip or surge protector mounted within the lift cabinet or concealment structure. Choose a power supply outlet with enough receptacles for your TV, all mounted devices, and the lift mechanism's control system.
Weight Capacity and Load Considerations
Understanding the weight limitations of both your TV lift system and the velcro mounting method is essential for safe, reliable operation. FIRGELLI TV lift mechanisms are engineered with substantial weight capacity reserves, but exceeding these limits can cause premature wear, reduced performance, or system failure.
Each FIRGELLI TV lift model has a specified maximum weight capacity that includes the television and all mounted accessories. The TVL-180 floor-mounted lift, for example, can typically accommodate total loads of 100-150 pounds depending on the specific configuration and stroke length. Always consult your lift's specifications to determine available capacity after accounting for your television's weight.
The velcro mounting method itself provides impressive strength when properly implemented. Industrial-grade velcro straps with the recommended two-strap minimum configuration can easily support devices weighing up to 20 pounds. The limiting factor is almost never the velcro's holding strength but rather the TV lift's overall weight capacity and load distribution.
When mounting particularly heavy devices—such as high-end AV receivers or gaming consoles—consider the weight distribution across the lift mechanism. Mounting one extremely heavy device on one side while leaving the other side empty creates an unbalanced load that can strain the lift's guidance system and reduce smoothness of operation. In these cases, either mount a counterbalancing device on the opposite side or position the heavy device as close to the lift column centerline as possible.
Compatibility Across FIRGELLI TV Lift Models
The velcro mounting method described in this guide works universally across all FIRGELLI TV lift product lines, though the specific implementation may vary slightly depending on the lift configuration and mounting geometry. Understanding these variations helps ensure successful installation regardless of which lift model you're working with.
Floor-mounted lifts like the TVL-180 provide the most straightforward mounting scenario, with horizontal mounting bars that are easily accessible and offer abundant space for device attachment. These lifts typically have the greatest weight capacity and the most flexibility for mounting multiple devices on both sides of the television.
Ceiling-drop lifts and cabinet-concealed models may have more constrained space around the mounting area, requiring more careful device positioning to ensure adequate clearance during operation. In these installations, measure the available space when the lift is in the fully raised position to confirm your devices will fit without interference.
Rear-mounted lifts like the TVL-170 attach to the back of furniture or architectural elements, which may limit access to one side of the mounting bars. In these configurations, plan to mount all devices on the accessible side, taking extra care to maintain balanced weight distribution.
Regardless of the specific lift model, the fundamental principle remains the same: use the horizontal mounting bars as secure anchor points for velcro straps that wrap around and support your auxiliary devices. This method has been validated across thousands of installations spanning all FIRGELLI TV lift product categories.
Troubleshooting Common Installation Issues
Device Slipping or Shifting During Operation
If your mounted device shifts position during lift operation, the most common cause is insufficient strap tension or inadequate contact area between the velcro surfaces. Remove the device and inspect the velcro straps for proper engagement—the hook and loop surfaces should be pressed together firmly across their entire width with no gaps or wrinkles.
Tighten the straps by pulling them snugly before pressing the velcro together, ensuring the device is held firmly against the mounting bars. If slipping persists, add a third strap or replace the existing straps with wider velcro that provides greater contact area and holding strength.
Velcro Adhesive Backing Coming Loose
Some velcro products use adhesive backing rather than the wrap-around strap style recommended in this guide. If you've chosen adhesive-backed velcro and experience failures where the adhesive releases from either the device or the mounting bars, the surface preparation was likely insufficient. Clean all mounting surfaces thoroughly with isopropyl alcohol before adhesive application, and ensure surfaces are completely dry.
However, for TV lift applications, wrap-around velcro straps without adhesive are strongly preferred over adhesive-backed products. The strap style creates a mechanical grip around the mounting bars that doesn't rely on adhesive bond strength, providing superior reliability and allowing easy repositioning without residue.
Remote Control Intermittent Operation
If your remote control works inconsistently after side-mounting a device, first verify that the device's IR receiver isn't blocked by the velcro straps or positioned directly against the TV mounting bar. Adjust the device position slightly outward if necessary to ensure the IR receiver has a clear path to receive reflected signals from the viewing area.
Check that the room has sufficient reflective surfaces for IR signal bounce. In rooms with heavy sound-dampening materials or very dark, non-reflective surfaces, you may need to angle devices slightly toward the viewing position or invest in an IR repeater system for reliable operation.
Maintenance and Long-Term Care
Once properly installed, velcro-mounted devices require minimal maintenance, but periodic inspection ensures continued reliable operation. Every three to six months, inspect all velcro straps for signs of wear, particularly the hook surfaces which can become clogged with lint and debris over time.
Clean velcro hook surfaces using a stiff brush or the edge of a rigid plastic card to remove accumulated lint. The loop surfaces typically require less maintenance but can be spot-cleaned with a lint roller if they become excessively dirty. Replace straps immediately if you notice significant wear, fraying, or reduced holding strength.
Check that device mounting positions haven't shifted over time, particularly if you frequently change devices or adjust your setup. Tighten any straps that have loosened and verify that all cable connections remain secure and strain-free.
When upgrading equipment or removing devices, the velcro straps can be carefully cut away and new straps installed. This non-destructive mounting method means you're never locked into a specific configuration—your TV lift system adapts as your entertainment setup evolves.
Alternative Mounting Methods and When to Use Them
While velcro straps provide the optimal solution for most installations, certain scenarios may benefit from alternative mounting approaches. Understanding when and why to consider these alternatives helps you make the best choice for your specific application.
Custom shelving or platforms can be fabricated and attached to TV lift mounting bars for installations requiring multiple devices or especially heavy components. These rigid mounting surfaces distribute weight more evenly and can incorporate cable management features, though they require more complex fabrication and reduce the flexibility to reconfigure your setup.
For extremely lightweight devices such as streaming sticks or small media players, industrial-strength mounting tape or 3M Dual Lock fasteners may provide sufficient holding strength with a lower profile than velcro straps. However, these adhesive methods lack the adjustability and non-permanent nature that makes velcro ideal for most users.
In commercial installations or situations where devices must be accessible for frequent service, hinged brackets or slide-out trays can be engineered into the lift system. These solutions add complexity and cost but may be justified in applications where easy equipment access is critical.
Conclusion
Mounting auxiliary devices to your TV lift mechanism transforms a simple television concealment system into a complete entertainment solution where all components rise and fall together seamlessly. The velcro strap method provides professional-grade reliability with hobbyist-friendly installation requirements, requiring no specialized tools or permanent modifications to your equipment.
By following the installation process outlined in this guide—using appropriately sized straps, ensuring proper weight distribution, maintaining adequate cable slack, and testing thoroughly after installation—you'll achieve a clean, reliable mounting solution that serves your entertainment system for years to come. The method scales from single-device installations to complex multi-component setups across all FIRGELLI TV lift models.
Remember that the flexibility of velcro mounting means your setup can evolve as your needs change. Devices can be repositioned, replaced, or removed without any permanent changes to your TV lift system, providing long-term value and adaptability that rigid mounting solutions cannot match.
Frequently Asked Questions
What's the maximum weight I can mount using velcro straps on a TV lift?
Industrial-grade velcro straps using the two-strap minimum configuration can reliably support devices weighing up to 20 pounds, which exceeds the weight of virtually all consumer media components. However, the practical weight limit is determined by your TV lift's total capacity specification, not the velcro's strength. After accounting for your television's weight, you typically have 10-15 pounds of capacity remaining for mounted accessories. Always verify your specific lift model's maximum weight capacity and ensure your total load—TV plus all mounted devices—stays within this limit.
What types of devices can be mounted using this method?
The velcro mounting method works with virtually any electronic device that has a reasonably flat surface for strap attachment. Common applications include cable boxes, satellite receivers, DVRs, Blu-ray players, streaming devices, gaming consoles, sound bars, and AV receivers. The device should have ventilation grilles that won't be blocked by the straps and should not require frequent physical access to buttons or controls beyond remote operation. Devices with exposed hard drives or moving parts (like disc players) should be mounted in their manufacturer-specified orientation to ensure reliable operation.
Will my remote control work with side-mounted devices?
Yes, remote controls function reliably with side-mounted devices in typical home theater environments. Infrared signals reflect readily off walls, ceilings, and other surfaces, allowing the signal to reach devices that aren't directly facing the viewing position. Position devices flush with the TV's edge or angled slightly outward for optimal results. In very large rooms or environments with significant IR interference, you may need to angle devices more toward the viewing area or use an IR repeater system, but the vast majority of installations work perfectly with standard side-mounting and no additional equipment.
Does this mounting method work with all FIRGELLI TV lift models?
Yes, the velcro strap mounting method is compatible with all FIRGELLI TV lift models, including floor-mounted systems like the TVL-180, rear-mounted configurations like the TVL-170, and ceiling-drop or cabinet-integrated units. All FIRGELLI lifts feature horizontal mounting bars that serve as ideal attachment points for velcro straps. The specific positioning and available space may vary between models, but the fundamental installation process remains the same across the entire product line. Always measure your available space when the lift is fully raised to confirm adequate clearance for your devices.
How do I manage cables for devices mounted on a moving TV lift?
Cable management for lift-mounted devices requires providing adequate cable length and strain relief for movement throughout the lift's full travel range. Measure the lift's total stroke length and add 12-18 inches of slack to each cable. Use high-quality cables rated for repeated flexing, and secure them loosely to the lift structure with velcro cable wraps at regular intervals—avoid tight clamping that restricts cable movement. Create service loops near connection points to absorb minor cable motion. Route power cables together and signal cables separately when possible to minimize interference. Ensure your power source has adequate capacity for all connected devices and the lift mechanism itself.


