Third-Class Lever Calculator — Calculate Effort Force Required
A third-class lever is a simple machine where the effort is applied between the fulcrum and the load. Unlike first and second-class levers, a third-class lever does not amplify force — instead, it trades force for greater speed and range of motion at the load end. Use the calculator below to determine the exact effort or actuator force required for any third-class lever configuration.

What Is a Third-Class Lever?
In a third-class lever, the effort (applied force) sits between the fulcrum (pivot point) and the load. The load arm is always longer than the effort arm, which means the mechanical advantage is always less than 1. You must apply more force than the load weighs, but in return the load moves faster and through a greater distance than the effort point.
The mechanical advantage (MA) of a third-class lever is:
MA = Effort Arm Distance / Load Arm Distance
Because the effort arm is always shorter than the load arm, MA is always less than 1. This is sometimes called a "mechanical disadvantage" — but it’s actually a feature, not a flaw. Third-class levers are designed to amplify speed and distance at the expense of force.
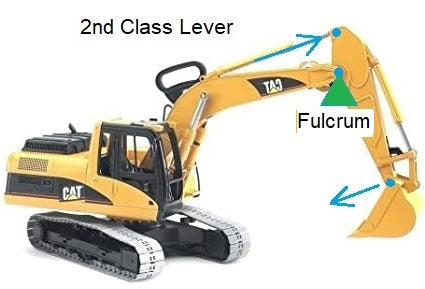
How Is a Third-Class Lever Different from a Second-Class Lever?
The key difference is the position of the effort relative to the load and fulcrum:
| Feature | Second-Class Lever | Third-Class Lever |
|---|---|---|
| Arrangement | Fulcrum — Load — Effort | Fulcrum — Effort — Load |
| Mechanical advantage | Always > 1 (amplifies force) | Always < 1 (amplifies speed/distance) |
| Effort vs. load force | Effort < Load weight | Effort > Load weight |
| Output speed | Slower than input | Faster than input |
| Output distance | Shorter than input | Greater than input |
| Examples | Wheelbarrow, nutcracker, hatch lid | Fishing rod, tweezers, human forearm |
| Actuator use | Heavy lids, hatches, trap doors | Fast-moving flaps, gates, robot arms |
It’s worth remembering that in a third-class lever, the force required to lift the load is significantly more than in a second-class lever. Try the calculator below with the same load weight and see how the required effort changes when you swap L1 and L2.
Third-Class Lever Force Calculator
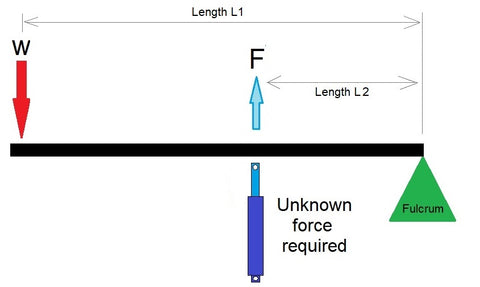
Results
Unknown Force Required F:
0 lbs
0 N
0 kg
0 g
0 tonnes
The Formula: How the Calculator Works
The calculator uses the same torque balance equation as all lever types:
Effort × Effort Arm = Load × Load Arm
Rearranged to solve for the effort (actuator force):
Effort Force (F) = (Weight W × Distance L1) / Distance L2
Where:
- W = the load weight at the end of the lever
- L1 = the distance from the fulcrum to where the load acts (the longer arm)
- L2 = the distance from the fulcrum to where the effort force is applied (the shorter arm)
- F = the effort force required (this is what the calculator solves for)
In a third-class lever, L1 is always greater than L2, so the calculated effort force F is always greater than the load weight W.
Worked Example
Suppose you have a gate that weighs 20 lbs at its end, 36 inches from the hinge (fulcrum). You mount a linear actuator 12 inches from the hinge (between the hinge and the load).
F = (20 × 36) / 12 = 60 lbs of actuator force required
The mechanical advantage is 12/36 = 0.33 — meaning you need 3× the load weight in actuator force. But the trade-off is that the gate’s end moves 3× farther and 3× faster than the actuator’s stroke. Moving the actuator closer to the fulcrum increases speed multiplication but requires even more force.
Comparing to a Second-Class Lever
If the same 20 lb load were configured as a second-class lever (load between fulcrum and effort), with L1 = 12" and L2 = 36", the required force would be only (20 × 12) / 36 = 6.7 lbs. That’s the fundamental trade-off: second-class levers amplify force, third-class levers amplify speed and distance.
Real-World Examples of Third-Class Levers
- Human forearm — the elbow is the fulcrum, the bicep applies effort between the elbow and the hand, and the hand holds the load. The arm trades force for speed — your hand moves much farther and faster than the bicep insertion point.
- Fishing rod — the rod butt is the fulcrum, your hand grips between the butt and the tip, and the fish is the load at the tip.
- Tweezers — the hinge is the fulcrum, your fingers squeeze between the hinge and the tips.
- Shovel — the bottom hand is the fulcrum, the top hand applies effort in the middle, and the dirt at the end is the load.
- Baseball bat — the hands form the fulcrum, wrist effort is between hands and bat tip, and the ball is the load at the end.
- Catapult / trebuchet arm — the pivot is the fulcrum, the counterweight pulls between pivot and end, launching the projectile from the long arm end.

When Does a Second-Class Lever Become a Third-Class Lever?
A lever cannot change its class by changing the force or load amount. The class is defined entirely by the physical arrangement of the three components:
- First-class lever: fulcrum is between the effort and the load (seesaw, crowbar)
- Second-class lever: load is between the fulcrum and the effort (wheelbarrow, nutcracker)
- Third-class lever: effort is between the fulcrum and the load (fishing rod, tweezers)
If you physically move the effort point to a position between the fulcrum and the load, the lever becomes a third-class lever. If you move the load between the fulcrum and the effort, it becomes a second-class lever. The arrangement of components — not the magnitude of forces — defines the class.
Third-Class Levers and Linear Actuators
In actuator applications, a third-class lever is used when you need the load end to move faster or through a larger arc than the actuator’s stroke allows. The actuator mounts close to the pivot (fulcrum) and pushes the lever, causing the far end to swing through a much larger distance.
Practical examples with linear actuators include fast-opening gates, robot arms, deployable panels, and any mechanism where the load needs to move quickly over a large range. The trade-off is that the actuator must produce more force than the load weight, so a higher-force actuator is needed compared to a second-class lever configuration.
To calculate force and stroke for actuators mounted at angles (as most real installations are), use our advanced calculators:

Related Lever Calculators and Engineering Guides
- First Class Lever Calculator — fulcrum between effort and load (seesaw, crowbar)
- Second Class Lever Calculator — load between fulcrum and effort (wheelbarrow, hatch lid)
- Second Class Lever Angled Calculator — when the force is applied at an angle
- Compound Lever Calculator — multiple levers in series for high mechanical advantage
- Lid & Hatch Actuator Calculator — interactive tool for hatch, lid, and pop-top roof actuator sizing
- Scissor Lift Calculator — force and stroke for scissor-lift mechanisms
- Full Calculator Suite — all FIRGELLI engineering calculators in one place
- Types of Linkages Guide — comprehensive guide to all mechanical linkage types
- Mastering Mechanical Advantage — levers, pulleys, gears, and hydraulics explained


