What is a drop-down TV lift and how does it work?
A drop-down TV lift is a ceiling-mounted motorized mechanism that uses a linear or track actuator to lower a television from a concealed cavity above the ceiling into viewing position, then retract it flush behind a hinged or integrated ceiling panel when not in use.
Creating a motorized drop-down TV lift transforms any ceiling space into a sleek, hidden entertainment system that appears only when needed. Whether you're designing a home theater, bedroom retreat, or commercial space, a ceiling-mounted TV lift delivers the ultimate in space efficiency and aesthetic appeal. The question many DIY enthusiasts and professional installers face is whether to build a custom system using individual components or opt for a complete kit solution.
Engineering principle: Guide the load properly — the actuator should not become the guide. A lifting actuator handles vertical force; dedicated rails or slides handle alignment. Mixing those two jobs is what kills actuators early.
"The track actuator lifts the TV, but it should never be the thing keeping the TV straight. The TV's center of gravity sits behind the mounting point, so every cycle creates rotational load. Put two drawer slides on either side of that center of gravity and let them carry the alignment — the actuator only has to handle vertical force." — Robbie Dickson, Founder and Chief Engineer of FIRGELLI Automations
In this comprehensive guide, we'll explore how to construct a drop-down TV lift using a track actuator as the foundation, examining real-world customer installations that demonstrate both custom-built and kit-based approaches. We'll break down the engineering considerations, component selection criteria, installation techniques, and design options that will help you create a professional-grade ceiling TV lift system tailored to your specific requirements.
The beauty of modern linear actuators is their versatility—with proper planning and the right components, you can engineer a drop-down TV system that rivals commercial installations at a fraction of the cost, while maintaining complete control over aesthetics, stroke length, and mounting configurations.
How do you build a drop-down TV lift using a track actuator?
A custom drop-down TV lift built around a track actuator offers maximum flexibility in design and installation. Track actuators provide linear motion with exceptional stability because the carriage runs along an integrated rail system, making them ideal for applications where the load must remain precisely aligned throughout the travel stroke.
Real-World Installation Example
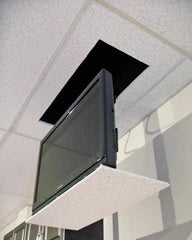
The following customer installation demonstrates a fully functional drop-down TV lift constructed using discrete components rather than a pre-engineered kit. This approach allowed for complete customization of the ceiling integration and travel distance.
In this installation, the builder selected a 30-inch stroke track actuator as the primary lifting mechanism, paired with two 32-inch drawer slides to provide lateral stability and smooth vertical travel. The track actuator handles all the lifting force, while the drawer slides function as precision guides that prevent any lateral movement or rotation of the television during operation.
Key Component Selection Considerations
When building a custom drop-down TV lift, several critical factors determine which components you'll need:
- Television Weight: Calculate the total load including the TV, mounting bracket, and any additional hardware. Track actuators are available with force ratings from 200 lbs to over 500 lbs, providing ample capacity for displays up to 75 inches.
- Drop Distance: Measure the vertical distance from your ceiling to the desired viewing height. Track actuators come in stroke lengths from 12 inches to 48 inches, allowing you to match the actuator precisely to your requirements.
- Speed Requirements: Most track actuators operate at speeds between 0.5 to 2 inches per second. For a 30-inch drop, expect a travel time of 15 to 60 seconds depending on the actuator specification.
- Mounting Space: Ensure adequate clearance in the ceiling cavity for the actuator in its fully retracted position, plus additional space for the mounting framework.
- Control Method: Decide whether you'll use a simple up/down switch, a remote control, or integrate the system into a home automation platform.
Building the Structural Framework
The structural framework must support the television weight while maintaining perfect alignment throughout the travel range. Here's the fundamental assembly approach:
Start by installing a reinforced mounting plate between ceiling joists that can support at least three times the weight of your television and hardware. This mounting plate serves as the anchor point for the track actuator and provides the structural foundation for the entire system. Use substantial lumber—typically 2x6 or 2x8 dimensional lumber—to create a rigid frame that spans multiple joists.
Mount the track actuator vertically to this frame, ensuring it's perfectly plumb. Any deviation from vertical will cause binding and premature wear. The drawer slides should be installed parallel to the actuator, typically positioned equidistant on either side of the television's center of gravity. These slides don't bear the load—they simply guide the motion and prevent rotation.
Create a lower carriage assembly that connects the actuator's moving element to the TV mounting bracket. This carriage must be rigid enough to prevent flexing but light enough not to reduce the system's effective capacity unnecessarily. Aluminum extrusion or steel channel makes an excellent material choice for this component.
Ceiling Panel Integration Approaches
One of the most elegant aspects of the installation shown in the videos is the spring-loaded hinged ceiling panel. When the TV raises into the ceiling cavity, springs pull the ceiling panel closed, creating a seamless flush surface that completely conceals the TV system. This approach requires:
- Piano hinge or continuous hinge along one edge of the ceiling opening
- Extension springs calibrated to close the panel without excessive force
- Magnetic catches or light latches to hold the panel securely closed
- Edge trim to create a clean finished appearance around the opening
The panel itself should be constructed from the same material as your ceiling—typically drywall—and finished to match. Frame the edges with lightweight wood or aluminum to add rigidity without excessive weight that would overpower the springs.
Should you build a custom track-actuator lift or use a complete kit?
Understanding the differences between building with discrete components versus using an integrated kit helps you make an informed decision based on your priorities, budget, and technical capabilities.
Kit vs. Custom Drop-Down TV Lift Build — Comparison
| Factor | Custom Track-Actuator Build | Complete Drop-Down Kit |
|---|---|---|
| Design flexibility | High — choose stroke, force, speed independently | Fixed by kit specification |
| Component validation | Builder must verify combined geometry | Pre-validated as a system |
| Install time (typical) | 12–20 hours | 6–10 hours DIY / 4–6 hours professional |
| Ceiling panel mechanism | Spring-loaded hinged panel | Integrated drop panel travels with TV |
| Cost | Lower if fabrication tools available | Higher, but fewer surprises |
| Mounting hardware | Builder-fabricated | Pre-drilled, pre-aligned |
| Best for | Unusual cavities, custom architecture, makers | Standard residential installs, faster turnaround |
Advantages of the Custom Component Approach
Building your drop-down TV lift from individual components offers several distinct benefits:
Design Flexibility: You have complete control over every aspect of the installation. Choose your own stroke length, force rating, and speed characteristics independently. This matters particularly in unusual spaces where standard kit dimensions don't align with your architecture.
Cost Optimization: By selecting only the components you need and fabricating custom brackets and mounting hardware, you can reduce costs compared to a complete kit. However, this assumes you have the tools, materials, and fabrication capabilities to create mounting components that match the quality and precision of engineered kit parts.
Ceiling Integration Options: As demonstrated in the customer examples, building custom allows you to implement alternative ceiling panel solutions like the spring-loaded hinged approach, which some users prefer over a panel that drops with the TV.
Learning Experience: For DIY enthusiasts and makers, engineering a custom solution provides valuable knowledge about linear motion systems, structural design, and home automation integration.
Advantages of the Complete Kit Approach
Pre-engineered TV lift kits offer their own compelling advantages:
Engineering Validation: Every component has been tested together as a system. The actuator force, guide system, mounting brackets, and ceiling panel mechanism are all engineered to work in concert, eliminating the trial-and-error often required in custom builds.
Installation Time: Complete kits typically reduce installation time by 50% or more compared to custom fabrication. All mounting hardware is included with pre-drilled holes aligned for perfect fit.
Ceiling Panel System: The kit includes a drywall bracket assembly that allows the ceiling panel to drop with the TV, then raise to sit flush with the ceiling surface. This bracket is fully adjustable to accommodate variations in ceiling height and opening dimensions.
Professional Appearance: Engineered brackets and trim pieces provide a finished look that's difficult to replicate with custom fabrication unless you have access to precision metalworking equipment.
Ceiling Panel Mechanisms Compared
The fundamental difference between custom and kit approaches often comes down to how the ceiling panel is handled:
Hinged Panel with Springs (Custom): The panel remains attached to the ceiling structure on one edge via a hinge. When the TV descends, the panel is pushed open. When the TV retracts, springs pull the panel closed to create a flush surface. This approach works beautifully when executed properly but requires careful spring selection and adjustment to achieve smooth, reliable operation.
Integrated Drop Panel (Kit): The ceiling panel attaches to a bracket that's part of the lift mechanism. When the actuator extends, both the TV and the ceiling panel descend together as a unit. When retracted, the panel sits flush with the ceiling, supported by adjustable stops. This eliminates the need for springs and hinges, and ensures the TV always has proper clearance regardless of panel position.
For the integrated approach, positioning equipment like cable boxes and streaming devices is straightforward—place them on top of the drywall bracket where they'll be concealed when the system is retracted but remain accessible when lowered.
What electrical and control system does a drop-down TV lift need?
A reliable control system is essential for smooth, safe operation of your drop-down TV lift. Understanding the electrical requirements and options helps ensure proper system performance.
Power Supply Requirements
Track actuators typically operate on 12V or 24V DC power. Your television weight and desired speed determine the current requirements. Most residential drop-down TV applications require a power supply rated for 5 to 10 amps at 12V DC. Always select a power supply with at least 25% more capacity than your actuator's maximum draw to ensure reliable operation and prevent overheating.
Install the power supply in an accessible location with adequate ventilation. Ceiling cavities can trap heat, so if mounting the supply above the ceiling, ensure proper air circulation or consider locating it in an adjacent closet or equipment room with low-voltage wiring run to the actuator.
Control System Options
Several control methods are available for drop-down TV lifts:
Basic Switch Control: A simple momentary switch with up/down functions provides the most straightforward control. Install the switch near the viewing area at a convenient height. This approach requires running low-voltage control wire from the switch location to the actuator control box.
Wireless Remote Control: A remote control system eliminates visible switches and wiring to the viewing area. Modern RF remote systems offer reliable operation through walls and don't require line-of-sight like infrared remotes. This is the option selected in the customer installation shown in the videos.
Home Automation Integration: For advanced installations, integrate the lift mechanism into your broader home automation system. This allows control via smartphone apps, voice commands through Alexa or Google Assistant, or automated operation based on other triggers (like turning on the TV automatically activates the lift).
Limit Switches and Safety Features
Proper limit switches prevent the actuator from over-extending or retracting beyond its mechanical limits. Quality track actuators include built-in limit switches, but verify they're properly set during installation. Test the full range of motion several times without the television attached to confirm the limits are correctly positioned.
Consider adding soft-start and soft-stop functionality to your control system. This reduces mechanical stress and provides smoother, quieter operation. Some advanced control boxes include these features programmatically.
What are the best practices for installing a drop-down TV lift?
Successful drop-down TV lift installation requires attention to structural, mechanical, and electrical details. These professional practices ensure reliable, long-term performance.
Structural Preparation and Reinforcement
Never underestimate the importance of proper structural support. A 55-inch TV weighs 35-50 lbs, but when you add the mounting hardware, actuator, and guide system, you're approaching 100 lbs of dynamic load—meaning the structure must handle not just static weight but also the forces generated during motion.
Locate ceiling joists using a stud finder and map their positions carefully. Ideally, your mounting frame should span at least three joists. If the TV width or your desired position doesn't align with joist locations, install blocking between joists to create attachment points where needed. Use structural screws or lag bolts—never drywall anchors—to attach the mounting frame to joists.
For installations in finished ceilings, you'll need to cut an access opening. Make this opening slightly larger than the TV width to allow clearance for the guide rails and actuator. The ceiling panel will cover this opening when the system is retracted.
Alignment and Precision
Precise alignment is non-negotiable for smooth operation. Use a quality level during every step of installation. The track actuator must be perfectly vertical—even a few degrees of deviation can cause binding, excessive wear, and premature failure.
When installing guide rails or drawer slides, ensure they're exactly parallel to each other and to the actuator. Measure from a common reference point to verify parallel alignment, then confirm with test operation before mounting the television.
The TV mounting bracket should hang level when the system is fully extended. If it's tilted, viewers will notice immediately, and the asymmetric load can cause wear on one side of the guide system.
Cable Management and Accessibility
Plan your cable routing before finalizing the installation. HDMI cables, power cords, and any other connections must travel with the TV through its full range of motion without binding, stretching, or getting pinched.
Use a cable carrier or strain relief system to manage cables cleanly. Create a service loop—extra cable length formed into a gentle coil—that deploys as the TV descends and retracts as it rises. Secure cables every 12-18 inches along the travel path to prevent tangling.
Position your cable box, streaming device, or other source equipment on the ceiling panel bracket where it will descend with the TV. This keeps cable runs short and eliminates the need for extra-long HDMI cables. Ensure adequate ventilation around equipment to prevent overheating when concealed in the ceiling cavity.
Testing and Adjustment
Before considering the installation complete, perform comprehensive testing:
- Operate the system through 20-30 full cycles to verify smooth, consistent movement
- Check for any unusual sounds that might indicate binding or misalignment
- Verify the TV remains level throughout the entire travel range
- Test all control methods (switches, remotes, automation triggers)
- Confirm the ceiling panel closes properly and sits flush when the TV is retracted
- Verify adequate clearance exists when the TV is fully raised—nothing should contact the TV back or mounting hardware
Make any necessary adjustments to alignment, limit switch positions, or spring tension before finishing the installation and closing up access panels.
Where are drop-down TV lifts used?
Drop-down TV lifts appear in any setting where a display should disappear when unused. Common applications include:
- Home theater rooms — TV concealed in a coffered ceiling between viewing sessions.
- Bedrooms — TV hidden above the foot of the bed, lowered for viewing without occupying wall space.
- Open-plan living rooms — TV stored out of sight to preserve sightlines and architecture.
- Commercial and hospitality — conference rooms, hotel suites, and restaurants where the display should disappear when unused.
- Outdoor covered patios — TV retracted into a protected ceiling cavity to keep it out of weather between uses.
How do you maintain and troubleshoot a drop-down TV lift?
Like any mechanical system, drop-down TV lifts benefit from periodic maintenance and attention to performance changes that might indicate developing issues.
Routine Maintenance Schedule
Every three to six months, depending on usage frequency:
- Inspect all mechanical fasteners and tighten any that have loosened from vibration
- Clean guide rails and drawer slides with a dry cloth to remove dust accumulation
- Apply a small amount of dry lubricant to guide rails if movement becomes less smooth
- Verify electrical connections remain secure and show no signs of corrosion
- Test limit switches to confirm they're still functioning correctly
- Check that springs (if using a hinged panel design) maintain proper tension
Avoid over-lubricating components, as excess lubricant attracts dust and debris that can accelerate wear.
Common Issues and Solutions
Jerky or Uneven Movement: This typically indicates misalignment of the guide system or binding somewhere in the travel path. Verify that all rails remain parallel and that no cables are interfering with movement. Check for debris in the guide channels.
Excessive Noise: New installations may make some noise as components settle, but increasing noise over time suggests developing wear. Inspect mounting brackets for looseness and verify that no metal components are contacting each other without proper spacing or cushioning.
Incomplete Travel: If the system doesn't extend or retract fully, check limit switch settings first. Also verify the power supply is delivering adequate voltage under load—voltage drop can prevent the actuator from completing its full stroke.
Remote Control Issues: If wireless control becomes unreliable, check battery levels in both the remote and receiver. Verify that no new sources of RF interference have been introduced near the receiver.
Frequently Asked Questions
What size track actuator do I need for my TV?
Select a track actuator with a force rating at least 50% higher than your total load (TV plus mounting hardware). For a 50 lb TV with 20 lbs of mounting equipment, choose an actuator rated for at least 105 lbs. The stroke length should match your desired drop distance—measure from the ceiling to your preferred viewing height. Common stroke lengths for drop-down TV applications range from 24 to 36 inches.
Do I really need drawer slides or guide rails in addition to the actuator?
Yes, absolutely. While the track actuator provides the lifting force and some inherent stability, drawer slides or dedicated guide rails prevent rotation and lateral movement that would otherwise occur. TVs have their center of gravity behind the mounting point, creating rotational forces. Without proper guides, the TV would tilt and swing during operation. Quality guide rails ensure the TV remains perfectly aligned and level throughout its travel.
What are the minimum ceiling clearance requirements?
You need clearance equal to the TV height plus the actuator's retracted length plus 4-6 inches for mounting hardware and service clearance. For a typical installation with a 30-inch TV height and 30-inch stroke actuator, plan for approximately 65-70 inches of total ceiling cavity depth. If your ceiling cavity is shallower, consider a shorter stroke length or mounting the TV horizontally (which reduces the required clearance dimension).
What's the maximum TV size I can install with this approach?
The practical limit depends on your actuator force rating and structural support capabilities. Track actuators are available with force ratings exceeding 500 lbs, which can handle TVs up to 85 inches. However, ceiling structure becomes the limiting factor for very large TVs. Displays above 65 inches require substantial reinforcement spanning multiple joists. Most residential drop-down installations accommodate TVs from 40 to 65 inches, weighing 30-60 lbs.
How long does it take to install a drop-down TV lift?
Installation time varies significantly based on your approach and experience level. A custom build using discrete components typically requires 12-20 hours including structural preparation, fabrication of mounting components, installation, electrical work, and testing. Using a complete kit reduces this to 6-10 hours for most DIY installers. Professional installers with experience in ceiling-mounted systems can complete kit installations in 4-6 hours. The majority of time is spent on structural preparation and precise alignment rather than the actual component mounting.
Can I integrate the TV lift with my smart home system?
Yes, drop-down TV lifts integrate well with home automation platforms. The simplest approach uses a smart relay that your automation system controls to trigger the actuator up/down commands. More advanced integration uses feedback actuators that provide position information, allowing your automation system to know exactly where the TV is positioned. This enables partial extension positions and synchronization with other home automation events like lighting scenes or motorized window treatments.
Can I install a drop-down TV lift in an existing ceiling without major renovation?
Yes, but it requires careful planning. You'll need to cut an access opening in the existing ceiling, which means patching and refinishing drywall. The key is ensuring adequate structural support exists above the ceiling. In many homes, you can work between existing joists with minimal structural modification. The ceiling panel can be cut from the removed drywall section and refinished to match the surrounding ceiling. The most challenging aspect is usually running electrical wiring to the location without opening large sections of ceiling or wall.
About the Author: Robbie Dickson, Founder and Chief Engineer of FIRGELLI Automations, has been designing linear motion systems since founding the company in 2002. His engineering career includes prior roles at Rolls-Royce, BMW, Isuzu, and Ford. More background: Wikipedia.


