How do you install drawer slides for professional results?
Drawer slides are the paired mechanical guides — typically a cabinet member fixed to the cabinet wall and a drawer member fixed to the drawer box — that allow a drawer to extend and retract smoothly under load. Installing drawer slides correctly is fundamental to creating furniture that functions smoothly for years to come. Whether you're building custom cabinetry, upgrading existing drawers, or tackling a DIY furniture project, understanding proper installation techniques ensures your drawers glide effortlessly and support their intended loads without binding, misalignment, or premature wear.
The quality of your drawer slide installation directly impacts the longevity and functionality of your cabinets. A properly installed set of drawer slides will operate smoothly through thousands of cycles, supporting everything from lightweight utensil drawers to heavy-duty storage applications. Poor installation, however, can lead to drawers that stick, bind, or eventually fail—regardless of the quality of the hardware itself.
This comprehensive guide walks you through the complete installation process for the two most common types of drawer slides: roller slides and ball-bearing slides. While manufacturers may provide basic instructions, this detailed walkthrough covers the critical alignment techniques, adjustment procedures, and professional tips that ensure your installation meets exacting standards. We'll also address common challenges and provide solutions for achieving perfect drawer operation every time.

Drawer motion is geometry first, hardware second. If the cabinet members aren't parallel and the drawer box isn't square, no slide — regardless of price or load rating — will glide cleanly.
"Most drawer slide failures aren't slide failures — they're alignment failures. A 1/8 inch mismatch between left and right will bind a 500-pound-rated slide just as fast as it binds a 75-pound one. The hardware can only be as good as the surfaces it's mounted to." — Robbie Dickson, Founder and Chief Engineer of FIRGELLI Automations
What are the components and types of drawer slides?
Before beginning installation, it's essential to understand the anatomy of your drawer slides. All drawer slides consist of at least two primary components, each serving a distinct function in the sliding mechanism.
Cabinet and Drawer Members Explained
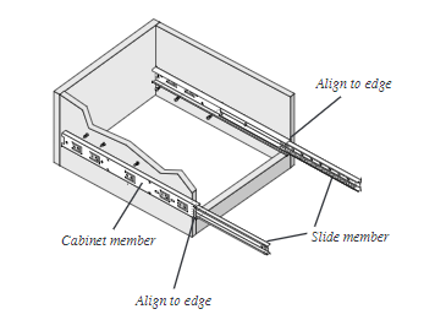
The cabinet member is the portion that mounts to the stationary component—typically the interior side wall of your cabinet or furniture piece. This member remains fixed and provides the track or bearing surface for the moving components. The drawer member attaches directly to the drawer box itself and moves with the drawer as it opens and closes.
For ball-bearing slides, you'll encounter a third component called the intermediate member or slide member. This middle section remains connected to the cabinet member and provides the bearing surface for the drawer member to ride upon. This three-piece design enables full-extension capability and superior load capacity compared to simpler two-piece roller slides.

Roller Slides vs. Ball-Bearing Slides
Roller slides feature plastic or nylon wheels that roll along metal tracks. They're economical, simple to install, and suitable for light to medium loads—typically supporting 75 to 100 pounds. However, they generally offer only three-quarter extension and provide less smooth operation compared to ball-bearing alternatives.
Ball-bearing slides incorporate precision steel ball bearings that ride in formed raceways, delivering exceptionally smooth and quiet operation. These slides commonly support 100 to 500 pounds and offer full-extension or over-extension capabilities. FIRGELLI's heavy-duty drawer slides can support loads up to 500 pounds while offering the longest stroke telescopic action in the industry, making them ideal for demanding applications like tool chests, industrial cabinets, and mobile workstations.
Release Mechanism Types
Ball-bearing slides come in two configurations: releasing and non-releasing. Releasing slides feature a lever mechanism that allows you to separate the drawer member from the intermediate member, simplifying installation by letting you mount each component independently. Non-releasing slides keep all members connected throughout the installation process, requiring different installation techniques that we'll cover in detail below.
| Slide Type | Load Capacity (per pair) | Extension | Operation | Typical Use |
|---|---|---|---|---|
| Roller (side-mount) | 75–100 lb | 3/4 extension | Acceptable, can be noisy | Light kitchen drawers, utensils |
| Ball-bearing (side-mount) | 100–500 lb | Full or over-extension | Smooth, quiet | General cabinetry, tool storage, file cabinets |
| Under-mount | 75–150 lb typical | Full extension common | Smooth, hidden | Premium kitchen and furniture cabinetry |
| Center-mount | Light loads | 3/4 extension typical | Basic | Simple furniture, single-track economy applications |
How do you separate the cabinet and drawer members?
This preparatory step isn't always necessary or possible, depending on your slide type, but when applicable, it significantly simplifies the installation process. Separating the members allows you to mount each component individually without wrestling with connected hardware inside tight cabinet spaces.
Separating Roller Slides
Roller slides typically arrive pre-separated or can be easily disconnected. If the drawer roller sits atop the cabinet roller, simply extend the drawer member fully forward and lift the drawer roller up and over the cabinet roller to separate them. The process reverses during final assembly when you'll roll the drawer member back onto the cabinet member.
Separating Ball-Bearing Slides
For ball-bearing slides with release levers, locate the small lever tab positioned between the intermediate member and the drawer member. The lever position determines the release direction: if the release lever appears on the right-hand side when viewing the slide, push downward to release; if on the left-hand side, push upward. While pressing the lever, pull the drawer member forward to separate it from the intermediate member.
The intermediate member remains attached to the cabinet member throughout installation. If your ball-bearing slides lack release levers, they cannot be separated—you'll need to follow the non-releasing installation procedure outlined in Step 2 below.
How do you install the cabinet members?
Proper cabinet member installation establishes the foundation for smooth drawer operation. This step requires precision, as misalignment here propagates through the entire system, causing binding, uneven gaps, or drawer misalignment.
Positioning and Alignment
Begin by determining your mounting configuration. Position the cabinet member along the interior sidewall of your cabinet, ensuring both left and right slides sit at identical heights. Use a quality level to verify that each cabinet member is perfectly horizontal—even slight deviations will cause drawers to roll open or closed on their own.
Achieving parallel alignment between left and right cabinet members is equally critical. Measure the distance from the cabinet's front edge to the front of each slide, then measure from the rear edge to the rear of each slide. These measurements must match precisely on both sides to prevent binding and ensure the drawer tracks straight.
Overlay vs. Inset Drawer Front Positioning
Your drawer front style determines cabinet member setback. For overlay drawer fronts—where the drawer face overlaps the cabinet opening—align the front of the cabinet member flush with the cabinet's front edge. This positioning allows the drawer box to sit behind the face frame while the drawer front extends forward to cover the opening.
For inset drawer fronts—where the drawer face sits flush with or inside the cabinet opening—set back the cabinet member from the cabinet's front edge by the thickness of your drawer front plus any desired reveal gap. This typically means a 3/4-inch to 1-inch setback for standard construction.
Fastening the Cabinet Members
Once positioned, secure the cabinet member using appropriate fasteners through the designated mounting holes. Most quality slides provide multiple mounting locations—use at least three fastening points per slide to ensure stability, particularly for heavy-load applications. Wood screws work well for wooden cabinets, while bolts may be necessary for metal cabinets or applications requiring maximum holding strength.

Many cabinet members feature slotted mounting holes rather than round holes. These slots enable post-installation adjustments—typically horizontal slots for depth adjustment and vertical slots for height adjustment. If you plan to utilize these adjustment capabilities, initially fasten the cabinet member using only the round holes or the ends of the slots, leaving the middle fastener locations available for adjustment and final securing.
If using bolts, pre-drill appropriately sized holes before attempting to drive fasteners. Mark hole locations with the slide positioned correctly, remove the slide, drill pilot holes using the proper diameter bit for your fastener size, then reposition and secure the slide.
Special Considerations for Ball-Bearing Slides
When installing ball-bearing slides, the intermediate member may obscure certain mounting locations on the cabinet member. Slide the intermediate member forward and backward as needed to expose each mounting hole. After fully securing the cabinet member, verify that the intermediate member slides smoothly along its entire length without binding or resistance.
How do you install the drawer members?
With cabinet members properly positioned, drawer member installation follows similar principles but requires additional attention to drawer box construction and alignment with the cabinet members.
Installing Releasing Slides and Roller Slides
For roller slides and releasing ball-bearing slides, position the drawer member against the drawer box sidewall. The front of the drawer member should typically align with the front of the drawer box, though specific positioning depends on your drawer box construction and desired drawer front attachment method.

Verify that both drawer members sit at equal heights and parallel to each other—use the same measuring technique employed for cabinet member alignment. Additionally, ensure drawer members align with their corresponding cabinet members so the drawer will slide smoothly into the cabinet opening without interference.
Secure drawer members using at least three fasteners through the recommended mounting holes. Like cabinet members, drawer members often feature slotted holes for adjustment—vertical slots typically allow height adjustment after installation. If planning to make adjustments, use only two fasteners initially, securing through round holes or slot ends.
Installing Non-Releasing Ball-Bearing Slides
Non-releasing ball-bearing slides present a unique challenge since the drawer member cannot be separated from the cabinet member. This installation method benefits greatly from a helper or temporary support to hold the drawer box in position while you secure it.
With the cabinet members installed, fully extend the drawer member on each slide. Position your drawer box carefully, aligning it with both extended drawer members. A second person can hold the drawer steady while you drive fasteners, or construct a temporary support at the correct height to hold the drawer box level during installation.
Work systematically, securing the front mounting holes first, then progressing toward the rear. You may need to partially close the slides to access rear mounting locations. Once all fasteners are secure, test the drawer's sliding action before proceeding—this is your last opportunity to make major adjustments before final assembly.
How do you complete final assembly and adjustments?
With all mounting complete, you're ready for final assembly and precision adjustments that transform functional hardware into a perfectly operating drawer system.
Inserting the Drawer
For roller slides, tilt the drawer slightly and position the drawer rollers above the cabinet rollers. Lower the drawer carefully, allowing the drawer rollers to settle onto the cabinet roller tracks. Push the drawer partially closed to ensure it's properly seated on both sides.
For releasing ball-bearing slides, align the drawer member with the intermediate member channel and push the drawer member into the intermediate member. As you close the drawer, the release lever will automatically engage, locking the drawer member into position. You should hear or feel a distinct click as the mechanism engages.

Making Precision Adjustments
Open and close the drawer several times, observing its operation carefully. The drawer should glide smoothly without binding, require equal effort throughout its travel, and remain stable without racking or wobbling. Check gap uniformity around the drawer front and verify that the drawer face sits parallel to the cabinet opening.
If adjustments are needed, locate the slotted mounting holes you intentionally left partially secured. Loosen these fasteners slightly—just enough to allow movement within the slots. For depth adjustments (front-to-back positioning), adjust the cabinet member using horizontal slots. For height adjustments (raising or lowering the drawer), adjust the drawer member using vertical slots.
Make small incremental adjustments, tightening fasteners and testing operation after each change. This iterative approach prevents over-correction and helps you zero in on optimal positioning. Once satisfied with drawer operation, install additional fasteners through any unused mounting holes to maximize stability.
Final Securing for Heavy-Load Applications
For drawers supporting substantial weight—tool storage, file cabinets, or applications approaching your slide's rated capacity—take additional securing measures. Replace at least two standard screws per member with locking screws or add thread-locking compound to prevent fasteners from loosening under repeated loading cycles.
Consider also the total system capacity. While individual slides may be rated for 500 pounds, ensure your drawer box construction, cabinet structure, and mounting surface can support the intended load. High-capacity applications like those served by FIRGELLI's heavy-duty drawer slides require proportionally robust cabinet construction.
How should you test the installation before trusting it?
- Cycle test: Open and close the drawer at least 10 times. Resistance should feel uniform across the entire stroke — any change in effort signals binding or misalignment.
- Gap test: With the drawer closed, check that the reveal gap around the drawer front is uniform top, bottom, and both sides. Inconsistent gaps indicate height or depth mismatch between the left and right slides.
- Loaded test: Place at least half the slide's rated load in the drawer and cycle it again. Many alignment problems only appear under load, when the slide is forced to actually carry weight rather than just glide empty.
- Square test: Measure the drawer box diagonally corner-to-corner in both directions. If the measurements differ, the drawer is racked and will bind regardless of slide quality.
What advanced installation considerations matter?
Under-Mount and Center-Mount Slides
While this guide focuses on side-mount slides—the most common configuration—under-mount and center-mount slides follow similar principles but with different mounting locations. Under-mount slides attach to the drawer bottom and cabinet floor, providing a clean aesthetic with no visible hardware. Center-mount slides use a single slide assembly mounted to the drawer bottom's centerline, suitable for lighter loads but offering cost savings for simple applications.
Soft-Close and Self-Close Mechanisms
Many modern ball-bearing slides incorporate soft-close or self-close mechanisms. Soft-close features use hydraulic or mechanical dampening to slow drawer closing in the final inches, preventing slamming and reducing wear. Self-close mechanisms use springs to automatically pull drawers fully closed from a partially open position, ensuring positive closure.
These features require no special installation procedures but do necessitate slightly more closing force to engage. Ensure your cabinet members are securely mounted to withstand the additional forces these mechanisms generate over thousands of cycles.
Synchronizing Multiple Drawers in Vertical Stacks
When installing multiple drawers in vertical arrangements, maintaining consistent reveal gaps and alignment across all drawers requires systematic approach. Install the bottom drawer first, using it as a reference point for subsequent drawers. Measure from the bottom drawer's top edge to establish exact positioning for the next drawer up, accounting for desired gap spacing.
Use spacer blocks cut to your desired gap dimension to temporarily position each drawer during installation. This ensures uniform spacing throughout the cabinet and creates the professional appearance of precision cabinetry.
What goes wrong during drawer slide installation, and how do you fix it?
Drawer Binding or Sticking
If your drawer binds at certain points in its travel, the most likely cause is misalignment between left and right slides. Verify that cabinet members sit parallel using the measurement technique described above. Even small deviations—as little as 1/8 inch—can cause binding in precision slides.
Binding can also result from drawer box construction issues. Check that your drawer box is perfectly square by measuring diagonals—if measurements differ, the drawer is racked and will bind regardless of slide quality. Additionally, verify that the drawer box width provides adequate clearance for the slide mechanism—most manufacturers specify minimum clearance requirements.
Drawer Drops or Sags When Extended
Excessive deflection when the drawer is fully extended typically indicates either inadequate slide capacity for the load or insufficient mounting fasteners. Verify that your slide's rated capacity exceeds the drawer's loaded weight, accounting for safety factors. Ensure all recommended mounting holes are utilized with appropriate fasteners driven fully home.
For heavy applications, consider upgrading to higher-capacity slides such as FIRGELLI's industrial-grade models, which provide superior load capacity and extended stroke lengths for demanding applications.
Drawer Won't Close Completely or Self-Opens
If the drawer won't close flush with the cabinet face, check for obstructions inside the cabinet or material buildup on the slide mechanisms. For drawers that creep open on their own, verify that cabinet members are mounted level—use a precision level to check, as even slight angles will cause gravity to pull drawers open.
Uneven Gaps Around Drawer Front
Inconsistent reveal gaps around the drawer front usually stem from height misalignment between left and right drawer members. Use the vertical adjustment slots to raise or lower one side until gaps equalize. For front-to-back tilt, adjust the cabinet member depth using horizontal slots.
How do you maintain drawer slides for long-term performance?
Properly installed drawer slides require minimal maintenance but benefit from periodic inspection and basic upkeep. Every six months, examine fasteners to ensure none have loosened, particularly in high-use applications. Tighten any loose fasteners and verify that slides still operate smoothly without binding.
Clean slide mechanisms annually using a soft brush or compressed air to remove dust and debris. Avoid using oil or grease on ball-bearing slides unless specifically recommended by the manufacturer—most modern ball-bearing slides come pre-lubricated and additional lubricants can attract dirt, accelerating wear.
For roller slides in dusty or dirty environments, occasional lubrication with dry silicone spray can extend service life. Apply sparingly, wiping away excess to prevent dirt accumulation.
Where are heavy-duty drawer slides used?
- Workshop and tool chests: heavy hand-tool and power-tool storage, where each drawer can exceed 100 pounds loaded.
- Industrial cabinets and tool cribs: parts storage where drawers see thousands of pull cycles per year.
- Mobile workstations and service carts: drawers that must hold load while the cart itself is rolling.
- File cabinets and document storage: dense paper loads concentrated in deep drawers.
- RV and marine cabinetry: drawers that must stay closed through vibration and motion, often using locking or detent-equipped slides.
- Smart furniture and custom cabinetry: hidden-motion drawers, full-extension showcase drawers, and tall pantry pull-outs.
How do you select the right drawer slides for your project?
Installation success begins with selecting appropriate slides for your application. Consider these factors during the specification phase:
Load Capacity: Calculate the maximum weight your drawer will carry, including contents plus drawer box weight. Select slides rated for at least 25% more than your calculated maximum to provide a safety margin and ensure smooth operation under full load.
Extension Length: Determine whether three-quarter, full, or over-extension access is necessary. Full-extension slides provide access to the entire drawer depth, essential for deep drawers or applications requiring complete visibility and access to contents.
Stroke Length: The slide's closed length must fit within your cabinet depth while providing adequate extension. FIRGELLI offers the longest stroke telescopic drawer slides available, ideal for deep cabinets or applications requiring exceptional extension ratios.
Mounting Configuration: Ensure your cabinet construction accommodates your chosen slide type. Side-mount slides require adequate clearance between drawer box and cabinet interior. Under-mount slides need minimum drawer bottom thickness specifications.
Operational Requirements: Consider whether soft-close, self-close, or disconnect features benefit your application. High-traffic or commercial applications particularly benefit from soft-close mechanisms that reduce noise and extend hardware life.
What separates professional-grade installations from amateur ones?
Successful drawer slide installation combines careful preparation, precise measurement, systematic execution, and thoughtful adjustment. While the process requires attention to detail, following these professional techniques ensures your drawers will operate smoothly and reliably for years of service.
The key differentiators between amateur and professional installations are precision alignment, adequate fastening, and final adjustments that optimize operation. Taking time to verify measurements, ensure parallel mounting, and make incremental adjustments transforms basic functional hardware into a refined system that operates effortlessly.
Whether you're building custom cabinetry, upgrading existing furniture, or tackling an ambitious DIY project, proper installation techniques ensure your drawer slides perform to their full potential. Quality hardware like FIRGELLI's heavy-duty drawer slides—engineered for extended stroke lengths and exceptional load capacity—deserves installation practices that match their precision engineering.
Frequently Asked Questions
How do I measure for the correct drawer slide size?
Measure the depth of your cabinet from inside front to inside back, subtracting about 1 inch to allow clearance for the drawer front and any hardware. For example, a 20-inch deep cabinet typically requires 18-inch drawer slides. The slide length should be equal to or slightly less than your drawer box depth (excluding the front) to provide proper support. For full-extension slides, match the slide length to your desired drawer depth as closely as possible. Always verify manufacturer specifications, as some slides require specific minimum cabinet depths to function properly.
Can I install drawer slides on existing drawers without slides?
Yes, you can retrofit drawer slides onto existing drawers that currently use wooden runners or guides. First, remove any existing runner hardware from both the drawer and cabinet. Measure carefully to ensure your drawer box width allows adequate clearance for the slides—typically you need at least 1/2 inch clearance per side. You may need to narrow the drawer box or widen the cabinet opening to accommodate modern slides. Ensure the drawer box is structurally sound and square before installing slides, as weak or racked drawer boxes will not operate properly regardless of slide quality.
Why do my drawer slides bind halfway through their extension?
Mid-travel binding typically results from misalignment between the left and right slides. Even if slides appear parallel, a difference of 1/8 inch in positioning can cause binding. Verify that the distance from the cabinet's front edge to each slide's front end is identical on both sides, and that rear measurements also match. Additionally, check that your drawer box is perfectly square by measuring corner-to-corner diagonals—unequal measurements indicate a racked drawer box that will bind. Cabinet member mounting screws that are over-tightened can also deform the slide and cause binding, so ensure fasteners are snug but not excessively tight.
How much weight can drawer slides actually support?
Weight capacity varies dramatically by slide type and quality. Basic roller slides typically support 75-100 pounds per pair, while economy ball-bearing slides handle 100-125 pounds. Heavy-duty ball-bearing slides range from 150 to 500 pounds per pair. FIRGELLI's industrial-grade drawer slides are rated for up to 500 pounds, making them suitable for tool chests, industrial storage, and heavy file cabinets. Always check the manufacturer's rating and remember that capacity refers to the pair working together—don't exceed the stated rating as this accelerates wear and can lead to failure. For maximum longevity, operate slides at 75-80% of their rated capacity.
Do I need special tools to install drawer slides?
Basic drawer slide installation requires only standard tools: a drill/driver, appropriate drill bits for pilot holes, screwdriver bits, a tape measure, a carpenter's square, and a level. A clamp or two can be helpful for holding slides in position during installation. For metal cabinets requiring bolt mounting, you'll need appropriate drill bits and wrenches or sockets. While not essential, a drawer slide jig or installation template can speed up installation and improve accuracy, particularly when installing multiple drawers. These simple guides ensure consistent positioning and parallel alignment, though careful measurement achieves the same results.
How do I adjust soft-close drawer slides after installation?
Most soft-close mechanisms are factory-set and require no adjustment. However, if your soft-close function becomes too fast or too slow over time, many slides feature a small adjustment screw on the dampening mechanism—typically located near the rear of the cabinet member. Turning this screw clockwise usually increases dampening (slower closing), while counterclockwise decreases it (faster closing). Make small quarter-turn adjustments and test operation after each change. Some soft-close mechanisms cannot be adjusted and instead require replacement of the dampening cartridge if performance degrades. Consult your specific slide's documentation, as adjustment methods vary by manufacturer and model.


