If you’re putting in a weir—whether it’s for a spillway, an irrigation canal, or a stream gauge station—you need to run the numbers for flow rate before you build a thing. This Broad Crested Weir Calculator helps you work out discharge, head, weir length, critical depth, or discharge coefficient, using your site’s head measurement, crest dimensions, and a realistic Cd value. The right calculation is essential. A mistake here leads to an undersized structure, wrong water levels, or unreliable measurement, and fixing that after concrete sets is not fun. Below, you’ll find the actual equations, a step-by-step example from field practice, breakdowns of the key theory, and a FAQ with answers you’ll want if you’re specifying or troubleshooting these structures in the real world.
What is a broad crested weir?
A broad crested weir is just a flat-topped obstruction across a channel that forces water to flow over it at a specific depth. If built right, the flow over the crest is stable and predictable, which makes the calculations trustworthy for measuring or controlling open channel flow.
Simple Explanation
Picture a long, wide step or a broad hump across a river. The water pools a little upstream, then flows evenly across the wide crest—at a depth governed by physics, not just by luck or guesswork. Because the crest is wide, the flow settles into a dependable pattern we call critical flow. That’s useful: if you measure the water depth just before it flows onto the crest, you can calculate how much water is passing—no electronics, no complicated sensors, just a staff gauge and the right chart or formula.
📐 Browse all 1000+ Interactive Calculators
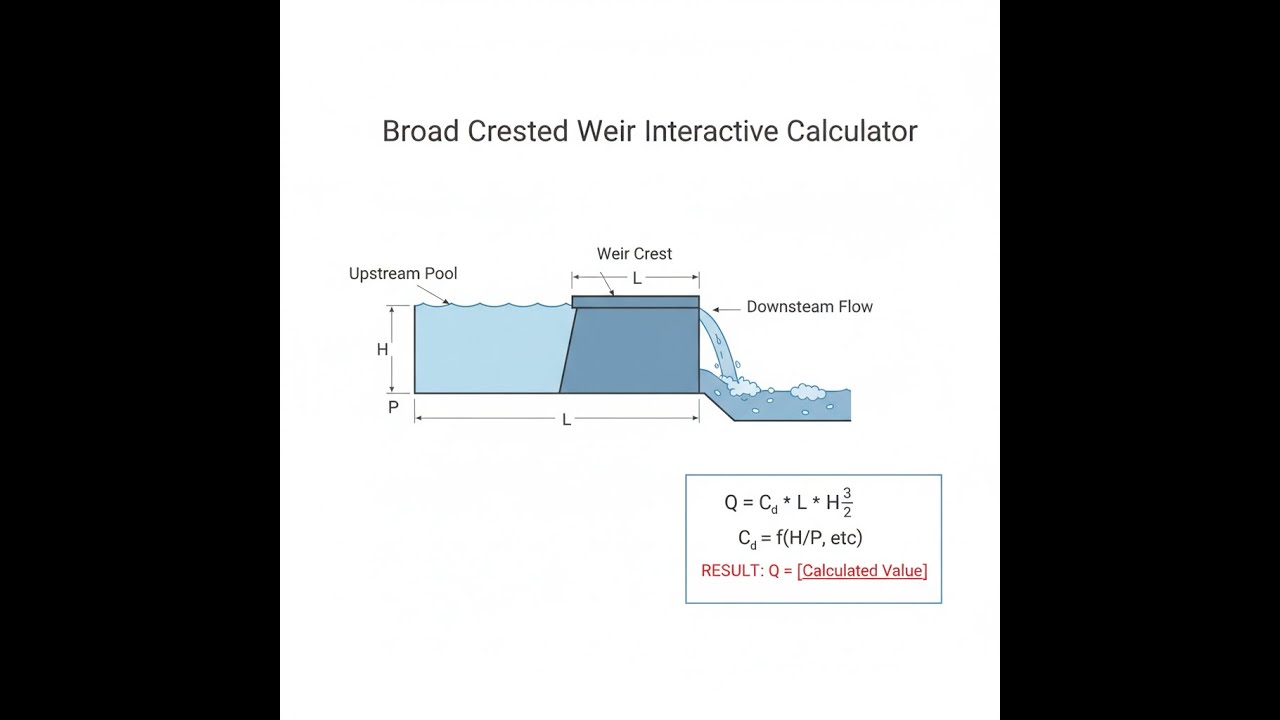
Flow Diagram

Broad Crested Weir Calculator
How to Use This Calculator
This calculator is intended for education, concept evaluation, and preliminary design. Results are based on the equations and assumptions described on this page, but cannot account for every real-world load case, tolerance, material property, environmental condition, installation detail, safety factor, code, or regulatory requirement. Verify all inputs, assumptions, units, and results independently before selecting components or using the result in a real application. Safety-critical, structural, medical, lifting, transportation, or regulated applications must be reviewed by a qualified engineer.
Questions about this calculator or found an error? Message our engineering team.
- Pick what you want to solve for (discharge, head, length, critical depth, or coefficient).
- Fill in the values you know: head above crest (H), weir length (L), crest width (b), discharge coefficient (Cd), and gravity (g) as needed.
- Leave gravity at 9.81 m/s² unless you’ve got a good reason to change it.
- Hit Calculate for the answer.
Broad Crested Weir Interactive Calculator
This widget lets you adjust head and geometry to watch how discharge, critical depth, and flow velocity change instantly – useful for getting a feel for the sensitivity of each variable. Move the sliders to test your scenario before heading into the field.
DISCHARGE
5.24 m³/s
CRITICAL DEPTH
0.40 m
FROUDE NUMBER
1.00
FIRGELLI Automations — Interactive Engineering Calculators
Governing Equations
Here is the equation to get discharge for a broad crested weir.
Discharge Equation:
Q = Cd L √g H3/2
Critical Depth:
Hc = (2/3) H
Froude Number:
Fr = V / √(g Hc)
Where:
- Q = Volumetric discharge (m³/s)
- Cd = Discharge coefficient (typically 1.4-1.8, dimensionless)
- L = Effective crest length (m)
- g = Gravitational acceleration (9.81 m/s²)
- H = Head above weir crest measured upstream (m)
- Hc = Critical depth over weir crest (m)
- b = Crest width in flow direction (m)
- V = Average flow velocity over crest (m/s)
- Fr = Froude number (dimensionless)
Simple Example
Given: H = 0.5 m, L = 2.0 m, Cd = 1.7, g = 9.81 m/s²
Q = 1.7 × 2.0 × √9.81 × 0.51.5 = 1.7 × 2.0 × 3.132 × 0.354 = 3.76 m³/s
Critical depth: Hc = (2/3) × 0.5 = 0.333 m
Theory & Practical Applications
Fundamental Flow Mechanics
Broad crested weirs force water to transition from subcritical flow upstream to critical flow right over the flat crest. This only happens if the crest is long enough in the direction of flow. If your crest is too short, you’ll get more like sharp-crested behavior and lose much of the weir’s stability advantage. For a proper broad crest, the flow depth over the crest settles automatically at critical depth (where the specific energy is at a minimum), and downstream from there you get supercritical flow. This is why broad crested weirs work well for larger, more turbulent flows that would split or become unstable at a thin (sharp) crest.
The Cd value for broad crested weirs is usually between 1.4 and 1.8. That’s much higher than the 0.6–0.65 you see for sharp crested weirs, mainly because the broad crest gives more support to the water, so you waste less energy on contraction and turbulence. Still, Cd is not universal—it varies with approach velocity, crest shape, roughness, and especially with the ratio of head over crest width (H/b). If you care about accuracy, you need to calibrate your structure, but on most straight, properly built crests with smooth (concrete) surfaces, you can usually use Cd around 1.65 (plus or minus about 0.05) and get within a few percent for most practical flows. The key difference with broad crested weirs is that the discharge coefficient stays more stable even as flow conditions change, compared to other weir types.
Design Criteria and Geometric Constraints
To get true broad crested behavior, you have to get the geometry right. Crest length in the flow direction (b) should be at least 2H; if it’s much less, the weir acts more like a sharp crest, and if it’s too long, boundary layer effects start to matter. If the crest is very rough or has weak formwork tolerances, or if the upstream head changes a lot, all bets are off without calibration. Height above the channel bed (P) should also be at least twice the head, to keep approach velocity effects small. If you can’t meet these ratios and tolerances, standard weir equations don’t apply—a different approach or corrections are needed.
Crest shape changes Cd quite a bit: if you leave the upstream edge sharp, Cd might drop to 1.44; if you round it generously (radius at least 0.1H), you’ll get 1.65 or so. An ogee (streamlined) crest can bump this to as much as 1.70–1.75, but that only holds across a set head range and requires properly shaped formwork. Roughness matters, too—smooth concrete works best. If the crest is made of rough rock or has degraded, expect a lower coefficient and higher uncertainty, sometimes by 5–10% or more. You’ll get the best results specifying both the dimensions and the surface finish before you build anything permanent.
Applications in Water Resources Engineering
Broad crested weirs are common in irrigation canals where you need to both measure flow and control upstream water levels. They’re used anywhere from big river diversion works to small distributary inlets. For trapezoidal channels, the geometry is matched to the canal cross-section for best fit, but that does mean you sometimes must use a modified Q-H equation. Concrete and stone builds will stand up to sediment and debris a lot better than thin sharp crests. In spillways and detention basins, broad crested weirs offer a gradual stage-discharge curve, which means less risk of sudden drawdown or slope failure. If you’re tight on width, modern labyrinth weirs let you fit more crest length into the same space—a handy upgrade for old dams.
If you’re working in rivers with sediment, you’ll find broad crested weirs far less prone to getting choked up than flumes. Bedload usually makes it over the crest at high flow, so you don’t have to shovel silt out as often. For spillways, zigzag “labyrinth” crests multiply the usable length without taking more horizontal space—that’s a way to boost capacity on old structures without a full rebuild.
Environmental Monitoring and Fisheries Applications
There’s a good reason you’ll see broad crested weirs at stream gauges and environmental flow sites: they keep working even if the river dumps a load of gravel or sand at high flow. Unlike Parshall flumes (which silt up and become useless without frequent cleaning), a broad crested weir with a good apron lets you keep measuring year after year, even on flashy streams. USGS uses them for long-term gauging and reports that, as long as the structure stays in spec, you can hold calibration for many seasons with only minor drift.
If you need fish passage, a conventional weir is an obstacle. “Rock ramp” or roughened broad crested weirs use boulders and a gentle slope (3–5%) to let fish climb upstream, but you’ll need a local calibration or field check to get a reliable rating curve, as the roughness is unpredictable compared to concrete. Still, these designs offer a tradeoff: less precise flow measurement, but much improved habitat connection for fish and critters.
Advanced Computational Considerations
If the approach velocity upstream of your weir is high or the channel is tight, you can’t just use static head—you must apply the velocity head correction. The more energetic the approach, the more it bumps up the effective head and so the flow rate. For wide channels (at least three times the width of the weir), and moderate flows, you can essentially ignore this correction. For confined channels or fast flows, you’ll need to solve for Q iteratively since V0 (approach velocity) depends on Q itself, or at least check if the extra 1–2% error is acceptable for your work.
Submergence—where the downstream level is high enough to back up over the weir crest—cuts flow below what the open-flow formula predicts. If the tailwater above crest (Ht) is less than about two-thirds of the upstream head (H), you can ignore it. Past that, a correction is necessary, and above about 95% submergence, the structure no longer works as a weir but as a submerged orifice. Many canal systems consciously choose designs so they run below 75% submergence in normal conditions, bumping above that only in rare (flood) situations where accuracy isn’t the limiting factor anyway.
Worked Example: Agricultural Canal Measurement Structure
Problem: An irrigation district wants a broad crested weir in a trapezoidal canal, measuring up to 12 m³/s. The bottom width is 4.2 m, side slopes 1.5:1 (H:V), normal depth 1.8 m. They want a concrete rectangular weir with a 0.2 m radius on the upstream edge, crest 1.1 m above the canal bed. Find (a) crest length, (b) critical depth at full flow, (c) Froude number at crest, (d) whether the geometry checks out.
Solution:
(a) Required Crest Length:
Max Q = 12 m³/s, weir height P = 1.1 m, round edge so Cd = 1.65, g = 9.81. You need both H and L. A good starting point for H is about 1.0 m; that puts the operating pool at 2.1 m, safely above the canal’s normal depth.
Plug into Q = Cd L √g H3/2. Rearranged: L = Q / (Cd √g H3/2) = 12 / (1.65 × 3.132 × 1) = 12 / 5.168 = 2.32 m. Standard formwork makes L = 2.4 m practical.
Check final Q with L = 2.4 m: Q = 1.65 × 2.4 × 3.132 × 1.0 = 12.40 m³/s. That’s within a sensible margin.
(b) Critical Depth:
Hc = (2/3) × 1.0 = 0.667 m (flow depth right at the crest).
(c) Froude Number:
V = Q / (L × Hc) = 12.40 / (2.4 × 0.667) ≈ 7.75 m/s. Fr = V / √(g Hc) = 7.75 / 2.56 = 3.03. This is strongly supercritical (Froude number >>1)—exactly what you expect.
(d) Geometric Check:
A practical b (crest width) is 1.2 m, so H/b ≈ 0.83. That’s above the critical value for forming critical flow. But b also needs to be at least 2H (2.0 m)—1.2 m falls short, so up it to 2.1 m if you want textbook performance.
Height: P = 1.1 m should be above 2H (2.0 m), but here it’s less. This means approach velocity matters, so you should check its impact: canal area at upstream depth is about 15.44 m²; V₀ = Q/A = 0.80 m/s; associated velocity head adds only about 3.3% to H—acceptable for most channel work.
Result: Crest length L = 2.4 m, width b = 2.1 m, height P = 1.1 m, upstream radius = 0.2 m, design Q = 12.4 m³/s at H = 1.0 m. The design is at the lower edge of the geometric ratios, which means the weir will work but sits close to the limits of "broad" behavior. Installing monitoring taps at the crest makes post-construction adjustment and calibration possible. Expect to fine-tune Cd based on real data if you want best-possible accuracy.
Measurement Uncertainty and Calibration
The main uncertainties in these weirs come from measurement errors in head (H), inaccuracies in Cd, and tolerance in crest geometry. If you measure H very carefully and have a lab-calibrated Cd, you can get uncertainties down to about ±1.5%. On most real sites using staff gauges and handbook Cd values, 3–5% total error is typical. The discharge is especially sensitive to errors in H: a 1 cm error at H = 0.5 m equals 3% flow error; at H = 1.5 m it’s closer to 1%. So, always favour good head measurement and recheck calibration if you suspect crest wear or changes. Field calibration—using a meter, dye, or comparison with a temporary flow measurement—will catch real-world shifts. Annual checks with a level staff across five crest points spot settlement or wear. If Q shifts by more than 5% from original, inspect and consider a new Cd. That hands-on, routine work is why these structures remain reliable, year after year.
For additional hydraulic engineering resources, visit our comprehensive engineering calculator library.
Frequently Asked Questions
Free Engineering Calculators
Explore our complete library of free engineering and physics calculators.
Browse All Calculators →🔗 Explore More Free Engineering Calculators
- Pneumatic Valve Cv Flow Coefficient Calculator
- Hydraulic Pump Flow Rate Calculator
- Duct Sizing Calculator — Velocity Pressure
- Darcy-Weisbach Friction Loss Calculator
- Water Viscosity Calculator
- Differential Pressure Calculator
- Hydrostatic Pressure Calculator
- O-Ring Squeeze Calculator — Groove Design
- Newton's Second Law Calculator — F=ma
- Hydraulic Motor Torque and Speed Calculator
About the Author
Robbie Dickson — Chief Engineer & Founder, FIRGELLI Automations
Robbie Dickson brings over two decades of engineering expertise to FIRGELLI Automations. With a distinguished career at Rolls-Royce, BMW, and Ford, he has deep expertise in mechanical systems, actuator technology, and precision engineering.
Video Walkthrough - How to Use This Calculator
Need to implement these calculations?
Explore the precision-engineered motion control solutions used by top engineers.


