The classic design dilemma of modern living spaces: should your television command the room's attention, or should architectural features like a fireplace or elegant mantelpiece remain the focal point? For homeowners who refuse to compromise on either aesthetics or functionality, the solution lies not in choosing between these options, but in engineering a system that elegantly integrates both. This is the story of how one innovative homeowner combined linear actuators, home automation technology, and custom fabrication to create a motorized TV lift that responds intelligently to his household's viewing habits.
🎥 Video — Motorized TV Lift with Home Automation Integration
Mike, an IT professional and skilled DIY enthusiast, faced this exact challenge when setting up his new home. He had already invested in a comprehensive SmartThings home automation ecosystem that controlled lighting based on ambient conditions, adjusted heating as he approached home, and configured the entire house for sleep mode on command. His home had become a responsive environment that anticipated needs and adjusted accordingly. The next logical step was integrating his entertainment system into this intelligent framework—but not at the expense of proper ergonomics or design aesthetics.
The conventional solution of mounting a large television above a fireplace creates a significant health concern: the viewing angle forces viewers to crane their necks upward, leading to discomfort during extended viewing sessions. For Mike's massive 84-inch display, this positioning would be particularly problematic. Manual drop-down mounts exist, but after spending five figures on a premium television, the idea of walking across the room to manually raise and lower it seemed absurdly impractical. What Mike envisioned—and ultimately built—was a fully automated, custom TV lift mechanism that integrated seamlessly with his existing home automation infrastructure.
System Architecture and Home Automation Integration
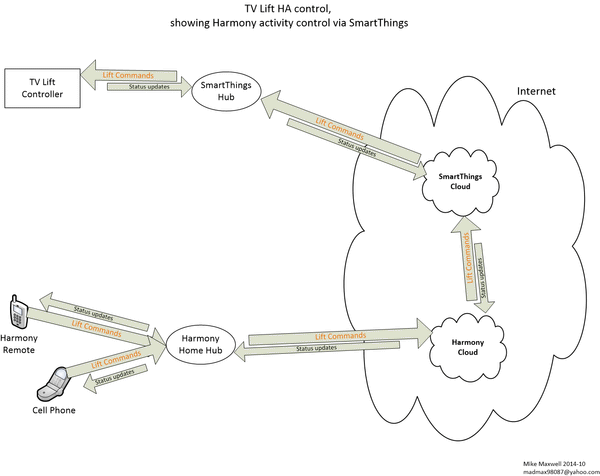
The brilliance of Mike's solution lies in how multiple smart home platforms communicate to create a seamless user experience. At first glance, the system architecture might seem complex, but each component serves a specific purpose in the automation chain. Understanding this integration demonstrates how modern home automation can extend beyond simple lighting and climate control to encompass custom mechanical systems.
The control hierarchy begins with a Harmony media system, which serves as the primary interface for controlling the television and audio equipment. The Harmony remote communicates via both infrared (IR) and radio frequency (RF) signals to the Harmony Hub, which acts as a central command station for all A/V equipment. The critical innovation in Mike's design was establishing bidirectional communication between the Harmony system and his SmartThings home automation hub.
This communication occurs through multiple pathways: an update daemon running in the background continuously polls the Harmony system to determine the operational status of the A/V equipment. This daemon reports to the SmartThings hub whether the TV and audio system are active or powered down. When Mike sends a lift command via the Harmony remote, that instruction travels to the Harmony Hub, then forwards to the SmartThings hub either through cloud services or via local area network (LAN) connection, depending on configuration.
The SmartThings hub then communicates with an Arduino Uno microcontroller mounted to the back of the television. This communication happens wirelessly through a Zigbee Radio Shield attached to the Arduino. The Arduino serves as the final control interface, directly managing the linear actuators and monitoring the position feedback from limit switches mounted on the custom lift mechanism.
Programming and Custom Commands
One of the advantages of this approach is that both SmartThings and Arduino platforms are well-documented and relatively accessible for DIY programmers. Since Mike controlled both sides of the communication protocol, he could define custom commands and their corresponding responses. The SmartThings hub was programmed to recognize specific lift commands and translate them into signals the Arduino could interpret.
The Arduino firmware handles the low-level control of the actuator system, including managing power delivery, monitoring position through microswitches, and implementing safety stops. This separation of concerns—high-level logic in SmartThings, low-level motor control in Arduino—is a robust architecture that allows for easier troubleshooting and future modifications.
The result is real-time status updates visible in both the SmartThings and Harmony mobile applications, plus full control via the Harmony universal remote. Users can see the current position of the TV lift and send commands from multiple interfaces, creating redundancy and convenience.
Intelligent Automation and Motion Sensing
Manual control of the TV lift would already represent a significant upgrade over fixed mounting solutions, but Mike took the automation further by implementing presence detection and activity monitoring. Hidden motion sensors positioned throughout the living room track occupancy, feeding data continuously to the SmartThings hub.
The hub employs a polling strategy, checking the status of the A/V equipment via the update daemon every five minutes. When the motion sensors detect no movement for a predetermined period, and the TV system status indicates all equipment is powered off, the hub automatically sends the retract command to the lift mechanism. This creates a truly autonomous system that maintains the aesthetic appeal of the space without requiring user intervention.
As Mike prepares for bed and the home transitions into sleep mode, the TV lift retracts automatically, returning the fireplace to its position as the room's centerpiece. The system demonstrates the potential of home automation when extended beyond conventional applications—it's not just controlling lights and thermostats, but actively managing the physical configuration of the living space based on usage patterns.
Mechanical Design and Actuator Selection

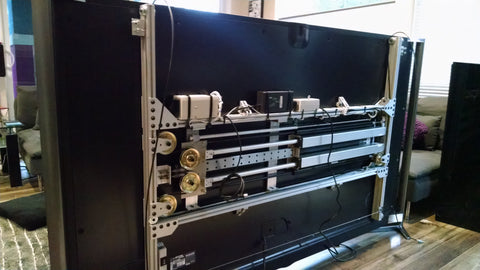
The mechanical heart of this project is a custom-fabricated aluminum frame that supports the 84-inch television and houses the actuation system. Mike's design incorporated two Sleek Rod Actuators as the primary lifting mechanism, supplemented by two gas springs for load balancing and smooth motion control. A pulley system distributes forces evenly across the frame, and several microswitches provide position feedback and safety limits.
The choice of rod-style linear actuators for this application reflects careful consideration of the load requirements. An 84-inch television represents a substantial mass—often exceeding 100 pounds—requiring actuators with sufficient force capacity and stroke length to handle the vertical travel distance. Rod actuators offer excellent force capacity in a compact form factor, and their rigid construction provides the stability necessary for supporting a large display.
Using two actuators instead of a single unit distributes the load and ensures balanced lifting motion. This dual-actuator configuration prevents the TV from tilting during travel and reduces stress on the mounting points. Synchronizing the two actuators requires either matched units with consistent extension rates or electronic control that monitors position and adjusts speed accordingly. The microswitches mounted on the frame provide position feedback, allowing the Arduino controller to stop the actuators precisely at the desired extended and retracted positions.
Gas Spring Integration for Smooth Operation
The inclusion of gas springs in the design serves multiple purposes. Gas springs provide constant force throughout their stroke length, helping to counterbalance the weight of the television. This reduces the load on the electric actuators, potentially extending their service life and allowing for smoother, quieter operation. During the descent phase, the gas springs provide controlled damping, preventing the television from dropping too quickly if power is interrupted or if the actuators disengage.
The pulley system works in conjunction with the gas springs to create mechanical advantage and distribute forces efficiently. Pulleys can redirect the force vector, allowing actuators to be mounted in orientations that optimize the available space behind the television. This is particularly important in custom installations where the depth of the mounting location may be limited.
Frame Construction and Mounting Considerations
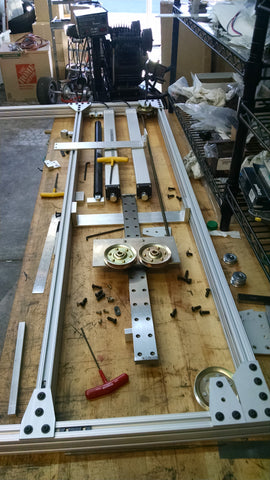
Mike fabricated the frame from aluminum, an excellent material choice for this application. Aluminum offers a high strength-to-weight ratio, doesn't rust, and is relatively easy to work with using common tools. The frame must be rigid enough to prevent flexing under load, as any movement could cause the television to oscillate during travel or result in binding of the actuator mechanism.
Proper mounting brackets are critical for attaching both the actuators to the frame and the entire assembly to the wall structure. The wall mounting must connect to studs or use appropriate anchors rated for significantly more than the combined weight of the TV and mechanism. Engineers typically recommend a safety factor of at least 3:1, meaning the mounting system should support three times the actual load.
The frame design must also accommodate the VESA mounting pattern on the back of the television. Most large displays use standardized VESA patterns (such as 400x400mm or 600x400mm), which dictate the spacing of the mounting holes. Mike's custom frame incorporated a VESA-compatible mounting plate that attached securely to the television while integrating with the lift mechanism.
Electrical System and Control Wiring
The electrical system powering this automated TV lift requires careful planning and proper wire management. The actuators draw significant current during operation, necessitating an appropriately sized power supply and proper gauge wiring. Most linear actuators suitable for TV lift applications operate on 12V or 24V DC power, drawing several amperes during movement.
Mike's Arduino-based control system manages the direction and speed of the actuators by controlling the polarity and voltage supplied to them. This typically requires either a relay-based switching circuit or an H-bridge motor driver capable of handling the actuator current requirements. The Arduino receives position feedback from the microswitches and controls the actuators accordingly, implementing software limits that prevent over-extension or retraction.
The Zigbee radio shield mounted on the Arduino enables wireless communication with the SmartThings hub, eliminating the need for long control cable runs between the TV mounting location and the home automation controller. This wireless approach simplifies installation and allows the Arduino to be mounted directly with the lift mechanism, minimizing wiring complexity.
Safety Features and Limit Switches
The microswitches integrated into the lift mechanism serve as both position indicators and safety limits. At minimum, the system should include switches at the fully extended and fully retracted positions to prevent the actuators from attempting to travel beyond the mechanical limits of the frame. Additional intermediate position switches can provide more granular feedback, allowing the control system to stop at specific viewing heights or implement multi-stage motion profiles.
Well-designed automated systems also incorporate overcurrent protection, ensuring that if the mechanism encounters an obstruction or mechanical failure, power is cut before damage occurs. This can be implemented in hardware through fuses or circuit breakers, or in software by monitoring current draw and halting operation if abnormal values are detected.
Video Demonstration of the System in Operation
The video above demonstrates the completed TV lift system in operation, showing the smooth, controlled motion of the mechanism as it lowers the television from its concealed position above the fireplace to the optimal viewing height. Note the synchronized movement of the actuators and the stability of the television throughout the travel range. The integration with the home automation system means this entire sequence can be triggered by voice command, remote control, or automatically based on the household's activities.
This second video provides additional perspectives on the lift mechanism and highlights the construction details of the custom frame and actuation system. The clean integration of the Arduino controller and wiring demonstrates the attention to detail in the project execution.
Design Considerations for Custom TV Lift Projects
For those inspired to undertake a similar project, several key design factors warrant careful consideration. These decisions will affect not only the performance and reliability of the system but also the complexity and cost of the build.
Load Capacity and Actuator Selection
The first step in any TV lift project is accurately determining the load requirements. Weigh your television including the mounting bracket, and add a 25-30% safety margin to account for dynamic loads during motion and potential future upgrades to a heavier display. This total load, divided between your actuators, determines the minimum force rating needed.
For vertical lift applications like Mike's, you'll want actuators with force ratings significantly higher than the static weight they're supporting. While a pair of actuators might theoretically need only 50 pounds of force each to lift a 100-pound television, you should specify units rated for at least 100-150 pounds each to ensure adequate performance, account for mechanical inefficiencies, and provide a safety margin.
Stroke length is equally important. Measure the vertical distance the TV must travel, from its concealed position to optimal viewing height. Add several inches to account for the mechanical mounting arrangement and to prevent operating the actuators at their absolute limits, which can reduce service life. Standard linear actuators are available in stroke lengths from 2 inches to 60 inches, so most TV lift applications can be accommodated.
Mounting Location and Space Constraints
The physical environment imposes constraints that must be worked into the design from the beginning. Measure the depth available behind the television mounting location—this determines how the actuators can be oriented and whether space-saving designs like track actuators might be advantageous. Consider also the wall structure: mounting to brick or concrete requires different fasteners than wood studs, and load-bearing capacity varies significantly.
The location of electrical outlets and the routing path for power and control cables should be planned early. While Mike used wireless control via Zigbee, the actuators themselves still require power delivery, and concealing these cables contributes to a professional-looking installation.
Speed and Noise Considerations
Linear actuators are available with different speed ratings, typically ranging from 0.5 to 2 inches per second. Faster actuators complete the TV lift cycle more quickly, but they may be louder and can create a jarring experience if the TV moves too rapidly. Many installers prefer moderate speeds of around 0.75 to 1 inch per second, which provides reasonable cycle times while maintaining smooth, controlled motion.
Noise levels vary significantly between actuator models. Applications in living spaces benefit from quieter actuators, even if they carry a price premium. The gas springs in Mike's design also help dampen noise by reducing the load on the electric actuators and preventing mechanical components from rattling during motion.
Alternative Approaches and System Variations
While Mike's implementation represents an sophisticated custom solution, several variations and alternative approaches can achieve similar results with different trade-offs in complexity, cost, and capability.
Commercial TV Lift Systems
For those who prefer turnkey solutions, commercial TV lift mechanisms are available that include pre-engineered actuator systems, mounting frames, and control electronics. These systems typically cost more than custom-built alternatives but offer the advantage of tested designs with known performance characteristics and sometimes include warranties. Many commercial TV lifts can be integrated with home automation systems through relay interfaces or RS-232 control protocols.
Simplified Control Systems
Not every installation requires the full sophistication of Mike's multi-platform automation approach. For basic motorized control, a simple control box with up/down buttons can operate dual actuators synchronously. More advanced remote control systems add wireless operation without requiring programming skills or integration with smart home platforms.
For DIY enthusiasts who want automation without the complexity of multiple hubs and communication protocols, standalone microcontroller solutions like ESP32 or ESP8266 boards can provide WiFi connectivity and direct control through simple web interfaces or integration with voice assistants like Amazon Alexa or Google Assistant.
Different Lift Configurations
Mike's drop-down configuration is ideal for concealing a TV above a fireplace, but other mounting scenarios may benefit from different approaches. Pop-up lifts that raise a television from inside furniture like cabinets or footboards use similar actuation principles but with different mechanical arrangements. Side-sliding mechanisms can reveal TVs from behind artwork or panels, using slide rails or drawer slides for smooth lateral motion.
Conclusion
Mike's motorized TV lift with home automation integration exemplifies what's possible when engineering expertise meets creative problem-solving. Rather than accepting the conventional compromises of fixed TV mounting, he designed and built a system that maintains both the aesthetic appeal of his living space and the ergonomic requirements for comfortable viewing. The integration with his existing SmartThings ecosystem elevates the solution from a motorized mechanism to an intelligent system that responds to household patterns and activities.
This project demonstrates several important principles for anyone considering similar automation endeavors: careful planning of system architecture, selection of components rated for the application requirements, attention to mechanical design details, and thoughtful integration of control systems. The result is not just functional but elegant—a living space that adapts to its occupants' needs while maintaining design integrity.
For DIY enthusiasts and custom installers, projects like this illustrate the expanding possibilities of linear actuator technology in home automation. As smart home platforms become more capable and motion control components more accessible, we can expect to see continued innovation in how physical spaces respond to digital control systems.
Frequently Asked Questions
What size linear actuator do I need for a TV lift?
The actuator size depends on your television's weight and the vertical travel distance required. As a general guideline, measure your TV's weight including the mounting bracket, then divide by two (assuming a dual-actuator configuration) and add 50% for safety margin. For example, a 100-pound TV would require actuators rated for at least 75 pounds of force each. For stroke length, measure the vertical distance between the concealed and viewing positions, then add 3-4 inches to avoid operating at the extreme limits. Most TV lift applications use actuators with 12-24 inch strokes, though larger displays concealed higher above fireplaces may require longer strokes.
Can I integrate a custom TV lift with Alexa or Google Home?
Yes, voice assistant integration is achievable through several approaches. The most straightforward method is using a smart home hub like SmartThings, Hubitat, or Home Assistant that already connects to Alexa or Google Home and can control relays or microcontrollers managing your actuators. Alternatively, you can use WiFi-enabled microcontrollers like ESP32 or ESP8266 boards programmed to appear as smart home devices directly to voice assistants. Many commercial control boxes also offer integration options through relay contacts that can be triggered by smart plugs or relay modules controlled by voice commands.
How do I synchronize two linear actuators for even lifting?
Synchronization can be achieved through several methods. The simplest is purchasing matched pairs of actuators with identical specifications and extension rates, then powering them from a single control circuit. For more precise synchronization, use feedback actuators with built-in position sensors (potentiometers or Hall effect sensors) that allow a microcontroller to monitor and adjust the extension of each actuator independently, correcting any drift. Another approach uses limit switches at key positions to ensure both actuators reach the same points simultaneously, though this provides less control during travel. High-end commercial systems employ dedicated synchronization controllers that actively monitor and adjust multiple actuators in real-time.
What safety features should a TV lift mechanism include?
Essential safety features include limit switches or software stops that prevent over-extension and over-retraction of the actuators, which could damage the mechanism or TV. Overcurrent protection through fuses or electronic monitoring detects if the mechanism encounters an obstruction and cuts power before damage occurs. The frame should include mechanical stops as a backup to electronic limits. For installations above seated areas, consider adding soft-start and soft-stop programming to prevent sudden movements that could dislodge the TV or startle occupants. Emergency stop functionality accessible through the control system allows immediate halt of operation if needed. Finally, ensure all mounting points are rated for at least three times the actual load, and use proper mounting brackets secured to structural elements, not just drywall.
How much does it cost to build a custom automated TV lift?
Cost varies significantly based on component choices and automation sophistication. A basic manual TV lift using a pair of quality linear actuators, aluminum framing materials, a simple control box, and power supply typically ranges from $400-800 in materials. Adding home automation integration with microcontrollers, wireless communication modules, and smart home hub compatibility adds $100-300 depending on the platform. Gas springs, if included for smooth operation, cost $50-150 per pair. Commercial off-the-shelf TV lift mechanisms range from $1,000 to $3,000+ depending on size and features, but lack the custom fit and integration possibilities of DIY builds. Labor costs for professional installation, if not doing it yourself, can add $500-1,500 depending on complexity and regional rates. Mike's sophisticated home automation integration, while impressive, used components mostly under $200 beyond the basic lift mechanism.


