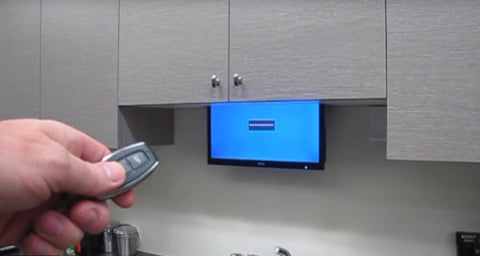
A drop-down TV lift transforms wasted cabinet space into a sophisticated home entertainment feature that appears when you need it and disappears when you don't. Whether you're looking to add a TV to your kitchen, create a hidden entertainment center in your bedroom, or maximize space in a compact living area, building your own motorized drop-down TV lift is more achievable than you might think. With the right components and a straightforward installation approach, you can create a professional-quality automated TV lift in a single weekend.
🎥 Video — How to Make a Drop Down TV Lift
This guide walks through the complete process of building a drop-down TV lift system that operates by remote control, using electric linear actuation technology. The mechanism is elegantly simple: a linear actuator pulls a cable system to raise the TV into a cabinet, while controlled extension allows gravity to smoothly lower it into view. The result is a clean, quiet operation that rivals commercial TV lift systems at a fraction of the cost.
We'll cover everything from selecting the correct actuator stroke length and calculating cable routing, to mounting guide rails and integrating wireless controls. By the end of this tutorial, you'll have a fully functional drop-down TV lift that adds both convenience and a premium design element to your home.
Understanding Drop-Down TV Lift Mechanics
A drop-down TV lift operates on a cable-driven pulley system powered by an electric linear actuator. Unlike commercial TV lifts that use complex scissor mechanisms or dual-actuator systems, this DIY approach uses a single actuator mounted horizontally in the cabinet, connected to a cable that runs through a pulley system to the TV mounting plate.
The operational principle is straightforward: when the actuator retracts (pulls in), it draws the cable and lifts the TV upward into the cabinet. When the actuator extends (pushes out), it releases tension on the cable, allowing gravity to lower the TV smoothly into viewing position. The slide rails mounted vertically in the cabinet ensure the TV travels in a perfectly straight path without wobbling or binding.
This design offers several advantages for DIY builders. First, it requires only a single actuator rather than synchronized dual actuators, simplifying both wiring and programming. Second, the horizontal mounting position keeps the actuator completely hidden from view. Third, the cable system allows you to use a relatively short-stroke actuator to achieve greater TV travel distance through mechanical advantage.
Required Components and Materials
Building a drop-down TV lift requires careful component selection to ensure smooth, reliable operation. Here's a comprehensive breakdown of everything you'll need:
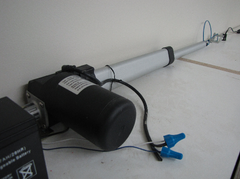
Linear Actuator Selection
The heart of your TV lift system is the electric actuator. For this application, a 9-inch stroke actuator provides sufficient travel for most TV sizes while remaining compact enough to fit within standard cabinet depths. The actuator should have these characteristics:
- Stroke length: 9 to 12 inches, depending on how far you want the TV to drop
- Force rating: Minimum 50 lbs for TVs up to 40 inches; 100+ lbs for larger displays
- Speed: 0.5 to 1.0 inch per second for smooth, quiet operation
- Voltage: 12V DC for compatibility with standard power supplies and battery backup options
- Noise level: Under 50 dB for kitchen or bedroom installations

A deluxe rod actuator with built-in limit switches is ideal because it automatically stops at full extension and retraction, protecting both the mechanism and your TV from over-travel.
Guide Rail System
The slide rails are critical for smooth, stable TV movement. Select rails with these specifications:
- Stroke length: 12 inches (3 inches longer than your actuator stroke)
- Load capacity: Rated for at least 150% of your TV weight
- Material: Steel or aluminum construction with sealed bearings
- Mounting pattern: Compatible with standard hole spacing for easy installation
Using rails slightly longer than your actuator stroke simplifies installation by providing adjustment room and ensures the TV mounting board never reaches the hard stops on the rails, which could cause binding or noise.
Cable and Pulley Components
The cable system requires:
- High-strength braided steel cable (typically 1/16 to 1/8 inch diameter)
- Cable clamps for secure attachment points
- Pulley bracket (MB1 bracket) for smooth cable direction changes
- Cable drag chain to organize and protect wiring during movement

Control System and Power
For wireless operation, you'll need:
- Two-channel remote control system (one channel for up, one for down)
- 12V DC power supply or rechargeable battery
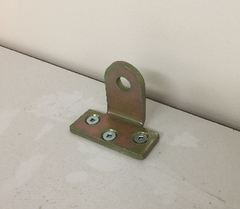
- Actuator mounting bracket (MB3 model for horizontal mounting)
Structural Materials
- MDF or plywood board for TV mounting plate (3/4 inch thick minimum)
- Wood screws appropriate for your cabinet material
- TV mounting hardware (typically included with your TV)
- Basic hand tools: drill, saw, screwdriver, measuring tape, level
Step-by-Step Installation Process
Step 1: Cabinet Preparation and Opening
Begin by carefully measuring your TV dimensions and determining the exact position where you want it visible when lowered. Mark the cabinet base where you'll cut the opening.
The opening should be slightly wider than the TV itself—add 2 to 3 inches to both width and depth to ensure clearance during movement. Use a jigsaw or circular saw to cut the opening, taking care to support the cutout piece as you near completion to prevent splintering. Sand the edges smooth to prevent cable or wire damage during operation.
Additionally, drill a 1-inch hole through the top of the cabinet where the lifting cable will route from the TV mounting area to the actuator. Position this hole centered between where your guide rails will mount.
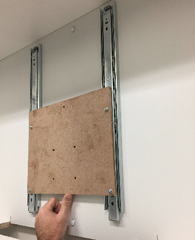
Step 2: Mounting the Guide Rails
The guide rails must be installed perfectly vertical and parallel to ensure smooth TV movement. Using a level, mark vertical lines on the cabinet back panel where the rails will mount—typically 6 to 8 inches apart, depending on your TV width.
Attach each rail using appropriate fasteners for your cabinet material. For MDF or plywood cabinets, use wood screws every 4 to 6 inches along the rail length. For heavier TVs, consider adding backing boards behind the cabinet panel for additional support. Test each rail by sliding the carrier up and down by hand—movement should be smooth and effortless throughout the entire stroke.
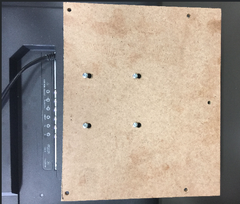
Step 3: Fabricating the TV Mounting Plate
Cut your MDF or plywood board to dimensions that provide at least 2 inches of clearance beyond your TV's mounting holes on all sides. The board needs three sets of holes:
- TV mounting holes: Match your TV's VESA mounting pattern (check your TV manual for exact spacing)
- Rail attachment holes: Align with the mounting holes on your guide rail carriers
- Cable attachment hole: Drill one centered hole near the top edge for the lifting cable
Use a countersink bit for the rail attachment holes so screw heads sit flush and don't interfere with movement. Test-fit the mounting plate to the guide rails before proceeding—it should slide freely without binding at any point in the travel range.
Step 4: Installing the Linear Actuator
Mount the linear actuator horizontally at the top of the cabinet using the MB3 mounting bracket. The actuator should be positioned so its mounting end (motor end) is securely fastened to the cabinet structure, while the rod end remains free-floating.

This single-point mounting works because the actuator only experiences tension forces during operation—it pulls the cable to lift the TV, with no compression or side-loading that would require stabilizing the rod end. Position the actuator far enough from the cable opening to allow for full stroke extension without interference.
Step 5: Wiring the Control System
The electrical connections for this system are straightforward, requiring no specialized knowledge beyond basic wire-to-wire connections. Connect the actuator's two lead wires to the output terminals on your wireless remote control receiver unit. Polarity determines direction—if the actuator moves opposite to your desired direction when testing, simply reverse these two connections.
Connect the power supply or battery to the input terminals on the control box, matching red to positive and black to negative. For permanent installations, a 12V DC power supply plugged into household current works well. For portable setups or locations without convenient outlets, a rechargeable 12V battery provides excellent runtime—most TV lifts consume less than 2 amps during movement.
Test the system before proceeding with cable installation by pressing the remote buttons and verifying the actuator extends and retracts smoothly in both directions.
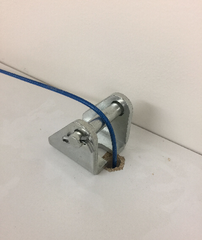
Step 6: Cable Routing and Installation
Install the MB1 pulley bracket at the edge of the cable opening in the cabinet top. This bracket provides a smooth, low-friction transition point for the cable as it changes direction from vertical (connected to TV) to horizontal (running to the actuator).
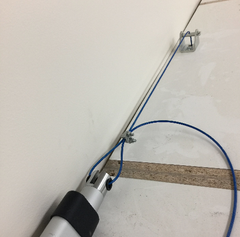
To set the correct cable length, use the remote to extend the actuator fully. Position the TV mounting plate at its lowest point—where you want the TV visible when in use. Thread the cable through the hole in the mounting plate, up through the pulley bracket, and across to the actuator rod. Leave several inches of extra length and temporarily secure the cable to the actuator using the supplied cable clamps.
Test the movement by retracting the actuator with the remote. The mounting plate should rise smoothly without jerking or binding. Adjust the cable tension if necessary—too loose and the TV may drop too quickly; too tight and it may not lower completely. Once satisfied with the movement, permanently secure the cable clamps and trim any excess cable length.
Step 7: Installing Cable Management
The nylon cable drag chain protects and organizes all wiring that must move with the TV—power cables for the TV itself, HDMI cables, and any other connections. Attach one end of the drag chain to the TV mounting plate and the other to a fixed point in the cabinet, allowing enough length for full travel plus a small service loop.
Route your TV cables through the drag chain, ensuring they're not twisted or kinked. The drag chain prevents cables from snagging on cabinet edges or getting pinched during movement—a critical safety feature that also extends cable life.
Step 8: Mounting the TV and Final Testing
With the mounting plate in its lowest position, attach your TV using the appropriate mounting hardware. Most modern TVs use VESA standard mounting patterns—verify you're using bolts of the correct length that thread fully into the TV's mounting points without bottoming out.

Before the TV is fully secured, connect all necessary cables—power, HDMI, antenna—routing them through the drag chain. Once everything is connected, perform multiple test cycles, watching carefully for any signs of binding, unusual noise, or cable interference.
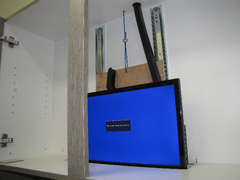
The TV should rise and lower smoothly at a consistent speed, stopping automatically when fully retracted or extended. Listen for any grinding, scraping, or motor strain—these indicate misalignment or binding that should be corrected before regular use.
Design Considerations and Customization Options
Calculating Load Requirements
Proper actuator selection requires understanding both static load (TV weight) and dynamic forces during movement. For drop-down applications, the actuator must provide enough force to overcome cable friction, pulley resistance, and rail drag—typically adding 30-50% to the static TV weight.
For example, a 30-pound TV should use an actuator rated for at least 40-45 pounds of force. This ensures adequate power reserve for smooth operation and extends actuator life by preventing motor overwork. If you're planning to install a particularly large TV or adding significant cable weight, consider using industrial actuators rated for higher loads.
Stroke Length Planning
The actuator stroke length determines how far your TV can drop from the cabinet. However, the cable routing through a pulley system doesn't provide 1:1 mechanical advantage—in this configuration, each inch of actuator stroke translates to approximately one inch of TV travel.
When selecting stroke length, consider both your desired viewing position and the space available within the cabinet when the TV is retracted. A 9-inch stroke works well for most applications, allowing the TV to drop to comfortable viewing height while still tucking completely into the cabinet when raised.
Speed Control Options
While the basic system operates at the actuator's native speed, you can add sophistication with variable speed controls. A PWM (pulse width modulation) controller allows you to adjust lifting and lowering speeds independently, creating smoother starts and stops that appear more refined and protect your equipment from sudden movements.
Integration with Home Automation
For smart home integration, the wireless remote control can be replaced or supplemented with relay modules controlled by home automation systems. This allows your TV lift to respond to voice commands, scheduled routines, or triggers from other smart devices. The 12V DC control signals are compatible with most home automation relay modules.
Troubleshooting Common Issues
TV Moves Unevenly or Binds
Binding or jerky movement usually indicates misaligned guide rails or an improperly seated mounting plate. Verify that both rails are perfectly vertical and parallel using a level and measuring to ensure equal spacing at top and bottom. Check that the mounting plate attachments to the rail carriers are secure but not over-tightened, which can cause rail deformation.
Insufficient Lifting Force
If the actuator struggles to lift the TV or stalls during operation, the problem may be undersized force capacity, excessive friction, or cable routing issues. Check the cable path for sharp bends or pinch points that increase friction. Verify that the pulley bracket allows smooth cable movement. If these are correct, you may need to upgrade to a higher-force actuator.
Excessive Noise During Operation
Noise can originate from the actuator motor, cable scraping, or rail friction. Actuator noise is typically motor or gear noise—if excessive, this may indicate overloading. Cable noise suggests inadequate pulley radius or sharp edges at cable transition points. Rail noise indicates inadequate lubrication or bearing wear. Address each potential source systematically.
Remote Control Unreliable or Unresponsive
Wireless control issues usually stem from interference, range limitations, or low battery. Ensure the receiver antenna is properly positioned and not blocked by metal cabinet components. Check batteries in both the remote transmitter and, if using battery power, the system power source. If problems persist, relocate the receiver closer to typical operating positions.
Maintenance and Long-Term Care
A well-maintained drop-down TV lift should provide years of reliable service with minimal attention. Establish a simple maintenance routine to ensure continued smooth operation:
Monthly checks: Operate the lift through several complete cycles, listening for unusual sounds and watching for hesitation or binding. Visually inspect cable condition for fraying or wear, particularly at attachment points and where it passes through the pulley.
Quarterly maintenance: Clean guide rails with a dry cloth to remove dust accumulation. Apply a small amount of dry lubricant (PTFE spray or dry silicone) to the rail surfaces—avoid wet oils that attract dust. Check all mounting hardware for tightness, as vibration can gradually loosen connections.
Annual service: Disconnect power and perform a thorough inspection of all mechanical components. Check cable clamps for tightness, inspect the actuator mounting bracket for stress or deformation, and verify that the TV mounting plate attachments remain secure. Test the remote control battery and replace if showing reduced range.
Keep the cable drag chain flexible by occasionally manually flexing it through its range of motion—this prevents the development of permanent set that can restrict movement. If you notice any increase in operating noise or reduction in speed, address it promptly before minor issues develop into component failure.
Safety Considerations
While drop-down TV lifts are generally safe when properly constructed, observe these precautions:
- Weight limits: Never exceed the rated capacity of your actuator or guide rails. Add a safety margin of at least 50% to account for dynamic forces.
- Cable security: Inspect cable clamps regularly and ensure they're properly tightened. A cable failure could result in the TV falling unexpectedly.
- Electrical safety: Use appropriate wire gauges for your power requirements and ensure all connections are secure and insulated. If hardwiring to household current, consult a licensed electrician.
- Clearance zones: Ensure nothing can be caught between the TV and cabinet opening during operation. Keep children's hands and pets clear during movement.
- Emergency stop: Familiarize all users with the remote control buttons so they can immediately stop movement if necessary.
- Structural integrity: Verify that your cabinet can support the combined weight of the TV, mounting hardware, and actuation system. Reinforce cabinet walls if necessary.
Cost Analysis and Project Budget
Building a DIY drop-down TV lift offers significant savings compared to commercial units, which typically start at $800 and can exceed $2,000 for premium models. Here's a realistic budget breakdown for a DIY build:
- Linear actuator (9-12" stroke): $120-180
- Guide rail pair (12" stroke): $80-120
- Wireless remote control system: $60-90
- Cable and pulley components: $40-60
- Mounting brackets: $30-50
- Cable drag chain: $20-35
- Power supply or battery: $25-45
- Mounting plate materials and hardware: $20-40
Total project cost: $395-620
This represents roughly 30-50% of the cost of commercial alternatives while providing a custom solution tailored to your exact space and requirements. The time investment is typically one weekend—4 to 8 hours for someone with basic DIY skills and tools.
Alternative Applications and Variations
The principles and components used in a drop-down TV lift can be adapted for numerous other hidden storage and reveal applications:
Ceiling-mounted projector lifts: Use the same mechanism inverted to lower a projector from a ceiling recess, with slide rails providing stability and cable management protecting connections.
Kitchen appliance lifts: Install stand mixers or other heavy appliances on a similar platform that raises from a base cabinet to counter height, eliminating the need to lift heavy equipment manually.
Hidden speaker systems: Create concealed audio installations where speakers deploy from ceiling or furniture cavities when needed and retract when not in use.
Artwork or mirror reveals: Install the mechanism behind artwork or mirrors to create hidden storage compartments or concealed television installations that appear when the covering piece lifts or lowers.
These variations may require different stroke lengths, force ratings, or mounting orientations, but the fundamental cable-and-pulley approach with linear actuator power remains the same.
Conclusion
Building a drop-down TV lift demonstrates how accessible modern linear actuation technology has become for DIY applications. What once required complex mechanisms or expensive commercial systems can now be accomplished with straightforward components, basic tools, and a weekend of work. The result is a professional-quality automated system that adds functionality, saves space, and creates a premium design element in your home.
The key to success lies in careful planning—accurately measuring your space, selecting appropriately rated components, and methodically following the installation sequence. Take time to understand how the cable routing affects mechanical advantage and ensure your guide rails are perfectly aligned before mounting the TV. With attention to these details, you'll create a reliable system that operates smoothly for years with minimal maintenance.
Whether you're retrofitting an existing cabinet or designing a new built-in installation, the flexible nature of this design allows customization to your specific space and requirements while maintaining the core operational principles that ensure success.
Frequently Asked Questions
What size linear actuator do I need for a drop-down TV lift?
For most residential drop-down TV lifts, a 9 to 12-inch stroke actuator works well, providing enough travel to lower the TV into comfortable viewing position while allowing it to fully retract into the cabinet. The force rating should be at least 50 pounds for TVs up to 40 inches, and 100+ pounds for larger displays. Consider your TV weight plus 30-50% additional capacity to account for cable friction, pulley resistance, and system efficiency losses. A 12V DC actuator with 0.5 to 1.0 inch per second speed provides smooth, quiet operation ideal for living spaces.
How much weight can a DIY drop-down TV lift support safely?
A properly constructed drop-down TV lift using appropriate components can safely support 30 to 60 pounds, which accommodates most TVs from 32 to 55 inches. The weight capacity is limited by three factors: actuator force rating, guide rail load capacity, and cable strength. Always select components rated for at least 150% of your TV's weight to provide an adequate safety margin. For heavier installations exceeding 60 pounds, consider using industrial-grade actuators and heavy-duty guide rails specifically rated for your load requirements. The cable itself is rarely the limiting factor—even 1/16-inch braided steel cable typically exceeds 200-pound breaking strength.
Can I install a drop-down TV lift without wireless control?
Yes, you can operate a drop-down TV lift using wired controls instead of wireless remotes. A simple rocker switch or momentary push-button switch wired directly to the actuator provides basic up and down control. This approach reduces cost by approximately $50-70 and eliminates potential wireless interference issues. However, you'll need to run switch wiring to a convenient location—typically mounted inside the cabinet where it remains hidden but accessible. For more sophisticated control, consider a wired control box with variable speed adjustment or programmable positioning. Wireless control offers convenience but isn't essential for reliable operation.
How long does it take to install a drop-down TV lift?
Most DIYers with basic woodworking skills and power tools can complete a drop-down TV lift installation in 4 to 8 hours spread over a weekend. The timeline breaks down roughly as follows: 1-2 hours for cabinet preparation and cutting the opening, 1-2 hours for guide rail installation and mounting plate fabrication, 1-2 hours for actuator mounting and cable routing, and 1-2 hours for wiring, TV mounting, and testing. First-time builders should allocate the full 8 hours to allow for learning, adjustments, and troubleshooting. Experienced builders with all components prepared can complete installation in as little as 3-4 hours. The most time-consuming aspects are ensuring perfectly aligned guide rails and achieving proper cable tension.
What maintenance does a drop-down TV lift require?
Drop-down TV lifts require minimal maintenance when properly constructed. Monthly operation through several cycles ensures all components remain functional and allows early detection of any issues. Clean guide rails quarterly with a dry cloth and apply dry lubricant to maintain smooth movement. Check cable condition regularly for fraying or wear, particularly at attachment points and pulley interfaces. Annually, inspect all mounting hardware for tightness and verify electrical connections remain secure. The actuator itself is typically sealed and requires no maintenance beyond occasional external cleaning. Most well-maintained systems operate reliably for 5+ years before requiring any component replacement, with the actuator motor being the component most likely to eventually need service due to normal wear.
Can this design work with curved or ultra-wide TVs?
Yes, the drop-down TV lift design accommodates curved and ultra-wide TVs with some modifications. For curved TVs, the main consideration is ensuring the mounting plate provides adequate clearance around the curved screen—typically adding an extra 2-3 inches to mounting plate dimensions. Ultra-wide TVs may require guide rails spaced farther apart and a wider cabinet opening, but the fundamental mechanism remains the same. Very wide displays (over 50 inches) may benefit from using two synchronized actuators for more balanced lifting force, though this significantly increases complexity and cost. Verify that your guide rails can handle the off-center loading that may occur with unusually shaped displays, and consider reinforcing the mounting plate with additional bracing for larger installations.


