Building an Automated Spice Rack: A Practical Guide to Kitchen Motion Control
The modern smart home isn't just about voice assistants and Wi-Fi thermostats—it's about thoughtful automation that solves real problems. The kitchen, with its countless cabinets, shelves, and storage challenges, presents an ideal opportunity to implement practical motion control solutions. One of the most satisfying and surprisingly simple automation projects is an automated spice rack that rises from your countertop or descends from upper cabinetry at the touch of a button.
🎥 Video — How to Make an Automated Spice Rack In this age of smart homes and the Internet of Things (IoT)
This project demonstrates fundamental principles of linear motion control in a compact, manageable format. Whether you're a woodworking enthusiast looking to add a high-tech touch to your kitchen remodel, or an engineer exploring home automation possibilities, an automated spice rack offers the perfect balance of practicality and sophistication. Using a single linear actuator, basic guide components, and straightforward wiring, you can create a professional-grade lifting mechanism that seamlessly integrates into your existing kitchen design.
What makes this project particularly appealing is its versatility. The same basic mechanism can be adapted for pop-up cutting boards, hidden utensil storage, concealed appliance platforms, or even medication cabinets. Once you understand the core principles, you'll see automation opportunities throughout your home.
Design Concepts and Installation Configurations
Before diving into the build, it's important to consider the various ways you can configure your automated spice rack. The installation location and movement direction fundamentally affect your design choices, required stroke length, and mounting approach.
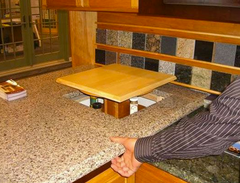
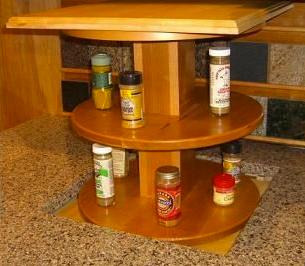
Countertop Pop-Up Design
The most popular configuration features a spice rack that retracts flush with the countertop and rises when activated. This design maximizes counter space when not in use and creates an impressive reveal effect. For countertop installations, consider incorporating a cutting board or decorative tile surface on top of the retracted rack—this transforms dead space into functional prep area. You'll need a linear actuator with stroke length matching your desired rise height, typically 8-12 inches for standard spice bottles.
Upper Cabinet Drop-Down Design
Installing your automated rack in an upper cabinet allows spices to descend to eye level, eliminating the need to reach into deep, dark cabinet spaces. This configuration works particularly well for wall-mounted cabinets above countertops. The actuator mounts at the top of the cabinet interior, with the spice platform suspended below. This approach requires careful consideration of weight distribution and may benefit from dual slide rails for stability.
Advanced Control Options
While this guide focuses on simple switch-operated control, the same mechanical assembly can be enhanced with sophisticated control systems. Motion sensors can trigger automatic deployment when you approach the cooking area. Integration with smart home systems allows voice activation or smartphone control. NFC tags enable touchless operation—simply tap your phone or a programmed card to activate. For these advanced implementations, consider using feedback actuators that provide position data, enabling precise height control and programmable presets.
Essential Components and Specifications
Selecting appropriate components ensures smooth, reliable operation and longevity. Here's a detailed breakdown of what you'll need and what to consider when choosing each component.
Electric Linear Actuator Selection
The actuator is the heart of your automated spice rack. For typical spice storage applications, you'll need an actuator capable of lifting 20-40 pounds—accounting for the weight of the shelf, spices, and any decorative elements. Standard linear actuators operating at 12VDC offer ideal characteristics for this application: quiet operation, moderate speed (around 0.5-1 inch per second), and sufficient force ratings.
Stroke length should match your desired travel distance. For countertop pop-ups, 8-10 inches provides adequate clearance for standard spice bottles. If storing taller bottles or multiple tiers, consider 12-14 inch stroke options. Compact micro linear actuators can work for lightweight racks storing smaller spice containers, though standard units provide better force margins and longevity.
Guide Rails and Slide Systems
Guide components prevent wobble and binding while the rack moves. Basic slide rails consist of extruded aluminum track with plastic or nylon sliders that mount to your shelf assembly. The guide rails should span the full travel length—matching or slightly exceeding your actuator's stroke length.
For enhanced smoothness and load capacity, upgrading to telescoping drawer slides significantly improves performance. Quality drawer slides provide superior load distribution, reduce friction, and eliminate any lateral play. This upgrade is particularly valuable for heavier installations or when using the rack top as a functional surface. When selecting drawer slides, choose full-extension models rated for at least 125% of your total moving weight.
Mounting Brackets and Hardware
Proper mounting is critical for safe, reliable operation. You'll need two sets of mounting brackets—one pair for the actuator ends and potentially additional brackets for guide rail attachment. Universal clevis-style brackets offer the most flexibility, accommodating slight misalignments during installation and allowing the actuator to articulate as needed.
The fixed mounting bracket attaches to your stationary base (countertop frame or cabinet floor). The moving bracket attaches to the spice rack itself. Using high-quality brackets prevents stress on the actuator body and ensures load forces transfer properly through the mounting points rather than creating side-loading on the actuator shaft.
Electrical Components and Control
A basic rocker switch provides simple up/down control through polarity reversal. The switch should be rated for at least 5 amps at 12VDC to handle actuator current draw safely. For the power supply, select a 12VDC adapter rated for at least 5 amps—this provides adequate headroom for startup current surges when the actuator begins moving under load.
Wire gauge matters for reliability and safety. Use 18-gauge or heavier insulated wire for all connections between the power supply, switch, and actuator. Proper wire connectors or soldered joints ensure secure electrical connections that won't work loose from vibration over time.
Step-by-Step Assembly Process
With components selected, the assembly process follows a logical sequence that ensures proper alignment and smooth operation.
Step 1: Install Guide Rails and Slide Mechanisms
Begin by attaching the slide rails or drawer slides to the spice shelf structure. Position rails along the outer sides or back of the shelf assembly where they won't interfere with spice storage. The rails must be perfectly parallel—even minor misalignment causes binding and uneven wear.
For basic slide rails, secure the track sections to your fixed structure (the cabinet or countertop frame) and attach the slider blocks to the moving shelf. Test the fit by manually sliding the shelf along its full travel path before proceeding to actuator installation. The movement should feel smooth and consistent throughout the entire range with no tight spots or wobble.
If using telescoping drawer slides, mount the cabinet-side sections first, ensuring they're level and properly spaced. Then attach the drawer-side sections to your spice rack frame. Premium drawer slides often include soft-close dampers—position these according to manufacturer instructions to ensure proper function.
Step 2: Mount the Fixed Actuator Bracket
The fixed mounting bracket attaches to your stationary base—this is the cabinet floor for drop-down designs or the countertop support frame for pop-up installations. Position this bracket so the actuator will be aligned parallel to the direction of travel and centered relative to the shelf's center of gravity.
For maximum stability, use wood screws that penetrate at least 1 inch into solid material. If your base structure uses plywood or particle board, consider using threaded inserts for stronger hold. The fixed bracket must withstand the full pushing force of the actuator without flexing or shifting.
Step 3: Attach the Moving Bracket to the Shelf
The moving bracket attaches to the spice rack itself—this is critical to understand. A common mistake is mounting both brackets to stationary structures, which prevents any movement. The moving bracket should attach to the back or bottom structural member of the shelf that moves along the guide rails.
Position this bracket at the same relative height as the fixed bracket so the actuator will be level when installed. In pop-up designs, the moving bracket typically mounts near the top rear of the shelf frame. For drop-down configurations, it mounts on the top surface of the descending platform.
Step 4: Install and Secure the Linear Actuator
With both brackets in place, attach the linear actuator using the clevis pins provided with your mounting brackets. Most actuators include pins and retaining clips—ensure these are fully seated to prevent the actuator from separating under load.
Before securing everything permanently, manually extend and retract the actuator (you can briefly apply power or use a battery) to verify smooth operation throughout the full stroke. Watch for any binding, misalignment, or unusual sounds. The shelf should move smoothly without requiring excessive force from the actuator.
Step 5: Wire the Control System
The electrical wiring follows a simple circuit: power supply to switch, switch to actuator. Most rocker switches have six terminals—use the center pair for power input and the outer pairs for the two output states (extend/retract). When wired for polarity reversal, flipping the switch one direction extends the actuator, flipping the opposite direction retracts it.
Strip wire ends cleanly, use proper crimp connectors or solder joints, and secure all connections with heat shrink tubing or electrical tape. Route wiring away from moving parts and sharp edges. If the switch will be mounted in a visible location, consider using color-matched wire or running wires through conduit for a finished appearance.
Before final installation, test the complete system. Connect the power supply, operate the switch, and observe several complete extension and retraction cycles. Listen for unusual sounds, check for smooth motion, and verify the actuator stops cleanly at both travel limits.
Installation and Finishing Considerations
With the mechanical and electrical assembly complete, the final step involves integrating your automated spice rack into your kitchen.
Cutout Preparation
Measure your assembled rack's footprint carefully, adding 1/8 inch clearance on all sides for smooth operation. For countertop installations, use a jigsaw to cut the opening, working from pre-drilled corner holes for clean corners. Support the cutout piece from below to prevent tear-out as you complete the cut.
For laminate countertops, apply painter's tape over cut lines to minimize chipping. Solid surface materials require carbide-tipped blades and slower cutting speeds. If you're uncomfortable making countertop cuts, consult with a professional installer—a poor cut can ruin expensive counter materials.
Finishing Touches
The gap between your moving shelf and the surrounding structure can be concealed with various finishing techniques. For countertop pop-ups, a slight reveal creates a clean aesthetic—typically 1/16 to 1/8 inch gap around the perimeter. This narrow gap prevents binding while remaining visually discreet.
Consider the top surface treatment for pop-up designs. A matching countertop material makes the rack invisible when retracted. A contrasting material or cutting board surface adds functionality. Ensure any top surface element is securely attached and doesn't interfere with the lift mechanism.
Switch placement deserves thoughtful consideration. Mount the control switch in an easily accessible but discreet location—under the cabinet edge, inside an adjacent cabinet door, or integrated into your backsplash. For a more sophisticated look, consider a flush-mount switch plate that matches your electrical outlets.
Performance Optimization and Upgrades
The Drawer Slide Advantage
While basic slide rails provide adequate guidance for lightweight applications, upgrading to quality drawer slides transforms the system's performance. Ball-bearing drawer slides rated for 100 pounds or more virtually eliminate friction, allowing the actuator to work more efficiently and with less strain.
This upgrade is particularly valuable when using the rack top as a functional surface—cutting board, prep area, or appliance platform. The enhanced load distribution and smooth gliding action prevent binding under higher loads. Choose drawer slides with stroke length equal to or slightly longer than your actuator stroke for optimal performance.
Reducing Actuator Force Requirements
Several design considerations minimize the force required from your actuator, improving efficiency and extending service life. Keep the moving assembly as light as possible—use thin plywood or composite materials rather than solid hardwood. Remove any unnecessary structural elements.
Proper guide alignment is crucial. Even slightly misaligned rails create friction and side-loading that waste actuator force. Take time during installation to ensure perfect parallelism between guide components. The shelf should glide effortlessly by hand before connecting actuator power.
Consider counterbalancing for heavier installations. Gas springs or tension springs can offset some of the lifting load, allowing a smaller actuator or improving speed. This approach is particularly useful for large, heavy platforms or when incorporating substantial storage capacity.
Advanced Control Integration
Basic switch control is reliable and straightforward, but several upgrade paths enhance convenience and functionality. A control box with wireless remote allows operation from anywhere in the kitchen—no need to reach for a switch with messy hands.
For smart home integration, actuator control boards compatible with Arduino or other microcontrollers enable sophisticated automation scenarios. Program the rack to deploy when you turn on the kitchen lights, use voice commands through smart home assistants, or create time-based routines that match your cooking schedule.
Limit switches or feedback actuators enable precise position control. This allows programming multiple preset heights—perhaps one position for frequently used spices and another for full access to deeper storage. Position feedback also enables soft-start and soft-stop motion profiles that reduce mechanical stress and noise.
Applications Beyond Spice Storage
Once you've mastered the basic automated shelf mechanism, the same principles apply to countless other applications throughout your home.
Additional Kitchen Applications
The mechanism adapts easily to hide small appliances, store cookbooks, or create concealed beverage stations. A larger platform with multiple actuators can lift heavy items like stand mixers or food processors. The same pop-up concept works for knife blocks, utensil holders, or specialized storage for baking supplies.
Island installations benefit particularly from automated storage—pop-up shelving on the backside of an island provides accessible storage without visible cabinetry. This maintains clean sightlines while maximizing functional storage capacity.
Whole-Home Automation Possibilities
Master the fundamentals with a spice rack, then expand to more ambitious projects. TV lifts use the same basic principles at larger scale. Hidden bathroom storage, motorized murphy beds, automated window treatments, and standing desks all employ linear actuation technology.
The beauty of understanding core motion control principles is recognizing opportunities everywhere. Any time something needs to move in a straight line—up, down, forward, back—a linear actuator provides the solution. From automotive applications to workshop organization, the applications are limited only by imagination.
Maintenance and Troubleshooting
Routine Maintenance
Automated mechanisms require minimal maintenance but benefit from occasional attention. Every few months, wipe guide rails clean of dust and debris. Apply a small amount of dry lubricant (like PTFE spray) to slide surfaces if movement becomes less smooth. Avoid wet lubricants that attract dust and create sticky buildup.
Inspect mounting hardware periodically. Vibration over time can loosen screws—check and tighten as needed. Examine wire connections to ensure they remain secure. Listen during operation for any new sounds that might indicate developing issues.
Common Issues and Solutions
If the shelf moves sluggishly or stops before reaching full extension, check for binding in the guide system. Even small obstructions cause problems. Verify nothing is interfering with the actuator shaft movement. Ensure the power supply provides adequate amperage—undersized power supplies cause premature stopping under load.
Uneven movement or wobbling indicates misaligned guides. Loosen guide rail mounting hardware and adjust alignment, ensuring parallel tracks. Tighten incrementally while testing movement until smooth operation returns.
If the actuator buzzes but doesn't move, it's experiencing mechanical binding or voltage drop. Check all electrical connections. Verify the actuator isn't jammed against a hard stop. Disconnect the actuator from its load and test independently—if it extends and retracts freely, the issue lies in mechanical alignment or excessive load.
Conclusion
Building an automated spice rack combines practical woodworking, basic electrical wiring, and motion control principles into a satisfying weekend project. The result is a functional, impressive addition to your kitchen that demonstrates the accessibility of home automation technology. Whether you're looking to maximize limited counter space, add a high-tech touch to your home, or simply eliminate the frustration of digging through cluttered spice cabinets, this project delivers tangible benefits.
The skills and knowledge gained extend far beyond spice storage. Understanding how linear actuators, guide systems, and control circuits work together opens doors to countless automation projects. Start with this straightforward implementation, then let your creativity guide you toward more ambitious applications throughout your home, workshop, or vehicle.
Frequently Asked Questions
What size linear actuator do I need for a spice rack?
For typical spice rack applications, a standard 12VDC actuator with 50-100 pound force capacity provides adequate power. Stroke length should match your desired travel distance—8 to 12 inches covers most installations. Calculate total moving weight (shelf, spices, top surface) and select an actuator rated for at least double that weight to ensure smooth, reliable operation and long service life. Micro linear actuators work for very lightweight applications but standard units offer better longevity.
Can I use multiple actuators for a wider spice rack?
Yes, wider platforms benefit from dual actuators to prevent twisting and ensure even lifting. When using multiple actuators, synchronization is important—they should extend and retract at matching speeds. Purchase matched actuators from the same production batch when possible. Wire them in parallel to the same control switch. For platforms wider than 24 inches or heavier than 40 pounds, dual actuators are recommended. Consider using feedback actuators with electronic synchronization for precise coordinated movement.
Are drawer slides necessary or can I use simple guide rails?
Basic slide rails work adequately for lightweight installations where the top surface won't bear additional loads. However, upgrading to quality drawer slides significantly improves performance—smoother operation, reduced friction, better load distribution, and enhanced durability. If you plan to use the rack top as a cutting board or functional surface, drawer slides rated for 100+ pounds provide the stability and smooth gliding action needed. The upgrade cost is modest compared to the performance improvement.
How much power does an automated spice rack consume?
Linear actuators only consume power while moving—when stationary, they draw no current. A typical 12VDC actuator draws 3-5 amps during movement, meaning a complete extension or retraction cycle (lasting 10-20 seconds depending on stroke length) uses minimal energy. Over a month of daily use, total consumption is negligible—usually less than operating a single incandescent light bulb for an hour. The power supply should be rated for at least 5 amps to handle peak current during startup.
How noisy is the operation?
Quality electric linear actuators operate quietly—typically 45-55 decibels, comparable to normal conversation or a quiet refrigerator. Much of the perceived noise comes from vibration transmitted through mounting structures. Using rubber isolators or soft mounting pads at bracket attachment points significantly reduces audible noise. Proper guide alignment prevents binding that creates squeaks or grinding sounds. Premium linear actuators with ball-screw or lead-screw drives run quieter than budget models with simpler mechanisms.
What safety considerations should I keep in mind?
Primary safety concerns involve preventing finger pinches and ensuring secure mounting. If children are present, consider adding soft-close functionality or limit switches that stop movement when meeting resistance. Ensure all mounting hardware is properly secured—a falling shelf poses injury risk and could damage countertops. Use appropriate wire gauges and proper connections to prevent electrical issues. For countertop installations, verify structural supports can handle the additional weight and movement forces. Add labels near the switch indicating the function for guests unfamiliar with your automated kitchen features.


