Converting Power Wheels to Remote Control with Linear Actuator Steering
Power Wheels ride-on vehicles represent the pinnacle of childhood dreams—miniature cars and trucks that give young children their first taste of independence behind the wheel. But what happens when a child is too young to safely operate these vehicles, or when physical limitations prevent them from enjoying this milestone? The answer lies in a growing DIY movement: converting Power Wheels to full remote control operation using electric linear actuators for precision steering control.
🎥 Video — Using a Linear Actuator to Create a RC Power Wheels Vehicle

This modification isn't just about adding a cool feature—it's about accessibility and inclusion. Parents have successfully converted these vehicles for children with cerebral palsy, Down syndrome, and other conditions that make manual operation challenging. The technical heart of this conversion is a feedback actuator connected to the steering mechanism, providing precise, repeatable control that can be operated remotely via radio control systems paired with microcontroller boards like Arduino or dedicated Linear Actuator Control (LAC) boards.
The beauty of using a linear actuator for this application lies in its inherent advantages: weatherproof construction that handles puddles and light rain, sealed internal components that protect against dirt and debris, and smooth, controlled motion that provides safe, predictable steering response. Unlike hobby servos or makeshift solutions, industrial-grade linear actuators are engineered for outdoor use and extended duty cycles—exactly what a children's ride-on vehicle demands.
Why Linear Actuators Are Ideal for RC Power Wheels Steering
When the Modified Power Wheels community—a dedicated forum of hobbyists and parents—discusses remote control steering conversions, linear actuators consistently emerge as the preferred solution. This preference isn't arbitrary; it's based on several critical technical and practical advantages.
First, linear actuators provide direct linear motion, which perfectly matches the mechanical requirements of a steering tie rod system. The actuator pushes and pulls in a straight line, directly translating to left and right wheel movement without requiring complex linkages or conversion mechanisms. This simplicity reduces points of failure and makes installation significantly more straightforward than rotary solutions that would require additional gearing.
Second, the sealed construction of quality linear actuators makes them inherently outdoor-ready. Power Wheels vehicles are designed for outdoor use—driveways, sidewalks, grass, and inevitably, puddles. A sealed feedback actuator with IP54 or higher rating can handle these environmental challenges without performance degradation. The internal lead screw mechanism is protected from moisture and debris, ensuring reliable operation even after exposure to the elements.
Third, the integration of position feedback sensors in modern linear actuators enables precise closed-loop control. This feedback capability is crucial for remote control applications—the control system needs to know the exact position of the steering mechanism to make accurate adjustments. With a feedback actuator, the Arduino or LAC board can continuously monitor actuator position and make real-time corrections, resulting in smooth, accurate steering response that feels natural to the remote operator.
Understanding the Mechanical Installation
The mechanical installation of a linear actuator for Power Wheels steering follows a straightforward principle: create a push-pull connection between the actuator and the vehicle's steering tie rod. However, the implementation requires careful attention to mounting points, geometry, and mechanical advantage.

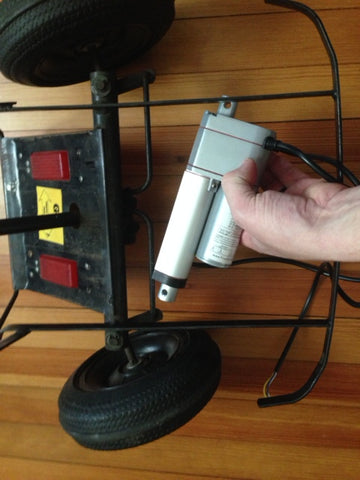
The first consideration is mounting the actuator body to the vehicle frame. The mounting point must be solid and rigid—any flex in the mounting will translate to imprecise steering and potential binding. Most builders fabricate a custom bracket or mounting plate, often from aluminum or steel, that bolts securely to the vehicle's existing frame structure. The use of proper mounting brackets designed for linear actuators ensures the unit is held at the correct angle and can withstand the lateral forces generated during steering.
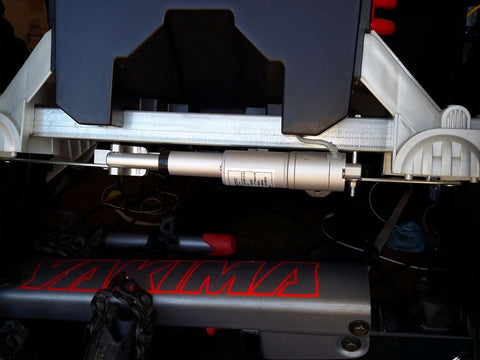
The second mounting point connects the actuator's extending rod to the steering tie rod—the mechanical linkage that connects the two front wheels. This connection typically requires a custom clevis or rod end bearing that allows for the angular changes that occur as the actuator pushes and pulls. The geometry here is critical: the actuator should be mounted to provide adequate mechanical advantage without creating binding at the extreme ends of travel. A common approach is to position the actuator roughly parallel to the tie rod in its centered position, which provides good leverage throughout the steering range.
Stroke length selection is another important consideration. Most Power Wheels vehicles require 2-4 inches of linear travel to achieve full lock-to-lock steering. A 4-inch or 6-inch stroke actuator typically provides sufficient range with room for adjustment. It's better to have excess stroke and limit it electronically than to have insufficient travel, as this provides flexibility for fine-tuning the steering geometry after installation.
Selecting the Right Actuator Specifications
Choosing the appropriate linear actuator for a Power Wheels conversion requires balancing several specifications: force rating, stroke length, speed, and importantly, the availability of position feedback.
Force requirements for Power Wheels steering are relatively modest. The steering mechanism on these vehicles is lightweight and operates at low speeds, so excessive force isn't necessary. Most successful builds use actuators with force ratings between 50 and 150 pounds. Higher force ratings aren't detrimental but do add cost and weight. The key consideration is ensuring the actuator has sufficient force to overcome any resistance in the steering mechanism while accounting for the mechanical disadvantage at the connection point.
Speed is another consideration that impacts the driving experience. Linear actuators are typically rated in inches per second of travel speed. For steering applications, speeds between 0.5 and 1.5 inches per second provide good response without making the steering feel twitchy or unsafe. Remember that the actuator speed translates through the mechanical geometry, so a faster actuator doesn't necessarily mean uncomfortably quick steering response.
The most critical specification for RC control is position feedback. Feedback actuators incorporate a potentiometer or Hall effect sensor that outputs a voltage signal proportional to the actuator's extended position. This signal feeds back to the control system (Arduino or LAC board), enabling precise, closed-loop control. Without feedback, the control system would operate "blind," unable to determine the actual steering position—a situation that makes accurate remote control nearly impossible.
Voltage considerations should match your existing Power Wheels electrical system. Most Power Wheels vehicles operate on 12V or 24V battery systems. Selecting an actuator with matching voltage simplifies the electrical integration, as you can power both the drive motors and the steering actuator from the same battery bank. Some builders add a separate battery for the actuator and control electronics to ensure steering remains operational even if the main drive battery depletes.
Control System Integration: Arduino and LAC Boards
The electronic control system bridges the gap between your radio control transmitter and the linear actuator's physical motion. Two primary approaches dominate the DIY community: Arduino-based custom controllers and dedicated Linear Actuator Control (LAC) boards.
Arduino-based solutions offer maximum flexibility and customization. Using an Arduino microcontroller board—typically an Arduino Uno or Mega—builders can write custom code that interprets signals from an RC receiver, processes the feedback from the actuator's position sensor, and controls a motor driver circuit that powers the actuator. This approach requires programming knowledge and understanding of PID (Proportional-Integral-Derivative) control loops, but it provides complete control over the steering response characteristics.

A typical Arduino-based setup includes the Arduino board itself, a motor driver module (often an H-bridge circuit like the L298N or a more robust automotive-grade driver), the RC receiver, and associated wiring. The Arduino reads the PWM (Pulse Width Modulation) signal from the RC receiver's steering channel, compares it to the current position reported by the actuator's feedback sensor, and adjusts motor power to move the actuator to the commanded position. Well-tuned code can achieve smooth, responsive steering that feels natural to operate.
LAC (Linear Actuator Control) boards provide a more integrated solution designed specifically for controlling feedback-equipped linear actuators. These dedicated boards typically include the motor driver circuitry, feedback processing, and RC receiver input processing in a single package. While they may offer less customization than an Arduino solution, they simplify installation and often include pre-tuned control algorithms that work well out of the box. For builders less comfortable with programming, a LAC board can significantly reduce the technical barrier to entry.
Regardless of which control approach you choose, the basic signal flow remains the same: the RC transmitter (in the hands of the parent or operator) sends steering commands to the receiver, which connects to the control board. The control board processes this command along with the actuator's position feedback and drives the actuator motor to achieve the desired steering angle. This closed-loop system continuously adjusts, providing smooth, accurate steering control.
Wiring and Electrical Considerations
The electrical integration of a linear actuator into a Power Wheels vehicle requires attention to wire sizing, circuit protection, and clean signal routing. These vehicles weren't designed with aftermarket electronics in mind, so careful planning ensures reliable operation and safety.
Power wiring for the actuator must be appropriately sized for the current draw. While linear actuators are generally efficient, they can draw several amperes under load, especially when overcoming resistance or moving quickly. Using wire that's too small creates voltage drop and can lead to overheating. Most installations use 16 AWG or 18 AWG wire for actuator power, with heavier 14 AWG wire for main battery connections. All power connections should be soldered and protected with heat shrink tubing or properly crimped with insulated terminals.
Circuit protection is essential. Adding an inline fuse in the power supply line to the actuator protects against short circuits and wiring faults. A 10-15 amp fuse is typically appropriate for most linear actuators used in Power Wheels applications. Similarly, the control electronics (Arduino or LAC board) should have their own power regulation and protection, often accomplished with a separate voltage regulator or a dedicated power supply module.
Signal wiring—the feedback sensor wires and RC receiver connections—should be kept separate from power wiring where possible. High-current motor wiring can induce electrical noise that interferes with low-voltage sensor signals. Using shielded cable for the feedback sensor wiring or simply routing these wires away from power cables minimizes noise-related issues. The feedback sensor typically provides a 0-5V or 0-10V analog signal, and maintaining signal integrity ensures accurate position sensing.
A clean installation also considers wire routing and protection. Zip ties, wire loom, and proper strain relief at connection points prevent wires from chafing against sharp edges or moving parts. Remember that these vehicles will be driven by children, often with less-than-gentle handling, so robust wire management prevents failures from vibration and physical stress.
Real-World Builds and Inspiration
The most compelling aspect of this modification is its real-world impact on families and children. The Modified Power Wheels community has documented numerous inspiring builds, with detailed tutorials that provide both technical guidance and heartfelt motivation.
One particularly detailed project documented the conversion of a Power Wheels vehicle for a child with cerebral palsy. The father, determined to give his son the same play experiences as his brother, meticulously planned and executed a full remote control conversion. The build log details every step: selecting the appropriate feedback actuator, fabricating custom mounting brackets, integrating an Arduino-based control system, and tuning the steering response. The result was a vehicle that could be controlled remotely while the child sat in the driver's seat, allowing him to experience the joy of "driving" alongside his sibling.
Another memorable project involved converting a Power Wheels Monster Trax for a child with Down syndrome. This build took a different approach, creating a trailer-style configuration where the child could ride while a parent maintained control via remote control. The linear actuator steering system proved essential to achieving smooth, safe operation across varied terrain. The builder documented not just the technical details but also the emotional journey—watching his son's face light up during the first test drive made every hour of fabrication and troubleshooting worthwhile.
These projects demonstrate that while the technical challenge is real, it's entirely achievable for DIY builders with basic mechanical and electrical skills. The key ingredients are patience, careful planning, and willingness to iterate and refine the system. The Modified Power Wheels forum provides a supportive community where builders share advice, troubleshoot problems, and celebrate successes together.
Safety Considerations and Best Practices
Any modification to a children's vehicle carries responsibility. While creating a remote-controlled Power Wheels can provide immense benefits, safety must remain the paramount concern throughout design, construction, and operation.
First, the mechanical installation must be robust and secure. Every bolt, bracket, and connection point should be checked for tightness and integrity. A steering actuator that comes loose during operation creates an immediate safety hazard. Using lock washers, thread-locking compound on critical fasteners, and quality mounting brackets ensures the installation withstands the vibration and stress of regular use.
Electrical safety is equally important. All wiring should be properly insulated and protected from physical damage. Exposed terminals should be covered, and connections should be made in weatherproof enclosures where possible. The addition of proper fusing and circuit protection prevents electrical fires in the event of a short circuit. Remember that children's vehicles will inevitably encounter water, whether from puddles, rain, or enthusiastic water play, so weatherproofing the electrical components extends beyond just the actuator itself.
Operational safety requires establishing clear protocols. The remote control operator must maintain line of sight with the vehicle at all times. The control system should include a fail-safe mode that centers the steering and stops the vehicle if the radio signal is lost. Testing this fail-safe behavior before allowing a child in the vehicle is essential. Additionally, starting with conservative speed settings and gradually increasing performance as both the operator and child gain confidence creates a safer learning curve.
Regular maintenance checks should become routine. Before each use, inspect the actuator mounting points, check for loose wiring, verify proper steering operation through full left and right travel, and ensure all safety features function correctly. The addition of a pre-operation checklist—similar to those used in aviation—might seem excessive for a toy, but it establishes good habits that prevent accidents.
Troubleshooting Common Issues
Even well-planned builds encounter challenges during installation and initial operation. Understanding common issues and their solutions helps builders overcome obstacles and achieve successful conversions.
Binding or stiff steering often indicates geometry problems in the actuator mounting. If the actuator angle creates a binding situation at the extremes of travel, the solution involves repositioning the actuator mounting point or adjusting the tie rod connection point. The goal is to maintain relatively consistent angles throughout the steering range. Some binding is inevitable in a non-ideal geometry, but it should never be severe enough to stall the actuator or create excessive current draw.
Erratic or jittery steering typically points to electrical noise affecting the feedback signal or inadequate tuning of the control loop. Rerouting feedback wiring away from power cables often resolves noise issues. If the problem persists, adding a small capacitor across the feedback signal lines can filter high-frequency noise. Control loop issues require tuning the PID parameters in the Arduino code or adjusting settings on a LAC board—this process involves iterative adjustment until smooth operation is achieved.
Loss of position feedback can occur if the actuator's internal potentiometer develops problems or if wiring becomes damaged. Testing the feedback voltage with a multimeter while manually moving the actuator shaft confirms whether the sensor is functioning. The voltage should change smoothly and proportionally with position. If feedback is lost entirely, the control system cannot operate properly, and the sensor or actuator may need replacement.
Insufficient steering range suggests either inadequate actuator stroke length or poor mechanical advantage at the connection point. Before purchasing a longer stroke actuator, experiment with adjusting the tie rod connection point closer to the pivot axis—this increases the steering angle achieved for a given amount of linear travel, though it also increases the force required. Finding the optimal balance between travel and force often requires trial and adjustment.
Expanding the Project: Additional Modifications
Once the remote control steering system is operational, many builders find themselves inspired to implement additional enhancements. The Modified Power Wheels community has explored numerous possibilities that build upon the basic RC conversion.
Remote throttle control is a natural extension. While the steering actuator handles directional control, adding remote control of the drive motor(s) creates a fully remote-controlled vehicle. This typically involves installing a motor controller between the battery and drive motors, with the controller receiving commands from the RC system. The child becomes a passenger while the operator has complete control over both speed and direction—ideal for very young children or situations requiring close parental supervision.
Camera systems provide another popular enhancement. Mounting a wireless camera on the vehicle and viewing the feed on a screen or FPV (First Person View) goggles allows the operator to "see" from the child's perspective. This becomes especially valuable when the vehicle moves out of direct line of sight or when precise navigation around obstacles is required. Small, inexpensive FPV camera systems designed for RC aircraft adapt well to Power Wheels applications.
Lighting upgrades both improve safety and add excitement. LED light bars, working headlights, and even underbody accent lighting make the vehicle more visible to others and create a more engaging experience for the child. With the control electronics already in place for the steering actuator, adding control circuits for auxiliary lighting becomes straightforward.
Some ambitious builders implement telemetry systems that report battery voltage, motor current, and vehicle speed back to the operator. This data can help monitor battery condition and predict when recharging will be needed. For accessibility applications, telemetry can also monitor the child's engagement and comfort, providing valuable feedback to parents and caregivers.
Cost Considerations and Budgeting
Understanding the financial investment required for a remote control Power Wheels conversion helps builders plan appropriately and make informed decisions about components and approaches.
The linear actuator itself represents the largest single component cost, typically ranging from $80 to $200 depending on specifications and features. Feedback actuators command a premium over basic models due to the integrated position sensor, but this feedback capability is essential for proper RC control. Selecting an actuator with appropriate force rating and stroke length the first time avoids the cost and frustration of purchasing a replacement after discovering the initial choice was inadequate.
Control electronics add $50 to $150 to the budget. An Arduino-based solution using an Arduino Uno ($25), motor driver module ($15-30), and associated components represents the economical end of this range. Dedicated LAC boards or more sophisticated motor controllers push costs higher but may include additional features that simplify installation and improve performance.
The RC transmitter and receiver system is another significant cost, ranging from $30 for basic hobby-grade equipment to $200+ for premium systems with better range and features. Many builders already own RC equipment from other hobbies, reducing this portion of the budget. Otherwise, entry-level hobby-grade systems provide adequate performance for this application at reasonable cost.
Fabrication materials, mounting hardware, wiring, and connectors typically add $50-75 to the project. Quality mounting brackets, appropriate wire sizes, waterproof connectors, and proper fasteners shouldn't be areas where costs are cut excessively—reliable mechanical and electrical connections are foundational to a safe, functional system.
The total project cost typically falls between $200 and $400, with the exact figure depending on component choices and whether any parts are already on hand. While this represents a significant investment, builders often note that the value—measured in joy, inclusion, and family bonding—far exceeds the monetary cost.
Conclusion: Engineering Solutions for Inclusion
Converting a Power Wheels vehicle to remote control operation using a linear actuator for steering represents more than a technical project—it's an exercise in engineering for accessibility and inclusion. The technical challenges are real but solvable, requiring basic mechanical fabrication skills, fundamental electrical knowledge, and patience to tune and refine the system.
The linear actuator serves as the ideal solution for remote steering control due to its direct linear motion, sealed weatherproof construction, and availability with integrated position feedback. When combined with Arduino or LAC control systems and standard RC equipment, these actuators enable precise, reliable steering control that allows children who couldn't otherwise operate these vehicles to experience the joy of independent mobility.
The broader community of builders, documented projects, and supportive forums provide both technical guidance and inspiration. The projects highlighted here—vehicles built for children with cerebral palsy, Down syndrome, and other conditions—demonstrate the real-world impact of applying engineering skills to solve accessibility challenges. Each successful build represents not just technical achievement but meaningful enhancement to a child's play experiences and family bonding opportunities.
For those considering this project, the path forward involves careful planning, appropriate component selection, methodical execution, and thorough safety consideration. FIRGELLI Automations supports these builders with appropriate feedback actuators, technical resources, and application support. Whether building for a special needs child, creating a unique remote-controlled toy, or simply embracing a challenging engineering project, the combination of electric linear actuators and modern control systems makes this ambitious modification achievable for dedicated DIY builders.
Frequently Asked Questions
What size linear actuator do I need for Power Wheels steering?
Most Power Wheels steering conversions use actuators with 4 to 6 inches of stroke length and force ratings between 50 and 150 pounds. The stroke length must provide enough travel to achieve full left-to-right steering motion, while the force rating should overcome steering resistance with some margin. A feedback actuator is essential for remote control applications, as it provides position data to the control system. Voltage should match your Power Wheels battery system—typically 12V. Before purchasing, measure the linear travel distance your steering tie rod moves from full left to full right lock to confirm the required stroke length.
Can linear actuators handle outdoor use in Power Wheels vehicles?
Yes, quality linear actuators are designed to handle outdoor environments. Look for actuators with IP54 or higher ingress protection ratings, which indicates the unit is sealed against dust and water splashing from any direction. The sealed construction protects internal components from moisture, dirt, and debris common in outdoor use. However, while they can handle puddles and light rain, they shouldn't be submerged. After exposure to wet conditions, allowing the vehicle to dry and performing periodic maintenance helps ensure long service life. The weatherproof nature of linear actuators is one reason they're preferred over hobby servos for this application.
Do I need programming experience to build an RC Power Wheels with Arduino?
Basic programming knowledge helps but isn't strictly required. Many builders successfully use example code and tutorials from the Modified Power Wheels community as starting points, making minor modifications for their specific setup. The Arduino code for controlling a feedback actuator based on RC input is well-documented in online tutorials. Alternatively, dedicated Linear Actuator Control (LAC) boards eliminate programming entirely—they're designed specifically to control feedback actuators using RC signals and include pre-configured control algorithms. If you're uncomfortable with programming, a LAC board provides a plug-and-play solution that simplifies the build process.
How much does it cost to convert Power Wheels to remote control?
The typical cost for a complete remote control steering conversion ranges from $200 to $400. The primary expenses include the feedback actuator ($80-200), control electronics such as Arduino and motor driver or LAC board ($50-150), RC transmitter and receiver ($30-200), and fabrication materials including mounting brackets, wiring, and hardware ($50-75). Costs vary based on component choices and whether you already own some equipment like RC gear. Additional features like remote throttle control or camera systems increase the budget. While the investment is significant, many builders consider it worthwhile for the accessibility and inclusion benefits it provides.
Is it safe to convert a Power Wheels to remote control?
When properly designed and implemented, remote control Power Wheels conversions can be safe. Critical safety considerations include: using robust mechanical mounting with quality mounting brackets and secure fasteners, implementing proper electrical protection with fuses and insulated wiring, establishing operational protocols including line-of-sight operation and fail-safe modes, and conducting regular maintenance checks before each use. The operator must remain attentive and maintain control at all times. Starting with conservative speed settings and gradually increasing performance as confidence builds creates a safer learning curve. Many successful builds demonstrate that with attention to safety throughout the design and operation phases, these conversions provide safe, enjoyable experiences for children.
Where can I find detailed build instructions and community support?
The Modified Power Wheels forum is the primary community hub for builders working on these projects. The forum includes detailed build logs, troubleshooting discussions, and technical advice from experienced builders. Several comprehensive tutorials document specific builds, including conversions for children with special needs. These tutorials typically include parts lists, wiring diagrams, code examples, and step-by-step photo documentation. Additionally, FIRGELLI Automations provides technical support for builders selecting and implementing linear actuators in these applications. Contacting FIRGELLI directly at sales@firgelliauto.com connects you with application engineers who can provide guidance on actuator selection and integration strategies specific to your project requirements.


