Choosing and installing drawer slides shouldn't feel complicated, yet many DIYers and even experienced cabinet makers find themselves overwhelmed by the sheer variety of options available. The difference between a smooth, reliable drawer that operates flawlessly for decades and one that binds, sags, or fails prematurely often comes down to selecting the right slide mechanism and installing it correctly.
This comprehensive guide cuts through the confusion surrounding drawer slides, covering everything from basic roller mechanisms to heavy-duty telescopic systems capable of supporting hundreds of pounds. Whether you're renovating kitchen cabinets, building custom furniture, or designing specialized storage solutions, understanding the mechanical principles, installation methods, and selection criteria for drawer slides will ensure your project succeeds. We'll explore the fundamental differences between roller slides and ball-bearing systems, walk through professional installation techniques step-by-step, and provide the technical specifications you need to match the right slide to your application.
By the end of this guide, you'll understand not just how to install drawer slides, but how to choose the optimal type for your specific needs—from lightweight kitchen drawers to heavy-duty tool storage requiring 400+ pound capacity ratings.
Engineering principle: A drawer slide is designed to carry load in compression, not in shear. Mount it so gravity presses the load straight down through the bearings, and the rated capacity holds. Mount it sideways and the same hardware loses most of its strength.
"A drawer slide's rated capacity is only as real as the load path behind it. The fasteners, the cabinet substrate, and the position the rating was measured in matter more than the number on the box. We rate every FIRGELLI slide at full extension because that is the condition the slide actually has to survive." — Robbie Dickson, Founder and Chief Engineer of FIRGELLI Automations
How do drawer slide mechanisms work?
Drawer slides—sometimes called drawer rollers or cabinet slides—are precision linear motion mechanisms designed to allow smooth, controlled movement along a single axis. While their application seems straightforward, the engineering behind reliable drawer slides involves careful consideration of load distribution, bearing design, and structural mechanics. These devices are typically sold and installed in pairs, with each slide carrying half the total drawer load.
The fundamental operating principle involves one component sliding over or within another component of complementary geometry, with rolling elements (bearings or wheels) positioned between them to minimize friction. This arrangement allows the mechanism to extend and retract smoothly while supporting significant loads. The quality of these rolling elements and the precision of the rail geometry directly determine the slide's performance characteristics, including load capacity, extension smoothness, and operational lifespan.

While drawer slides are traditionally manual mechanisms, they can be automated by integrating a linear actuator to provide motorized, hands-free operation. This approach is increasingly common in accessibility applications, automated storage systems, and smart home installations where touch-free drawer operation is desired.
What are the different types of drawer slides?
The drawer slide market divides primarily into two distinct categories, each with fundamentally different mechanical designs and performance characteristics. Understanding these differences is essential for selecting the appropriate mechanism for your application.
Roller Slides: Simple but Limited
Roller slides represent the most basic and economical drawer slide design. These mechanisms consist of two separate components: a sliding member that attaches to the drawer and a fixed member that mounts to the cabinet. Each component features plastic or nylon wheels positioned at the front and rear ends, creating four total contact points per slide pair.

The mechanical limitation of roller slides becomes apparent when analyzing load distribution. The entire weight of the drawer and its contents concentrates on just four small wheels—two on each side. This point-loading creates several problems: high contact stress on the wheels, accelerated wear, and eventual deformation of the plastic components under sustained loads. Additionally, most roller slides use simple plastic wheels rotating on metal axles without proper bearing assemblies, resulting in increased friction, noise generation, and premature wear.
Another significant limitation is extension capability. Roller slides typically provide only 75% of the drawer's depth as usable extension, meaning a portion of the drawer remains inaccessible when fully opened. This design constraint makes them unsuitable for applications requiring full access to drawer contents.
Despite these limitations, roller slides remain popular for light-duty applications due to their low cost and simple installation. They're adequate for drawers carrying minimal weight—typically under 50 pounds—and where occasional use is expected.
Ball-Bearing Drawer Slides: Precision Engineered Performance
Ball-bearing slides represent a significant engineering advancement over roller designs. These mechanisms utilize precision ball bearings contained within bearing cages, distributing loads across dozens of contact points rather than just four wheels. This fundamental difference in load distribution allows ball-bearing slides to support substantially higher weights while operating more smoothly.

Most quality ball-bearing slides feature telescopic construction with three or more nested members. This design allows the slide to extend to 100% or more of its closed length—a critical advantage for maximizing drawer accessibility. When fully extended, the drawer's entire depth becomes accessible, improving usability significantly compared to roller slides.
The structural rigidity of ball-bearing slides surpasses roller designs dramatically. When a drawer equipped with quality ball-bearing slides is fully extended, minimal deflection or play occurs even under substantial loads. This rigidity prevents drawer sagging and maintains alignment over the mechanism's lifetime. The FIRGELLI line of drawer slides features pre-drilled mounting patterns along the entire length of each member, simplifying installation while providing multiple attachment points for enhanced stability.
One particularly useful feature found on quality ball-bearing slides is the disconnect lever mechanism. This lever allows the drawer member to separate from the cabinet-mounted portions, making installation significantly easier. To operate this feature, simply press the release lever (downward for right-side levers, upward for left-side levers) while pulling the drawer member forward. Note that not all ball-bearing slides include this feature, though all FIRGELLI drawer slides incorporate it as standard.
The durability advantage of ball-bearing slides is substantial. Where roller slides might serve adequately for a few years of light use, quality ball-bearing slides can provide decades of reliable service even under demanding conditions. Load ratings for standard ball-bearing slides typically range from 100 to 400+ pounds, with heavy-duty versions capable of supporting 500 pounds or more when properly installed.
Slide Rails and Linear Guides: Beyond Traditional Drawers
Slide rails, also called linear guides or linear bearings, represent a different approach to linear motion entirely. Rather than the nested telescopic design of drawer slides, slide rails consist of a fixed-length rail with one or more carriages that travel along its length. Each carriage contains its own bearing system, typically using recirculating ball bearings for smooth, precise motion.

The key distinction is that slide rails maintain a constant length—they don't telescope. This characteristic makes them unsuitable for traditional drawer applications but ideal for specialized installations where the rail can remain visible or hidden behind paneling. The rails can be cut to custom lengths, offering flexibility that pre-sized drawer slides cannot match.
One significant advantage of slide rail systems is the ability to use multiple carriages on a single rail. This distributes loads across more bearing surfaces and dramatically improves stability for large, heavy panels. This feature makes slide rails the preferred choice for hidden door applications, such as sliding bookcase doors or concealed wall panels.

Additionally, slide rails typically allow friction adjustment, enabling fine-tuning of the resistance to movement. This adjustability proves valuable in applications where controlled, damped motion is desired, or where the mechanism must support a panel at any position along its travel without motor assistance.
While both drawer slides and slide rails facilitate linear motion, their applications differ substantially. Drawer slides excel in space-constrained applications requiring telescopic extension, while slide rails serve better for installations where constant-length guidance is acceptable and where multiple support points or custom dimensions are beneficial.
How do you choose the right drawer slide?
Selecting appropriate drawer slides requires analyzing several technical factors that directly impact performance, reliability, and longevity. Making informed decisions about these parameters prevents costly mistakes and ensures your installation performs as intended.
Load Capacity and Structural Loading
Load rating represents the maximum weight a drawer slide can safely support. However, this seemingly straightforward specification requires careful interpretation. The rated load capacity applies only when the drawer is properly installed with adequate structural support and appropriate fasteners.

Understanding the complete load path is essential. The drawer slide transfers forces through mounting fasteners into the cabinet structure. If either the fasteners or the cabinet material cannot handle these forces, the system will fail regardless of the slide's rated capacity. A drawer slide rated for 400 pounds means nothing if it's attached with undersized screws or mounted into particleboard that cannot resist pull-out forces.
The mounting fasteners experience shear stress—a force parallel to the fastener's cross-section attempting to shear the screw in two. This loading condition is why proper fastener selection matters critically. Wood screws should be appropriately sized for the material thickness and type, while bolted installations require consideration of bolt grade and thread engagement length.
Cabinet construction also influences effective load capacity. Solid hardwood provides excellent screw retention, while particle board and MDF offer less resistance to fastener pull-out. When working with engineered wood products, using more fastening points and potentially larger screws helps compensate for reduced material strength.
Critical specification note: Be aware that some manufacturers rate load capacity with the drawer closed, while others rate it when fully extended. Extended position ratings are more conservative and represent real-world use conditions. All FIRGELLI drawer slides specify load ratings at full extension, providing honest, usable capacity figures. Hardware store slides often cite closed-position ratings, which can be 50% higher than extended-position capacity—a significant difference that leads to undersized installations if not understood.
Extension Length and Telescopic Design
The required extension length determines how far the drawer must travel to provide full access to its contents. This dimension directly influences which slide designs are viable for your application.

Extension length, closed length, and overall length are interrelated dimensions that define a slide's geometry:
- Closed length: The slide's dimension when fully retracted, which must fit within the cabinet's available depth
- Extension length: How far the drawer member extends from the cabinet member at full travel
- Overall length: The total length of the mechanism when fully extended
For telescopic slides, the extension length typically equals or exceeds the closed length. Three-section telescopic designs can achieve 100% extension (extension equals closed length), while some specialized designs offer over-travel capability where extension exceeds closed length by 10-15%. This over-travel feature allows drawers to extend slightly beyond the cabinet face, improving access to rear compartments.
Non-telescopic two-section slides generally provide only 75% extension relative to their closed length. This limitation restricts access to the rear portion of the drawer, making these designs less suitable for applications requiring full drawer access.
When selecting extension length, measure the drawer's depth and subtract approximately 1 inch to account for the drawer face thickness and any cabinet face frame. This calculation provides the minimum required extension length. Choosing a slide with this extension ensures the drawer can open sufficiently for full access while the closed length remains short enough to fit within the cabinet.
Material Thickness and Construction Quality
The gauge (thickness) of the steel used in drawer slide construction directly impacts strength, rigidity, and longevity. This specification often differentiates quality mechanisms from cheap imports, yet it's rarely advertised prominently.
Quality drawer slides use steel ranging from 1.0mm to 2.0mm thickness depending on the slide's size and load rating. Heavier gauge steel resists bending and torsional loading better, maintaining drawer alignment even when loaded asymmetrically. Thin-walled construction—common in economy slides—feels tinny and flexes noticeably under load, leading to binding, misalignment, and premature wear.
Material quality extends beyond thickness to include steel composition and finishing. Quality slides use properly heat-treated steel with corrosion-resistant zinc plating or other protective coatings. The bearing races—the surfaces along which ball bearings roll—should be hardened and precisely ground to minimize friction and wear. Soft, roughly finished races cause rapid bearing deterioration and rough operation.
Bearing quality also varies dramatically between manufacturers. Premium slides use hardened steel ball bearings with tight dimensional tolerances, ensuring smooth operation and even load distribution. Economy slides may use lower-grade bearings with greater dimensional variation, resulting in uneven loading, increased friction, and shorter service life.
What are the drawer slide mounting methods?
The mounting configuration determines where and how drawer slides attach to the cabinet and drawer components. In most cases, the cabinet design dictates the mounting method, but understanding the options helps when designing custom cabinetry or modifying existing installations.

| Mount Type | Slides per Drawer | Capacity vs Rated | Typical Extension | Visibility | Best Use |
|---|---|---|---|---|---|
| Side-mount | 2 | 100% (compression loading) | Up to 100% (telescopic) | Visible on sides | Default for most applications |
| Center-mount | 1 | 20–30% of rated (lateral loading) | Typically 75% | Fully hidden | Light-duty drawers where aesthetics dominate |
| Undermount | 2 | ~90–100% (compression loading) | 75–90% | Mostly hidden | Premium cabinetry needing concealment with real capacity |
| Feature | Roller Slides | Ball-Bearing Slides |
|---|---|---|
| Contact points per pair | 4 plastic wheels | Dozens of steel bearings |
| Typical capacity | Under 50 lb | 100–500+ lb |
| Extension | ~75% of length | Up to 100% (3-section) |
| Service life | Years (light use) | Decades (proper sizing) |
| Cost | Low | Moderate to high |
| Disconnect lever | No | Available on quality slides |
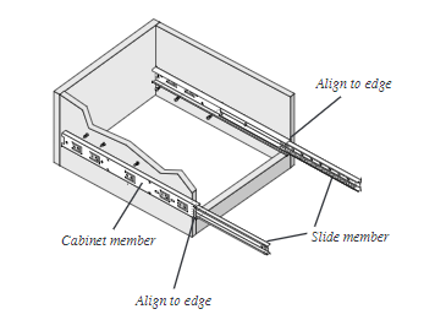
Side-Mount Installation
Side mounting represents the most common installation method and typically the easiest for DIY installers. This configuration positions drawer slides vertically on the sides of the drawer box and cabinet, with the slides oriented so the drawer weight loads them in compression—the strongest loading direction for these mechanisms.
Side-mount slides are sold in pairs since both left and right sides require a slide. The installation process is straightforward: the cabinet member attaches to the interior cabinet side panel, and the drawer member attaches to the exterior side of the drawer box. This arrangement places the slide's mounting holes in easily accessible locations, simplifying fastener installation.
The clearance requirement for side-mount slides depends on the slide's thickness—typically 3/8" to 1/2" per side. This means the drawer box must be approximately 3/4" to 1" narrower than the cabinet opening to accommodate both slides. This clearance requirement is standard in cabinet construction and rarely presents problems.
Side-mount slides maintain their full load capacity rating because they're loaded in compression vertically. The drawer's weight presses down onto the bearing system, which is how these mechanisms are designed to carry loads. This orientation provides maximum strength and reliability.
Center-Mount Installation
Center-mount slides install underneath the drawer along its centerline, mounting flat rather than vertically. This configuration uses a single slide per drawer rather than a pair, which can reduce costs but introduces significant performance compromises.

The primary advantage of center mounting is aesthetic—the slide mechanism remains completely hidden from view, maintaining clean sightlines inside the cabinet. This appeals in applications where visible hardware detracts from the design intent.
However, center mounting introduces a critical disadvantage: the slide operates in a sideways orientation, loading the bearing system laterally rather than vertically. This orientation dramatically reduces load capacity—typically by 70-80% compared to the same slide mounted vertically. A side-mount slide rated for 400 pounds might support only 80-100 pounds when center-mounted. This reduced capacity makes center-mount installations suitable only for lightweight drawer contents.
Additionally, center-mount slides don't provide lateral stability. Since only one slide supports the drawer along its centerline, nothing prevents the drawer from tilting side-to-side if loaded asymmetrically. This instability can cause binding and uneven wear.
Undermount Installation
Undermount slides attach to the underside of the drawer sides rather than the exterior surfaces, mounting horizontally but in pairs like side-mount configurations. This method offers a compromise between full concealment and reasonable load capacity.

The undermount approach keeps the slides relatively hidden while maintaining the stability advantages of a two-slide system. The drawer loads the slides in compression, preserving most of their rated load capacity. However, these slides typically don't offer full-extension capability—most undermount designs provide 75-90% extension rather than the 100% extension common with side-mount telescopic slides.
Undermount installation requires careful measurement and alignment since accessing the mounting locations during installation is more difficult than with side-mount hardware. The drawer box must also provide adequate thickness and strength at the bottom edges where the slides attach.
How do you install drawer slides step by step?
Professional installation of drawer slides requires careful measurement, proper alignment, and attention to structural considerations. Following this systematic approach ensures smooth operation and maximum longevity.

Step 1: Separate Cabinet and Drawer Members
Quality ball-bearing slides consist of three components: the cabinet member (which mounts to the fixed cabinet), the drawer member (which attaches to the movable drawer), and an intermediate member that remains connected to the cabinet member during installation. Separating these components before installation significantly simplifies the mounting process.
For slides equipped with release levers, separation is straightforward: fully extend the slide, then press the release lever while pulling the drawer member forward. The release lever typically appears as a plastic tab positioned between the intermediate member and drawer member. If the lever is on the right side, press downward; if on the left side, press upward. The drawer member will slide free once the lever releases its locking mechanism.
Roller slides arrive pre-separated, requiring no disassembly. Non-releasing ball-bearing slides cannot be separated prior to installation, making them more challenging to install—you'll need assistance or temporary supports to hold components in position during fastening.
Step 2: Install Cabinet Member
Always begin installation by mounting the cabinet member, which provides the fixed reference from which all other measurements derive. Proper positioning at this stage prevents misalignment issues later.
Position the cabinet member inside the cabinet according to your mounting configuration (side-mount, center-mount, or undermount). The front-to-back positioning depends on your drawer front style:
- Overlay fronts: Align the front of the cabinet member flush with the front edge of the cabinet opening
- Inset fronts: Set back the cabinet member by the thickness of your drawer front material
Ensure both slides are level and parallel by measuring the distance from the cabinet edge to the slide at both the front and rear mounting points. These dimensions must match on both sides to prevent binding. Use a torpedo level to verify the cabinet member sits horizontally.
Many quality slides feature slotted mounting holes that allow position adjustment after initial installation. These slots typically orient horizontally on the cabinet member, permitting front-to-back depth adjustments. When using slotted holes, initially secure the cabinet member with only two fasteners, leaving the adjustment slots unfastened until final alignment verification.

Fastener selection is critical for load capacity realization. Use wood screws at least 1" long for solid wood, and consider pan-head screws rather than flat-head for maximum pull-out resistance. For engineered wood products (particle board, MDF, plywood), use slightly longer screws and ensure at least three mounting points per slide. For high-load applications, pre-drill pilot holes to prevent splitting and ensure straight fastener installation.
After securing the cabinet member, verify the intermediate member slides smoothly along its full travel. Any binding or rough spots indicate misalignment that must be corrected before proceeding.
Step 3: Install Drawer Member
With the cabinet member securely mounted, install the drawer member on the drawer box itself. This process differs slightly depending on whether you're using releasing or non-releasing slides.
For releasing ball-bearing slides and roller slides, position the drawer member on the drawer box with its front edge aligned to the front of the drawer. The drawer member's mounting surface should sit flat against the drawer side, with the sliding portion extending toward the rear.

Again, verify both drawer members are parallel and level. Measure from the drawer's top edge to the slide at multiple points along its length to ensure consistent positioning. Misalignment here causes the drawer to sit cockeyed in the cabinet opening or bind during operation.
If using slotted adjustment holes, the drawer member typically features vertical slots that allow height adjustment. Secure the drawer member initially using two fasteners in round holes, leaving the slotted holes unfastened for later adjustment.
For non-releasing ball-bearing slides—those without separation capability—you'll need to mount the drawer while the slides are fully extended in the cabinet. This requires either an assistant to hold the drawer in position or temporary supports (small blocks or shims) to maintain alignment while driving fasteners. Extend the slides fully, position the drawer box at the correct height and depth, then fasten through the drawer member's mounting holes into the drawer sides. This method is more cumbersome but works when using slides without release mechanisms.
Step 4: Insert Drawer and Make Final Adjustments
With both cabinet and drawer members mounted, connect them to complete the installation. The connection method depends on slide type.
For roller slides, position the drawer's front near the cabinet opening, then angle the drawer slightly to position the drawer rollers above the cabinet rollers. Lower the drawer while pushing it rearward until the rollers engage, then slide the drawer fully closed.
For releasing ball-bearing slides, align the drawer member with the intermediate member (still extended in the cabinet) and push the drawer member into the intermediate member. Push the drawer fully closed—the release lever will engage automatically, locking the components together.

Test the drawer's operation through several complete cycles. Observe whether it opens and closes smoothly without binding, whether the drawer face sits parallel to the cabinet opening when closed, and whether the drawer height aligns properly with adjacent drawers.
Make adjustments using the slotted mounting holes if necessary:
- Horizontal slots (cabinet member): Adjust drawer depth, moving the drawer in or out relative to the cabinet face
- Vertical slots (drawer member): Adjust drawer height, raising or lowering the drawer within the cabinet opening
After achieving proper alignment, install fasteners in the remaining mounting holes, including those you left open initially for adjustment. For high-load applications, consider replacing standard wood screws with locking screws or adding lock washers to prevent fasteners from loosening due to vibration and repeated cycling.
For maximum security in heavy-duty installations, use at least three fasteners per member, with at least two being locking-type fasteners. This prevents the slide from working loose over time even under demanding use.
How do you select drawer slides for your specific application?
Choosing optimal drawer slides requires analyzing your specific application requirements and matching them against available product specifications. This systematic approach prevents costly mistakes and ensures long-term satisfaction with your installation.
Determining Required Extension Length
Extension length selection begins with measuring your drawer's depth—the distance from the drawer's front face to its rear panel. For side-mount installations, measure the cabinet depth from the inside face of the cabinet back to the front edge of the face frame or cabinet opening. Subtract approximately 1" from this measurement to account for the drawer front thickness and any clearance requirements. This calculation yields the minimum required slide extension.

For maximum drawer accessibility, select slides offering 100% extension—meaning the extension length equals the slide's closed length. This configuration allows the drawer to open completely, providing access to contents at the very back. Three-section telescopic slides achieve this 100% extension through their nested construction.
Standard drawer slides are available in 2" increments from 10" to 28", with heavy-duty models available in longer lengths up to 60". Choose the slide length closest to your required extension, erring on the longer side if between sizes. Slightly longer slides function perfectly well, while slides too short leave a portion of the drawer inaccessible.
Verify the closed length will fit within your cabinet depth. For telescopic slides with 100% extension, the closed length equals the extension length. If your cabinet depth is 20" and you need 18" of extension, an 18" slide with an 18" closed length fits comfortably. However, if your cabinet is only 16" deep, you cannot accommodate an 18" slide—you would need to use a shorter slide and accept reduced drawer access or modify the cabinet construction.
Calculating Load Requirements
Accurate load calculation prevents premature failure and ensures safe operation. Begin by estimating the maximum weight the drawer will contain when fully loaded. Add the weight of the drawer box itself—solid hardwood drawers can weigh 15-25 pounds empty, while plywood or MDF construction weighs less.
Apply a safety factor of 1.5 to 2.0 to your calculated load. This margin accounts for dynamic loading (the impact forces when closing a drawer), asymmetric loading (when weight concentrates on one side), and long-term durability. If your drawer will carry 150 pounds at maximum, specify slides rated for at least 225-300 pounds (150 × 1.5 to 2.0).
Remember that load ratings assume proper installation with adequate fasteners and structural support. Weak cabinet construction or insufficient fastening reduces effective capacity regardless of the slide's specifications. Also verify whether the load rating applies at full extension—the most demanding condition—or in the closed position. FIRGELLI drawer slides specify load ratings at full extension, providing realistic, usable capacity figures.
For residential kitchen applications, 100-150 pound capacity typically suffices. Tool storage, shop cabinets, and commercial applications often require 300-500 pound capacity. Heavy-duty industrial applications may demand specialized slides rated for 500+ pounds.
FIRGELLI offers two series of heavy-duty drawer slides specifically for demanding applications:
- 10" to 50" slides with 400-pound capacity for general heavy-duty use
- 40" to 60" slides with 500-pound capacity for extreme-duty applications requiring both long extension and high load capacity
Mount Type Selection
Mount type selection often depends on cabinet construction and aesthetic preferences. Side-mount installation offers the best combination of load capacity, ease of installation, and reliability. Unless specific constraints prevent side mounting, this configuration should be your default choice.
Center-mount should be reserved for light-duty drawers where the hidden mechanism is more important than capacity, since lateral loading of the bearings cuts effective strength by 70–80%. Undermount is the right compromise when concealment matters but the drawer still needs real load capacity, accepting the 75–90% extension limit in exchange for keeping the hardware out of sight. In every case, match the mount type to how the drawer will actually be loaded, not just how it will look.
What usually goes wrong with drawer slides?
Most drawer slide problems trace back to a small set of repeatable failure modes. Recognizing them up front prevents the majority of warranty calls and rebuilds.
- Plastic roller deformation. Roller slides concentrate the full drawer load on four small nylon wheels. Sustained heavy loads flatten the wheels, the drawer drops, and the slide binds.
- Fastener pull-out from engineered wood. The slide can be rated for 400 lb, but if it is screwed into particleboard or MDF with short or undersized screws, the screws strip out before the slide ever reaches its limit. Use longer screws and more fastening points in engineered wood.
- Center-mount overload. Center-mounted slides load the bearings sideways instead of in compression, cutting effective capacity by 70–80%. A drawer that worked fine empty fails the moment it is filled with tools.
- Thin-gauge steel flex. Economy slides built from sub-1 mm steel feel tinny and flex visibly under load. The flex causes the rails to misalign, the bearings to load unevenly, and the slide to wear out in a fraction of its expected life.
- Misaligned installation. If the two slides are not parallel and level front-to-back, the drawer binds at one point in its travel. Binding accelerates bearing wear and eventually seizes the slide.
- Fasteners loosening under cycling. Drawers are repeated-cycle mechanisms. Standard wood screws back out over thousands of cycles, especially in vibration-prone applications (tool drawers, vehicle storage, RV cabinets). Use lock washers or locking fasteners in high-cycle installations.
How should you test a drawer slide installation before trusting it?
A drawer slide that runs smoothly empty can still fail under real load. Cycle it under the conditions it will actually see, and pay attention to the hard part of travel — not the easy middle.
- Cycle test under real load. Open and close the drawer at least 20 times with its expected working load installed, not empty. A slide that runs smoothly empty can bind once weight engages the bearings.
- Check the hard part of travel. Pay attention to the first inch of opening from closed, the last inch before full extension, and the moment the drawer crosses the cabinet face. These are where misalignment shows up — the smooth middle of travel hides problems.
- Parallel and level verification. With the drawer fully closed, the drawer face should sit parallel to the cabinet opening with even reveals on both sides. Any tilt indicates one slide is mounted higher or deeper than the other.
- Full-extension deflection check. Pull the drawer fully open, press down at the front edge, and watch for excessive sag. Some deflection is normal at full extension; visible drooping or audible creaking indicates either an overloaded slide or weak cabinet anchoring.
- Fastener security after break-in. After the first week of normal use, retighten every mounting screw. Fasteners often seat slightly after initial cycling, and catching them now prevents working-loose problems later.
Real-world drawer slide applications by industry
- Residential kitchen and bath: 100–150 lb capacity covers utensil, cutlery, and pantry drawers. Side-mount full-extension slides are the standard choice.
- Tool storage and shop cabinets: 300–500 lb capacity. Tools concentrate weight, drawers are opened many times per day, and vibration from adjacent machinery loosens fasteners — use locking screws.
- RV and marine cabinetry: vibration, road or sea motion, and humid environments. Stainless or zinc-plated ball-bearing slides with locking fasteners are required. Center-mount is a poor choice here because asymmetric inertial loading from vehicle motion stresses the bearings laterally.
- Smart furniture and motorized drawers: drawer slides combined with linear actuators for hands-free opening. The actuator handles travel; the slides still carry the load, so size the slides for full drawer weight independently of actuator force rating.
- Industrial and heavy-duty storage: 500 lb+ capacity, long extension (40–60 in). Used for parts drawers, die storage, and tool chests where full access to the rear of a deep drawer is required.
- Accessibility installations: motorized drawer systems in healthcare and aging-in-place applications, where soft-close and full-extension are non-negotiable for usability.
About the author: Robbie Dickson is the Founder and Chief Engineer of FIRGELLI Automations. He previously worked as an engineer at Rolls-Royce, BMW, Isuzu, and Ford before founding FIRGELLI in 2002. More background on Wikipedia.


